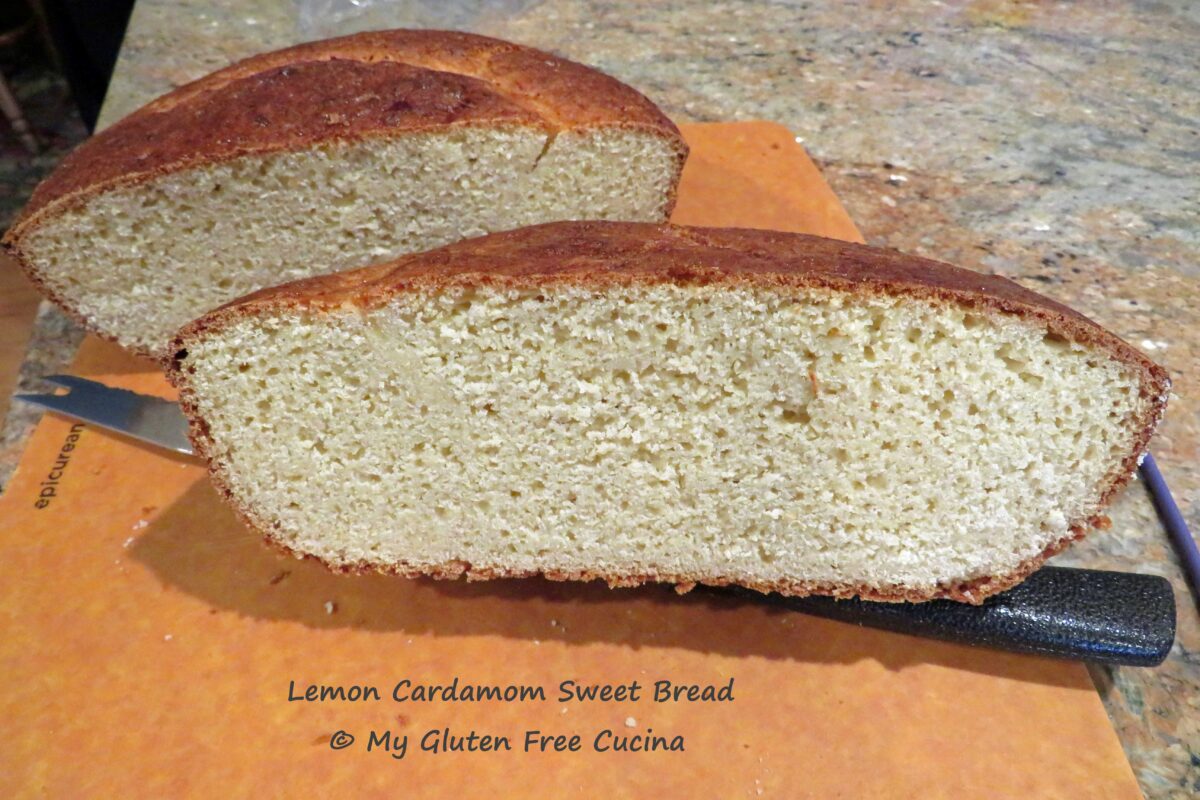
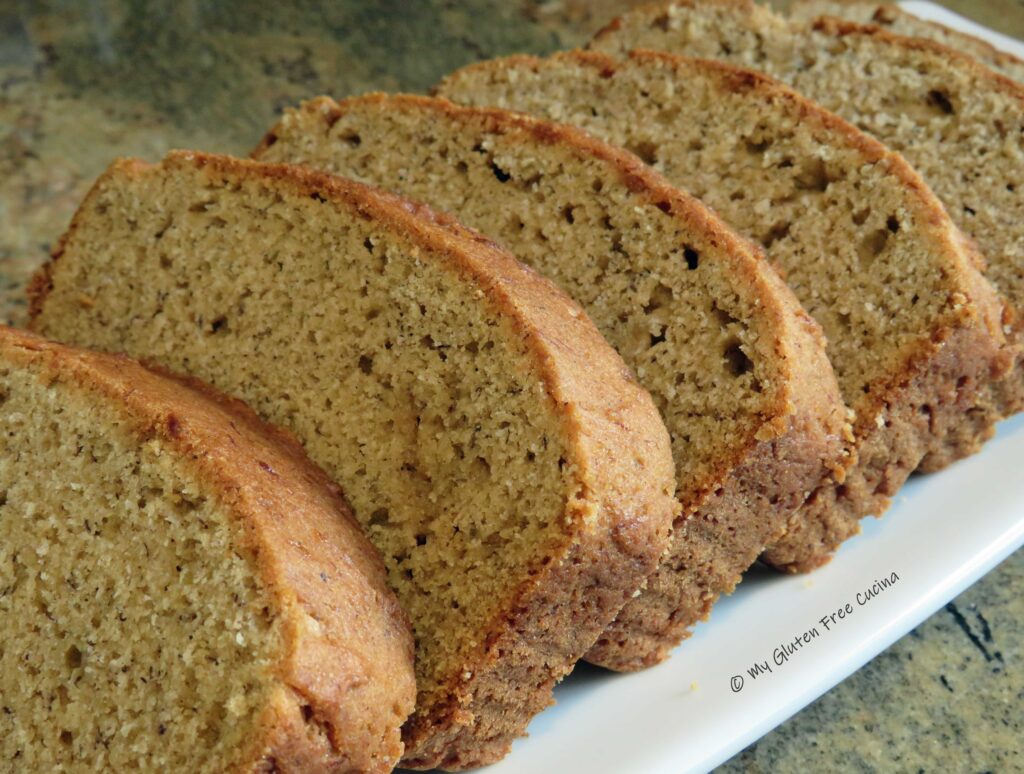
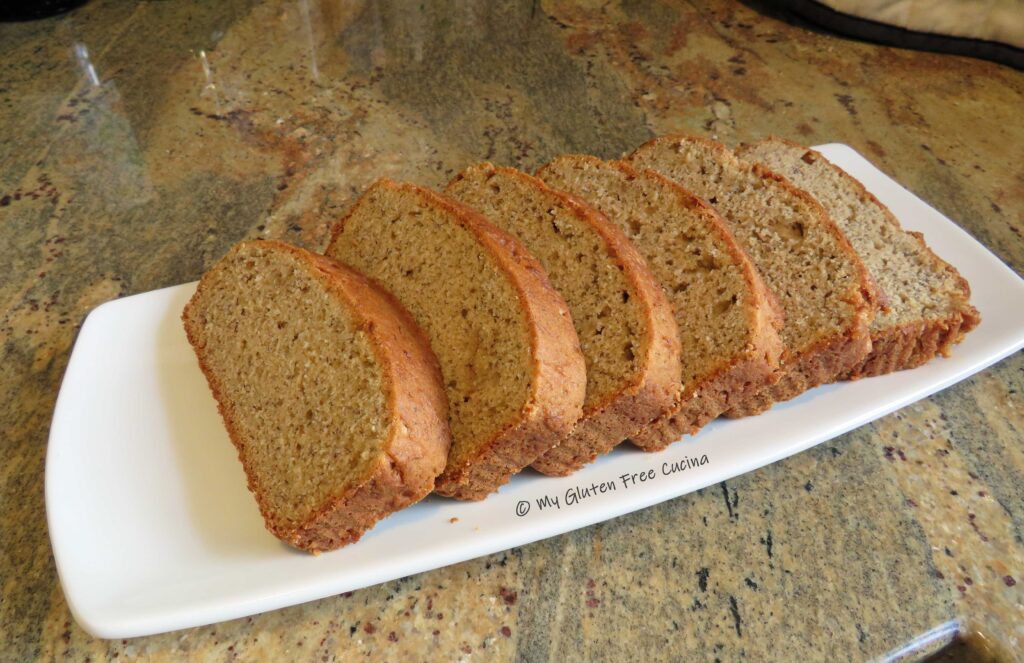
I have been working on this recipe for quite a while. I wanted a sweet bread with some texture, not too soft, no gummy center. Something that would stand up well to making French toast or bread pudding without turning to mush. After many bakes I was finally happy with this version. Check out the crumb! With hints of lemon and cardamom it is perfect for Easter and spring brunches.
Whisk together the first five ingredients in a small saucepan over low heat. Continue stirring just until the sugar has dissolved, about 5 minutes then set aside to cool.
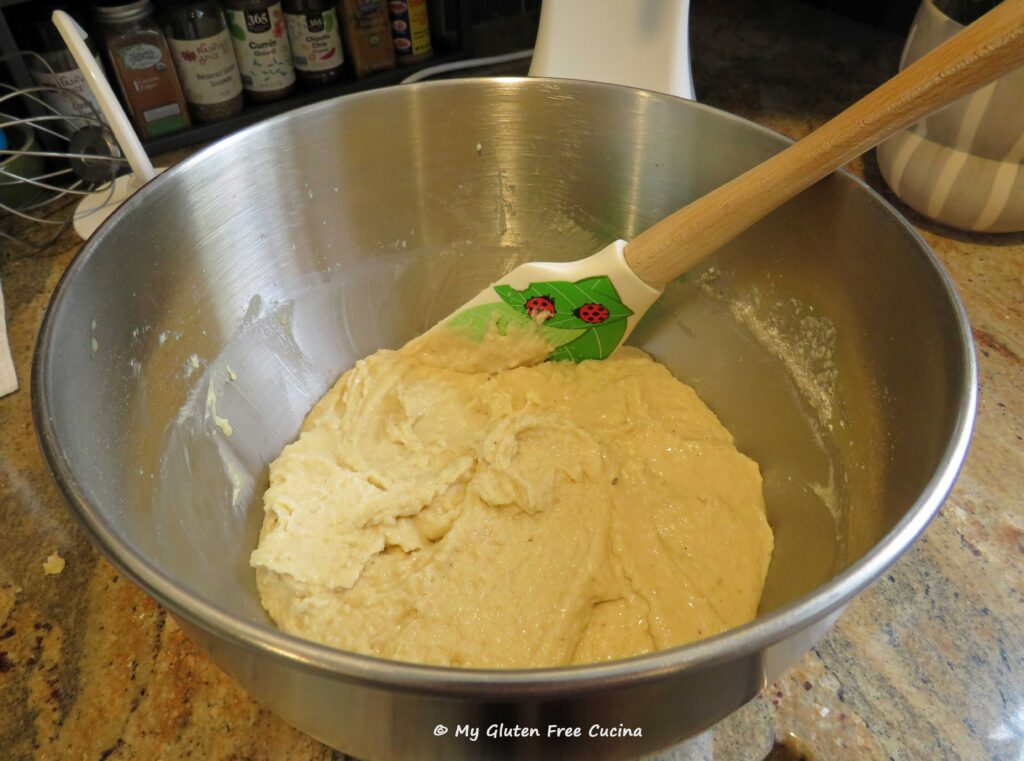
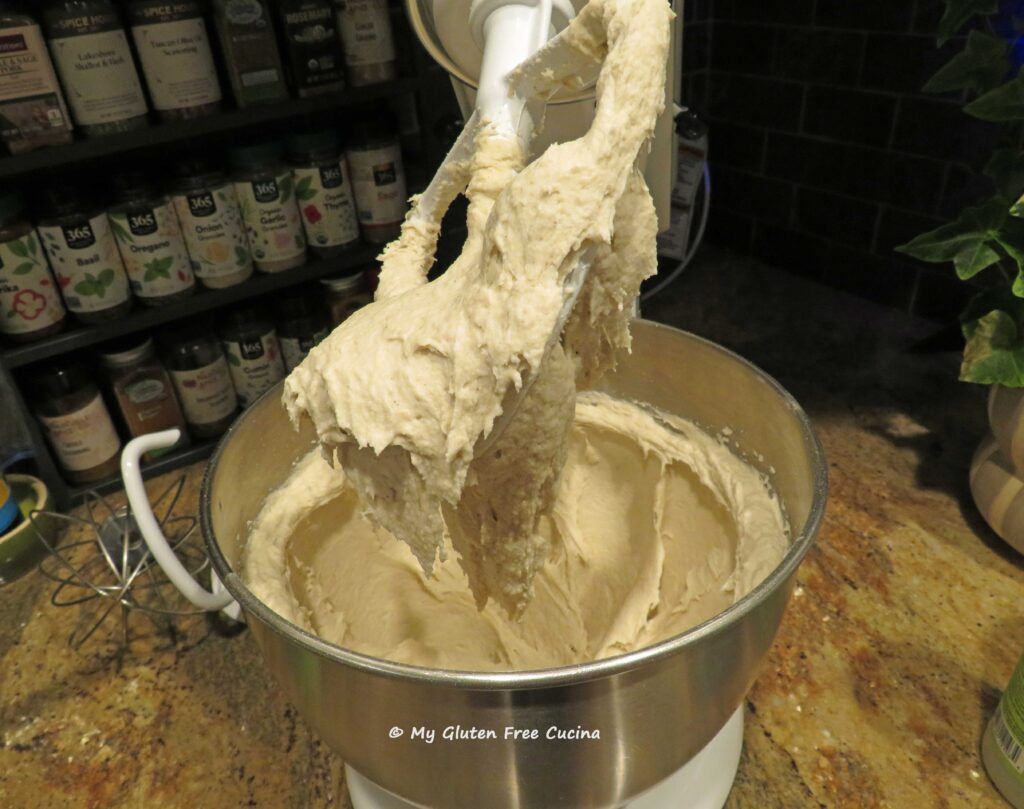
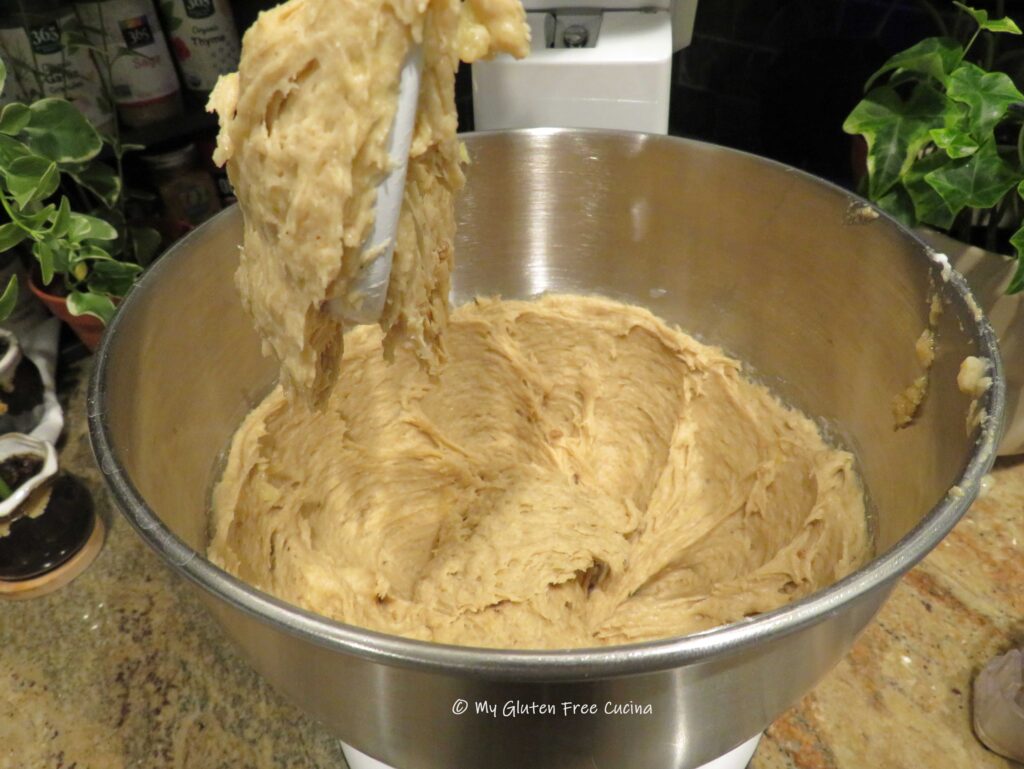
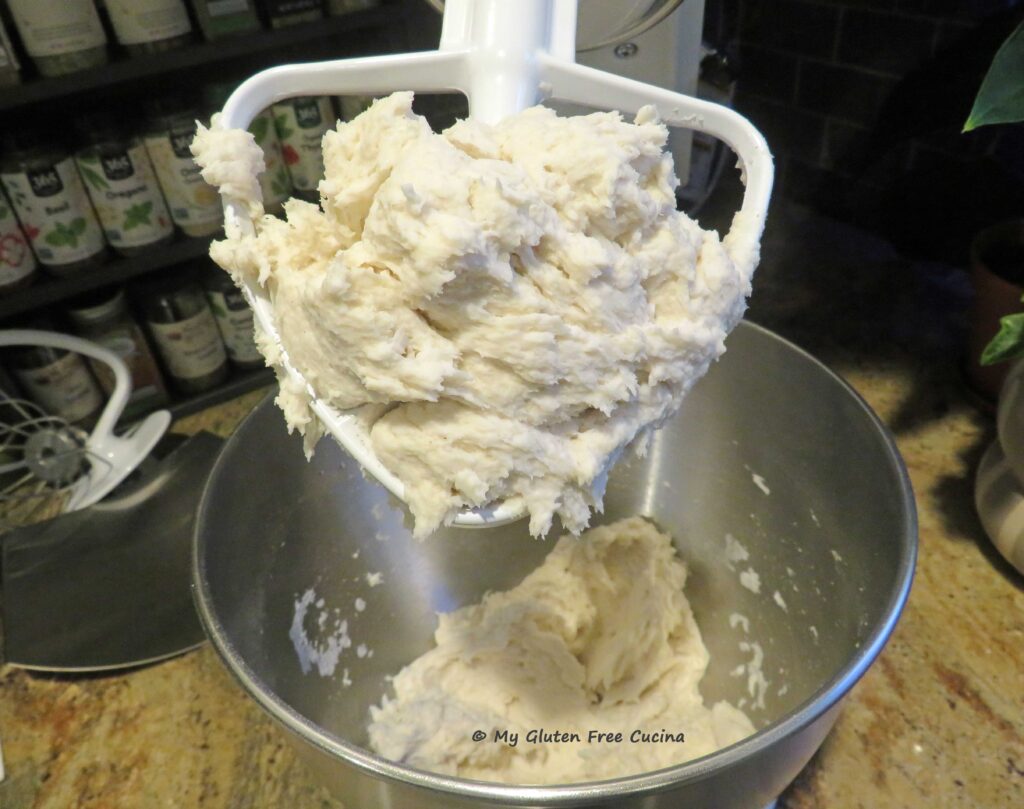
Combine the flours, psyllium husk, salt and yeast in the bowl of a stand mixer. When the milk mixture has cooled to room temperature, combine with the dry ingredients and one beaten egg.
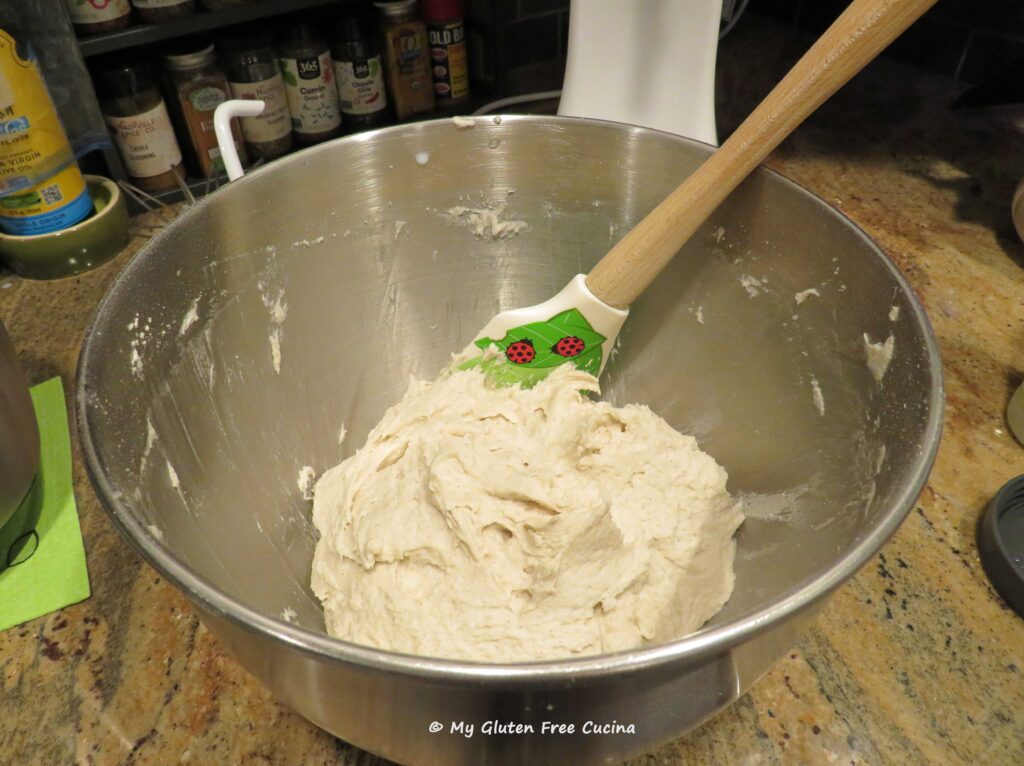
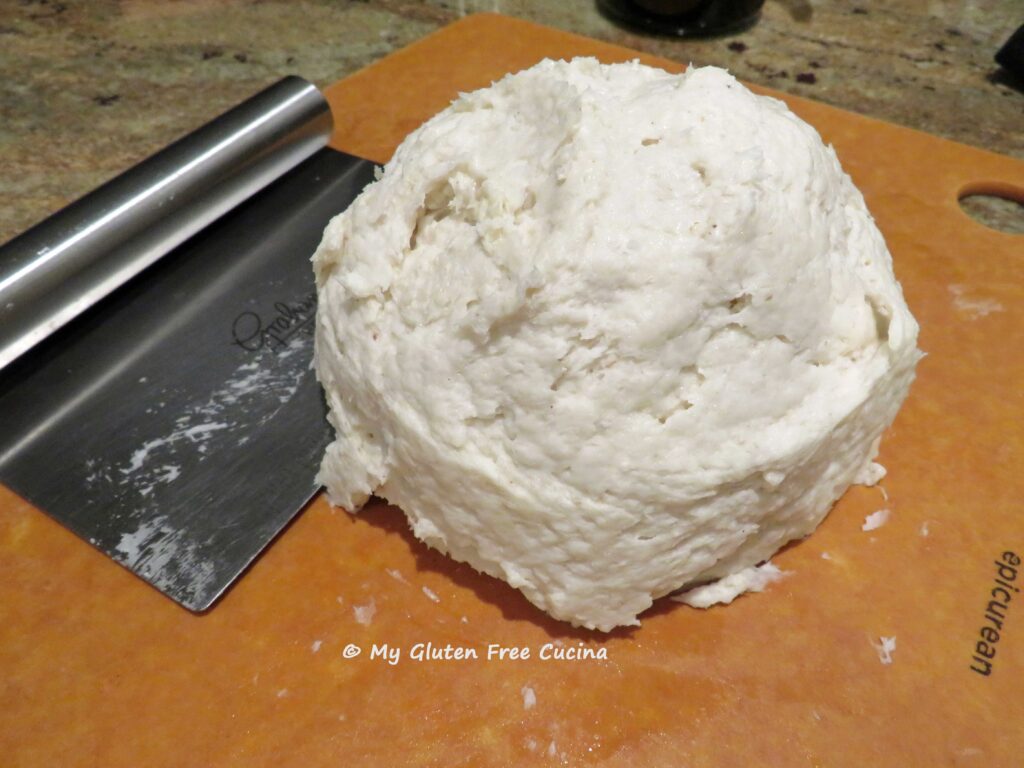
Mix the dough for 5 minutes on low speed until smooth and supple, then gather it together in the bowl and let it rest for 20 minutes.
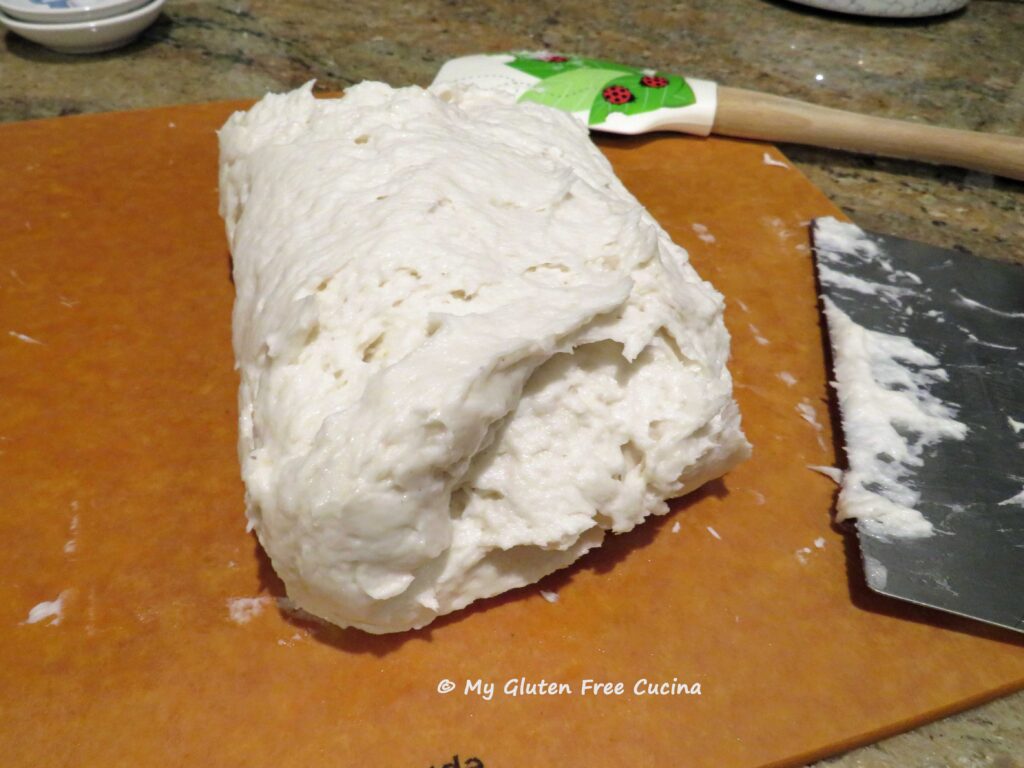
Oil an 8″ round baking dish (I got mine from King Arthur) and spoon in the dough. Smooth the top with a spatula dipped in warm water.
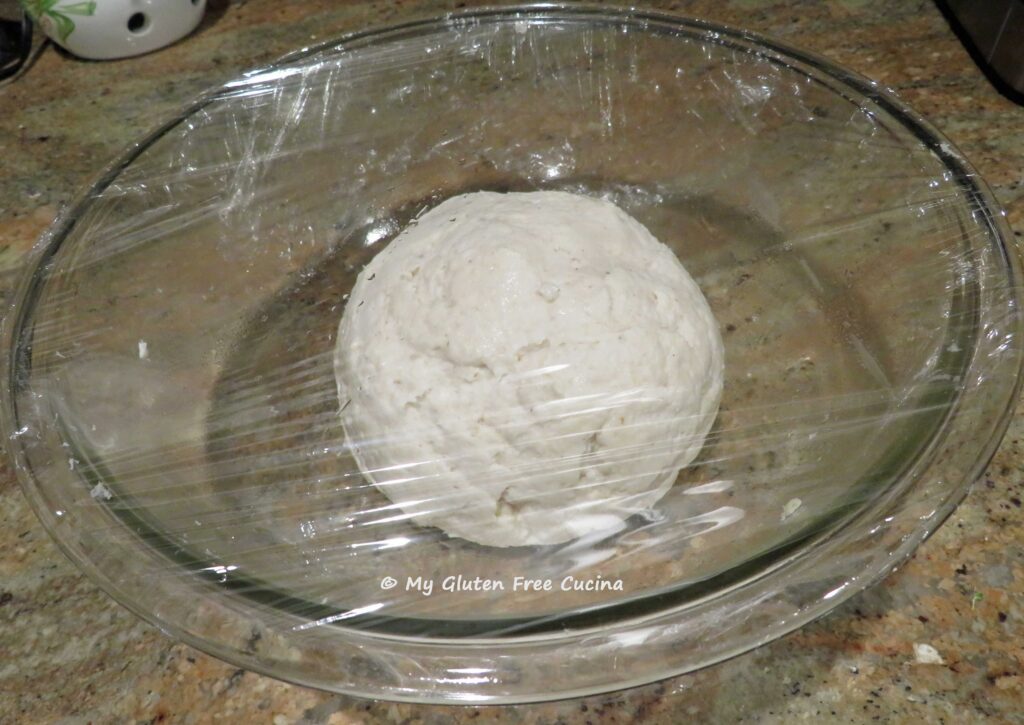
Cover the bowl with oiled plastic wrap and let the dough rise for 30 minutes while you preheat the oven to 375º.
Just before baking, whisk together one egg with 1 tbsp. water or milk. Brush over the entire loaf and score the top (reserve the leftover egg for breakfast).
Bake on the middle rack for 40-45 minutes, or until the internal temperature reaches 195-200º (use a thermometer).
Cool in the pan for 10 minutes then transfer to a rack. You may need to run a knife around the edges.
Let the loaf cool for at least 6 hours before slicing. Letting it rest overnight is even better, store in a bread bag once it has completely cooled.
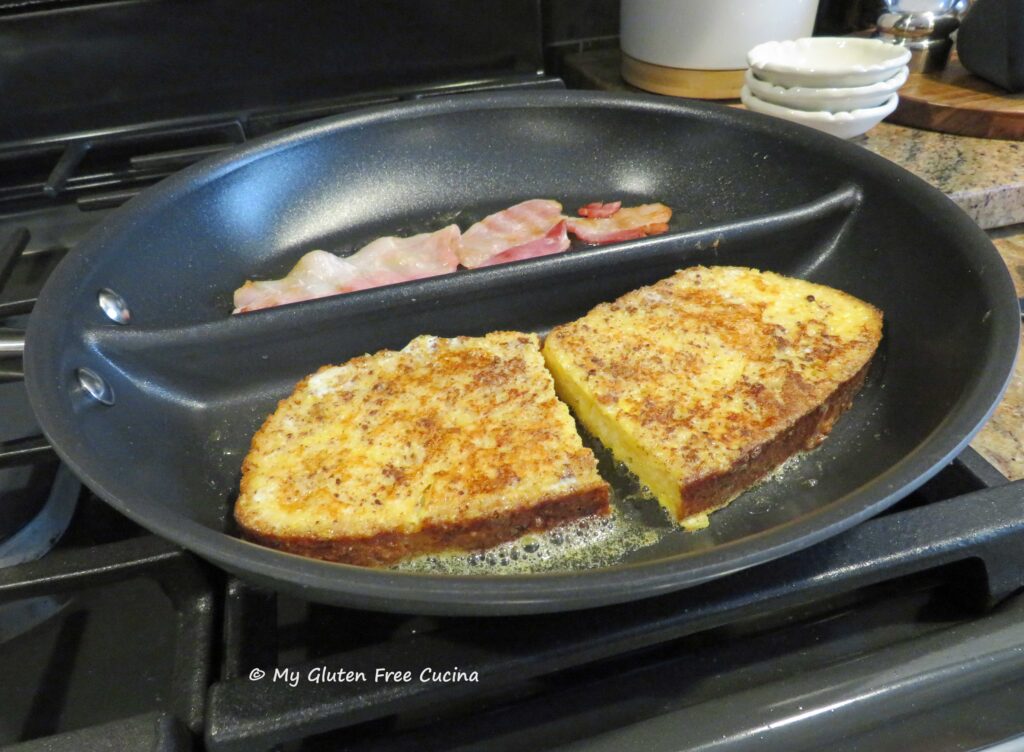
Here’s my breakfast, the perfect French toast with a side of bacon!
Notes ♪♫ I adapted this recipe from my Gluten Free Millet Bread, which has a softer texture. If you prefer a soft loaf for sandwiches, check out this recipe.
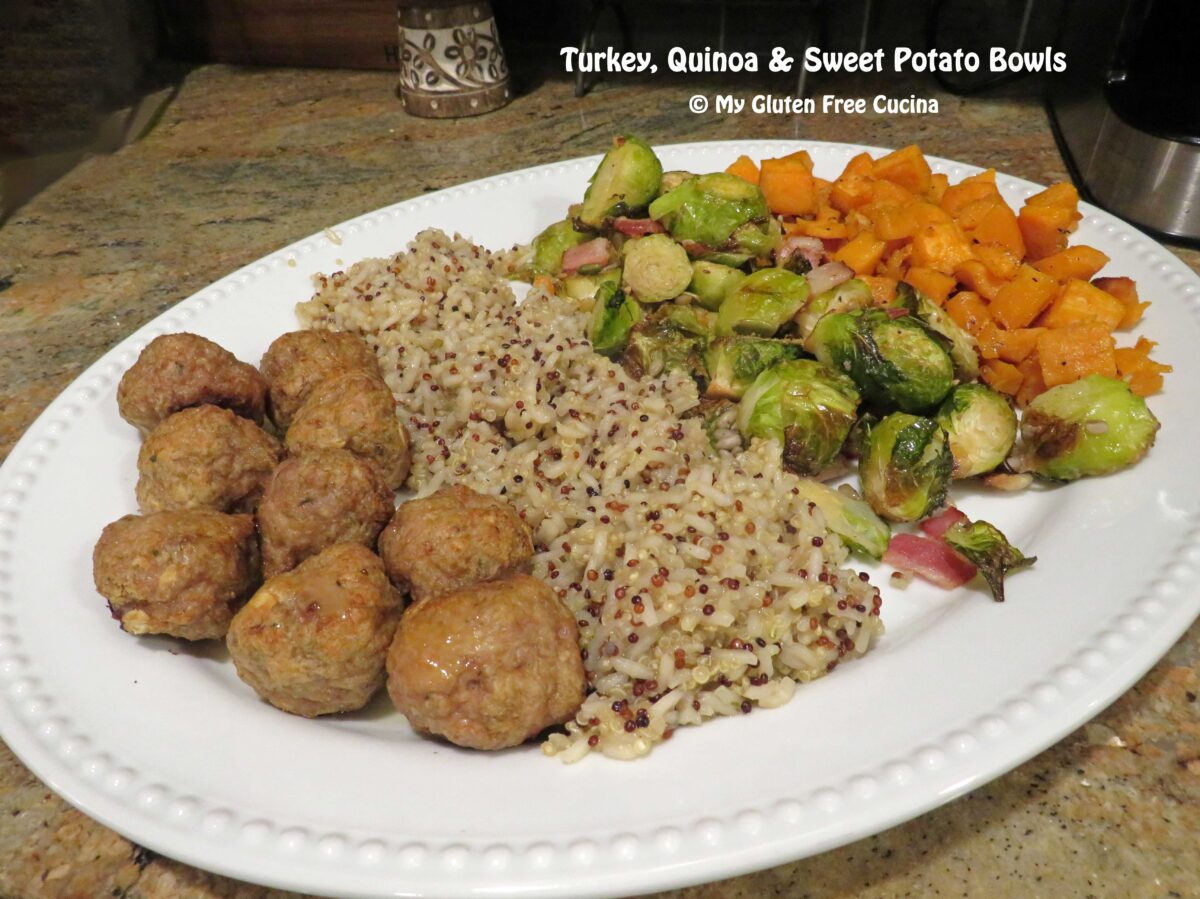
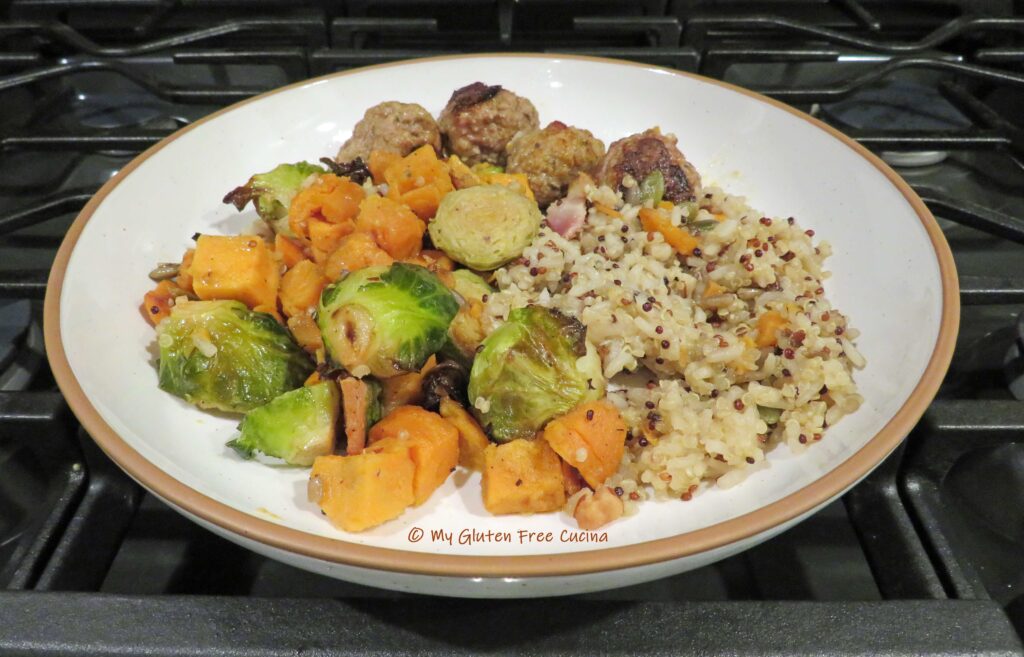
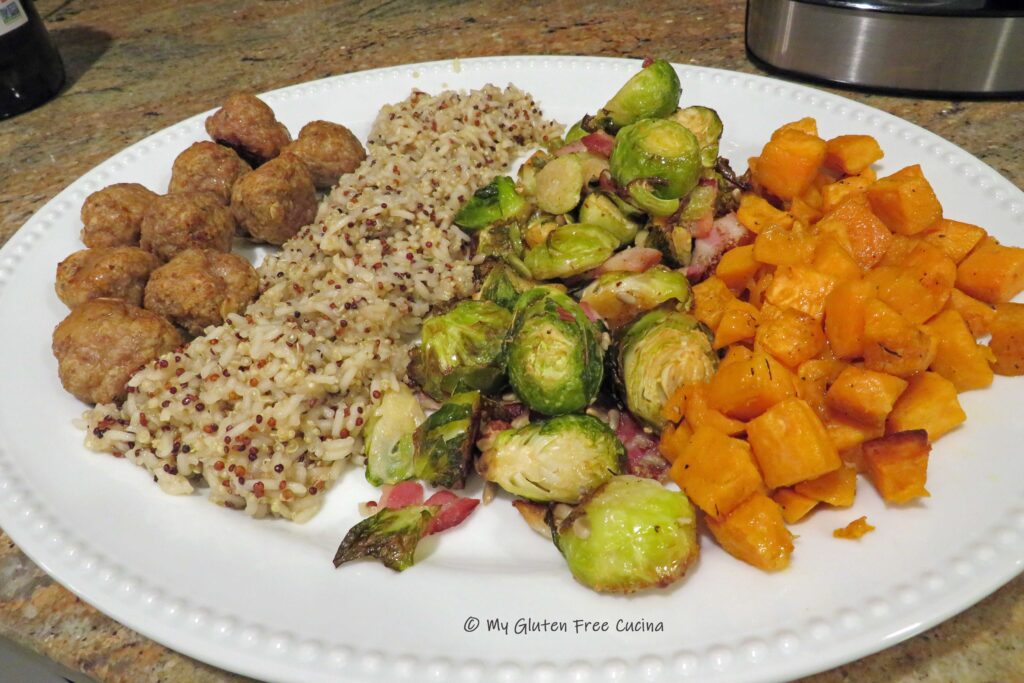
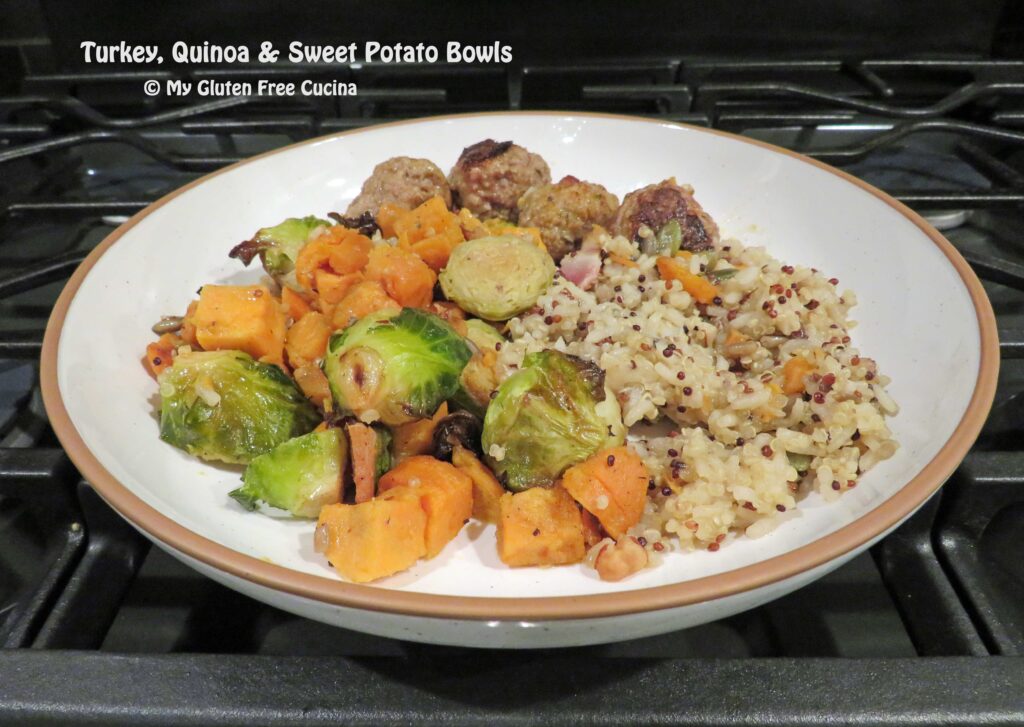
These dinner bowls have it all, they are packed with flavor, texture and fresh ingredients! Each component of this recipe was carefully chosen to create a colorful, balanced meal that will satisfy your hunger as well as your taste buds.
What’s in it?
This bowl has sweet potato, Brussels sprouts, turkey meatballs, and a rice-quinoa pilaf. For texture and crunch, I added bacon, nuts and seeds. Finished with a drizzle of gravy to bring it all together. Let’s take it one step at a time.
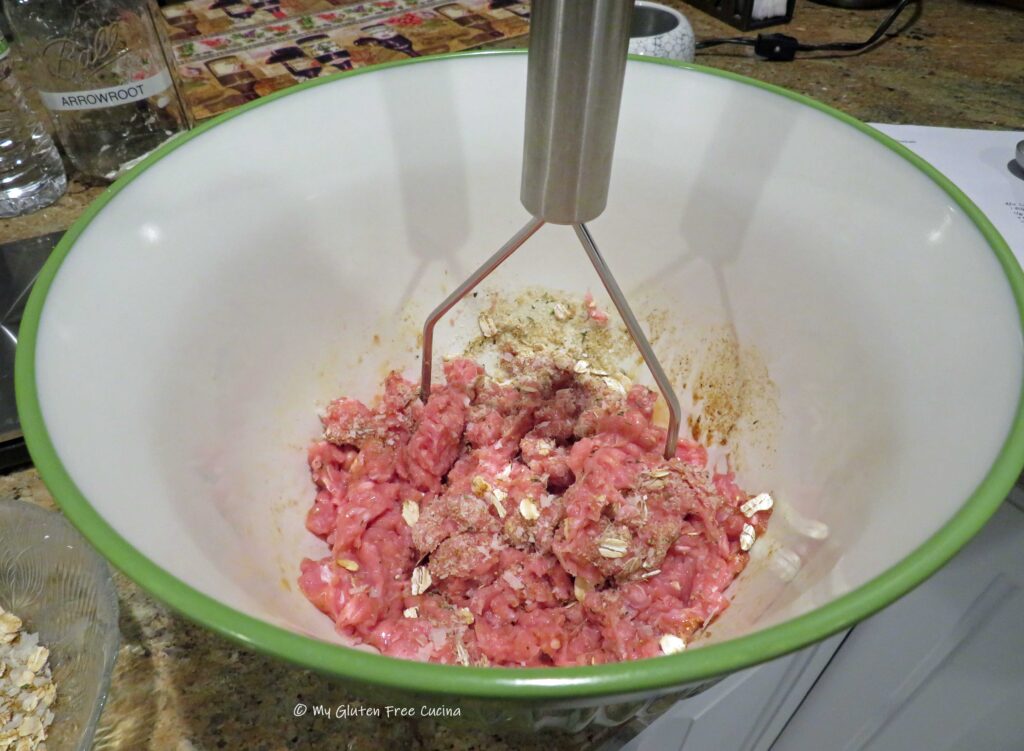
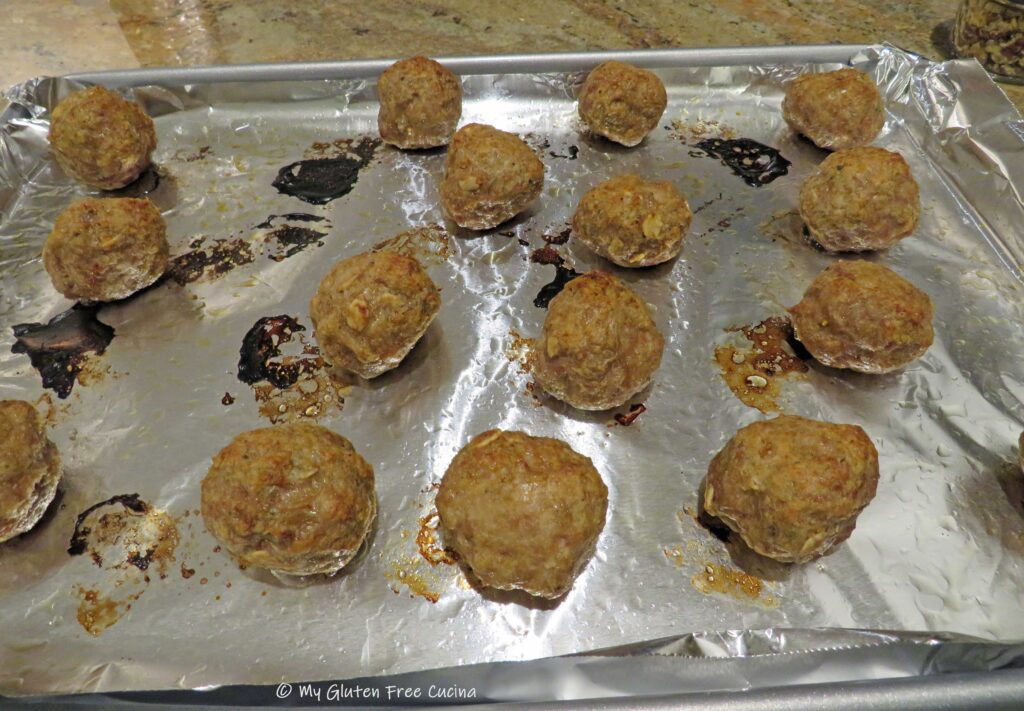
Combine all of the ingredients in a bowl and mix thoroughly with your hands or a potato masher. Line a sheet pan with foil and mist with cooking spray. Form 16 small meatballs and arrange in the pan with space in between. Broil 4-5 minutes per side.
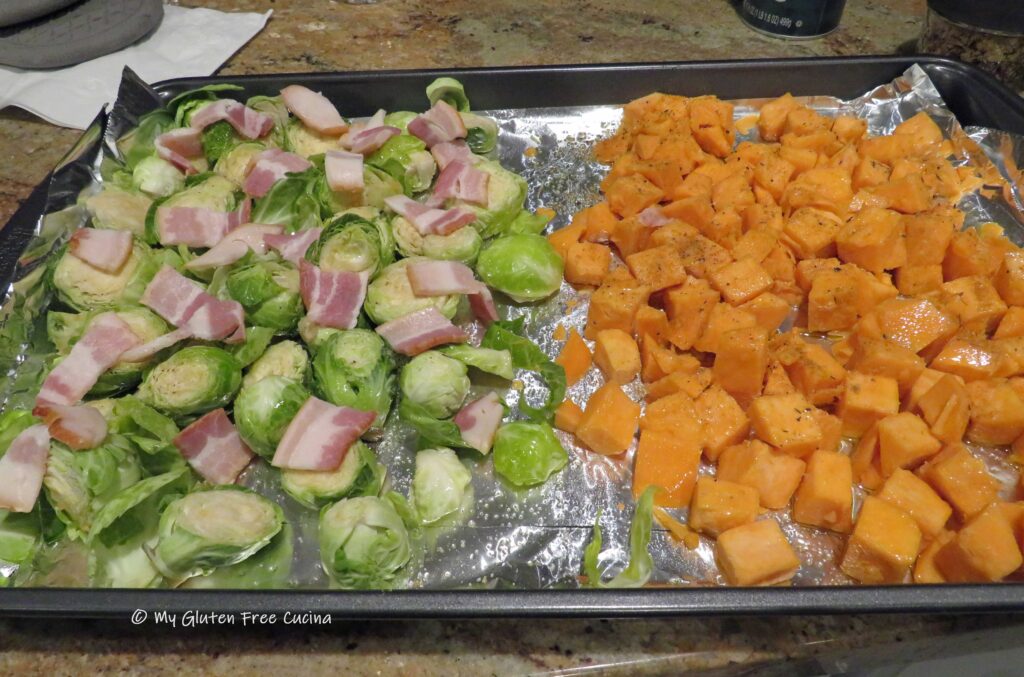
Roast the veggies
16 oz. sweet potato, peeled and cut into chunks
12 oz. Brussels sprouts, halved
2 tbsp. light oil (light olive oil or canola)
2 strips bacon
salt and pepper, to taste
1 tbsp. chopped nuts (almonds/pecans)
1 tbsp. seeds (pumpkin/sunflower)
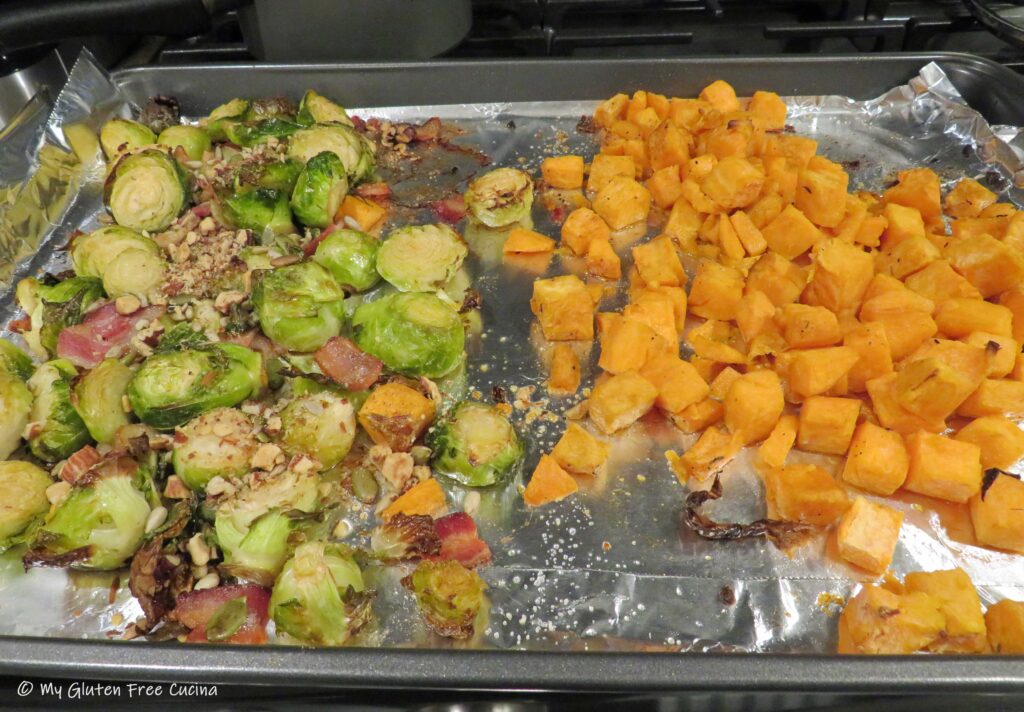
On a second sheet pan, spread the potatoes and Brussels sprouts in an even layer. Toss with oil and season with salt and pepper. Top the Brussels sprouts with bacon cut into 1″ pieces, 1 tbsp. nuts and 1 tbsp. seeds. Roast at 425º for 25 minutes.
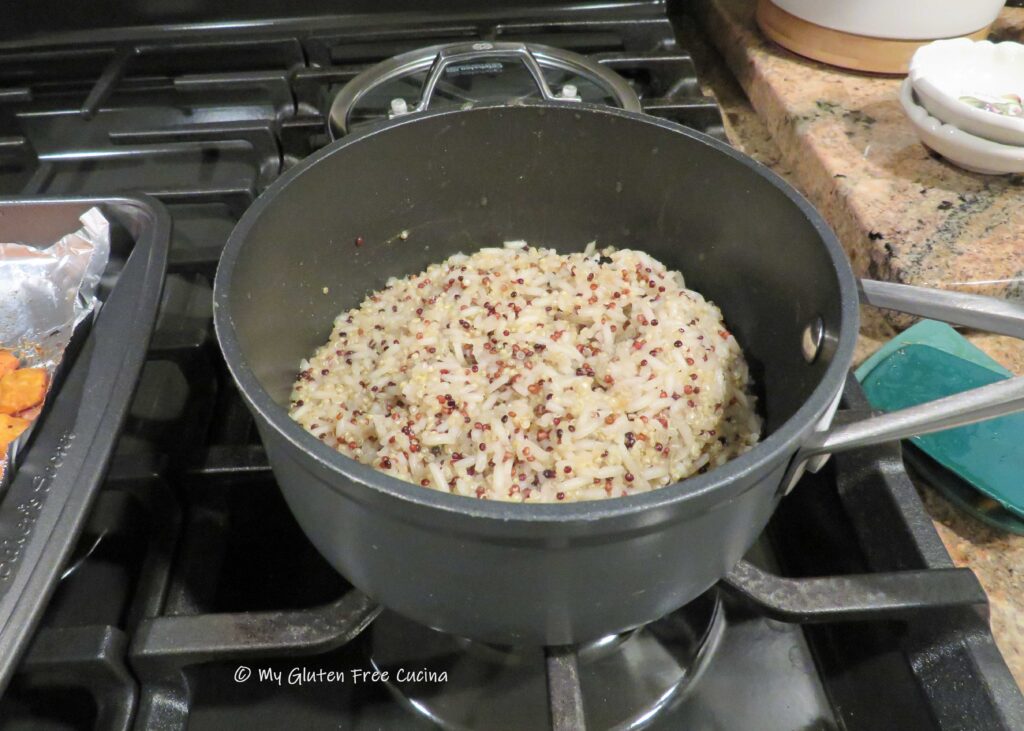
Melt butter in a small saucepan. Add the rice and quinoa, stirring to coat. Add the broth and salt, bringing to a boil. Cover and simmer on low for 20 minutes.
Stir the arrowroot and softened butter together to form a paste. In a small saucepan, combine the broth, onion powder and garlic powder. Bring to a boil then whisk in the butter mixture. Simmer 5 minutes to thicken.
Arrange your serving platter.
I set up my platter like this, to show off the different colors and textures. The gravy was served in a small gravy boat.
This took a little time to put together but it was definitely a hit. Leftovers were just as good the next day.
Notes ♪♫Many supermarkets offer fresh veggies that have been prepped for cooking. I got sweet potato peeled and diced, and Brussels sprouts that were pre-washed and halved. Such a convenience, I just had to spread them out on a baking sheet and add my toppings!
Baking with sourdough has really upped my gluten free bread game. The long, slow rise really develops the flavor of the dough in a way that commercial yeast alone cannot accomplish. It makes such a difference in the taste and texture of the finished loaf or rolls.
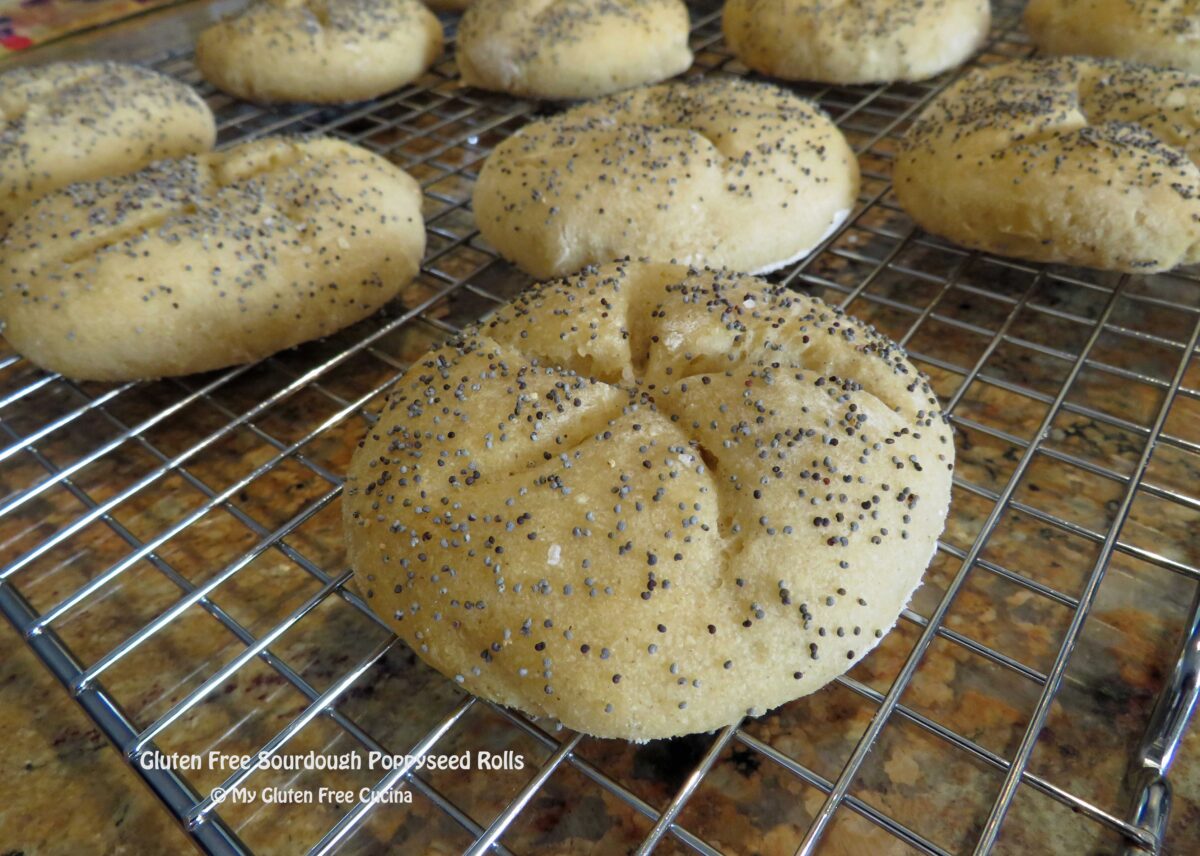
This recipe is for all the gluten free sourdough bakers who like to mix up your own flour blends! I enjoy experimenting with different flour combinations and was really happy with this bake! The dough was easy to work with and the rolls tasted great.
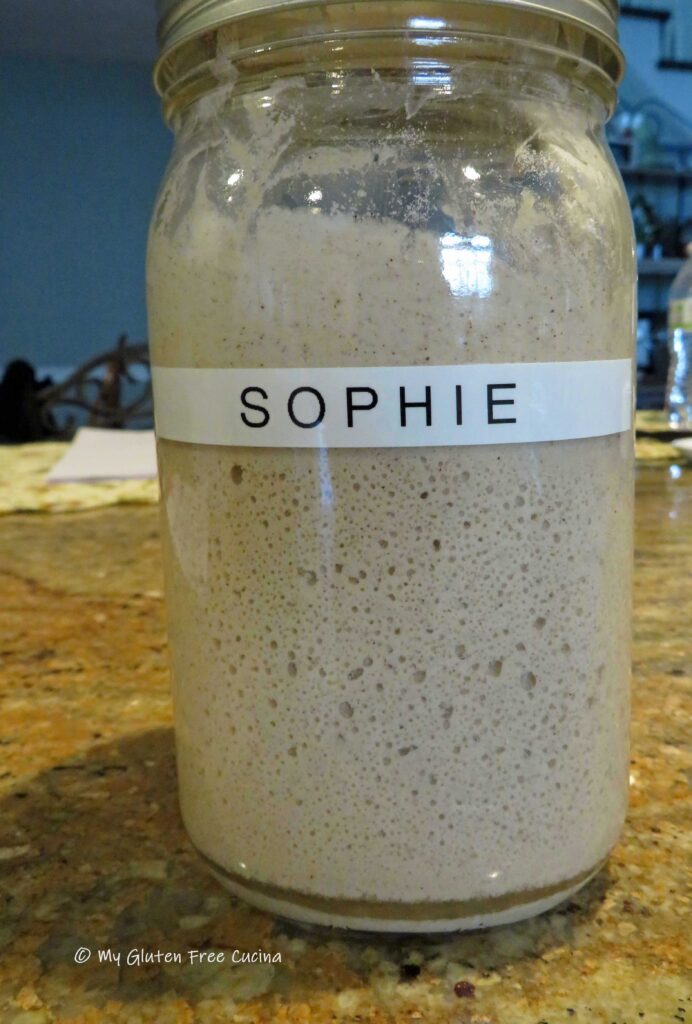
Note-> You will need a fully active sourdough starter for this recipe. You can read about my gluten free sourdough starter Sophie, in this post!
Combine the wet ingredients, starter through canola oil, in the bowl of a stand mixer. In another bowl, whisk together the dry ingredients, dry milk powder through instant yeast. Add the dry ingredients to the mixer bowl with the paddle attachment and beat on low speed for 5 minutes to form a smooth, sticky dough.
Gather the dough together in the mixer bowl, cover and let it rest for 20 minutes.
Transfer the dough into an oiled bowl and smooth the top with a wet spatula. Cover with plastic wrap and refrigerate overnight, up to 15 hours.
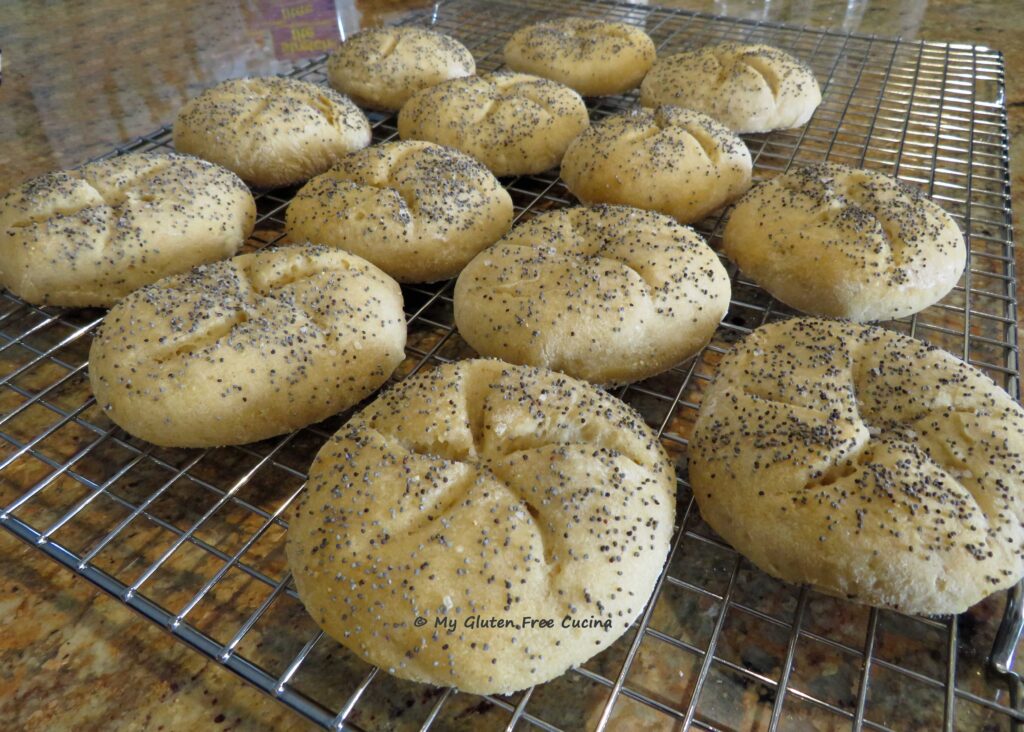
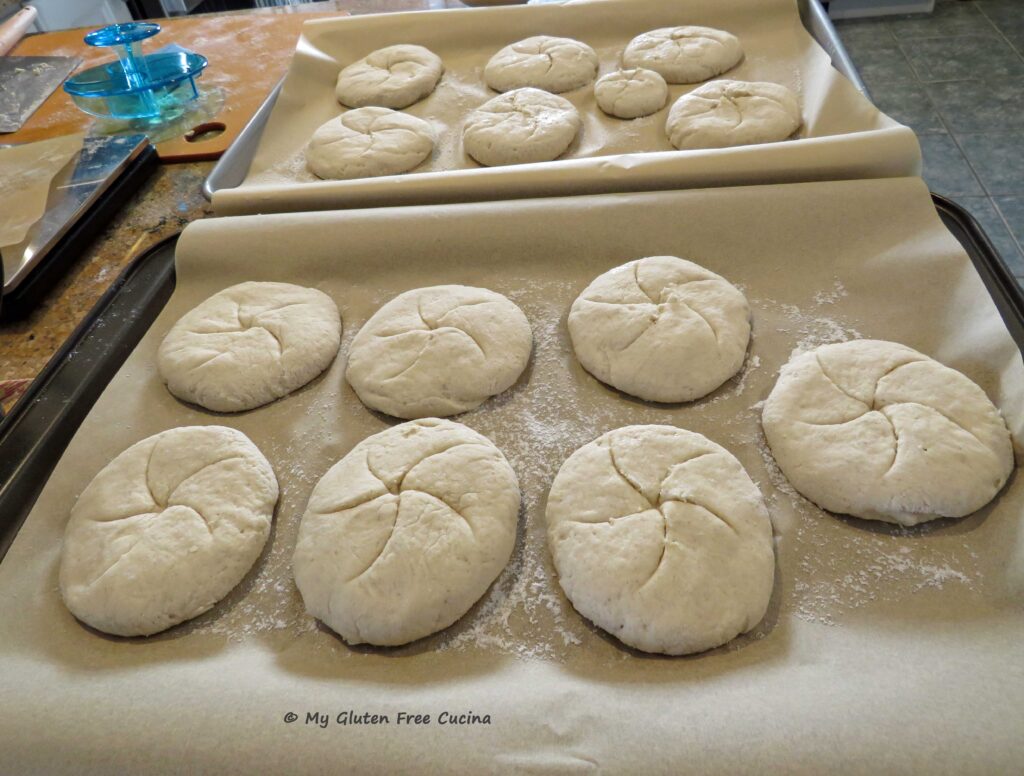
I usually make small rolls for my lunch sandwiches, so I divided my dough into 13 rolls that weighed about 2½ oz. each. You could do 2 oz. each for dinner rolls or sliders. For hamburger buns, 3-4 oz. is a good size.
Sprinkle a cutting board with flour and working with one piece at a time, roll the dough between your palms into a round. Place it on a lightly floured cutting board and rotate it in a circular motion to form a smooth round shape. Finally, use your palm to flatten it to about 3/4″ thick.
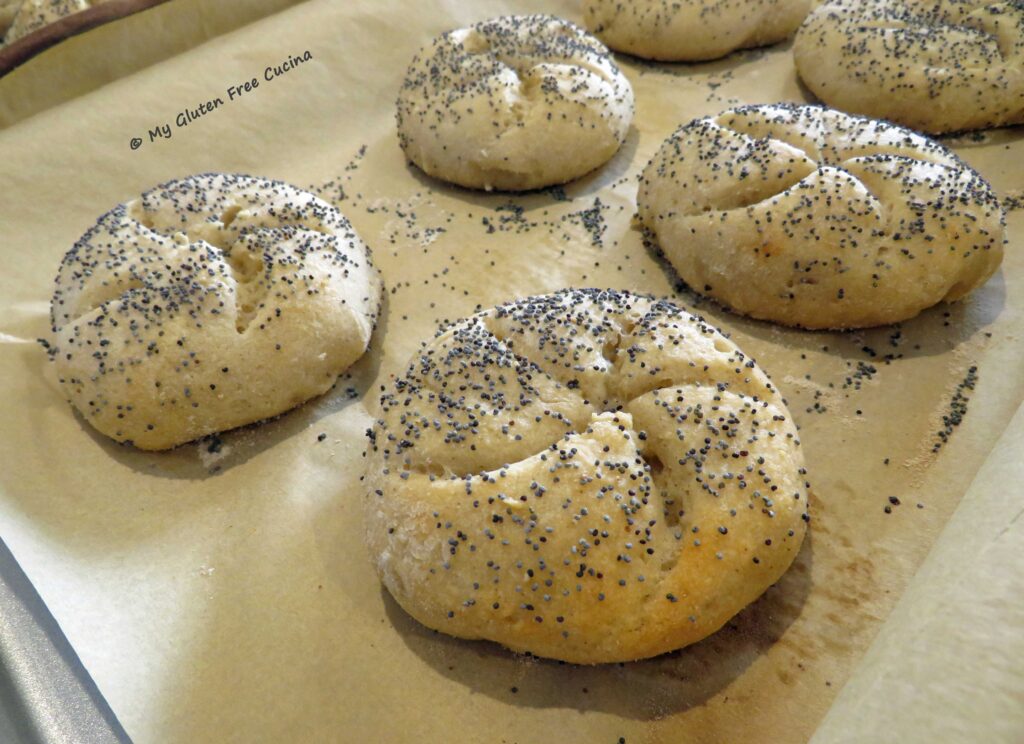
Continue with the rest of the dough, arranging your shaped rolls on a parchment lined baking sheet (use 2 sheets if needed).
Cover the rolls and let them rest for 30 minutes while you preheat the oven to 475º. Score the top of each roll.
Just before baking, brush the rolls with milk, or spray with water (you can also use an egg wash). Sprinkle the rolls with poppy seeds and coarse salt (optional).
Place the pans on the center rack and throw a few ice cubes into the bottom of the oven. Bake for 5 minutes, then lower the oven temperature to 375º.
Continue baking 15 minutes longer, or until the internal temperature of the rolls reaches 210º (check with a thermometer).
Cool in the pan for 15 minutes then transfer to a rack. Allow the rolls to cool completely before slicing.
For best texture, I let mine cool to room temperature then stored them on the counter in a plastic bag overnight. In the morning, I sliced them and wrapped each roll individually in plastic wrap. I left a few out for lunch and the rest went into a freezer safe bag. Freezing is recommended if you are not going to eat them immediately.
Here’s the crumb shot. The rolls don’t need to be toasted, but they are great either way. Just the right size for me.
Notes ♪ Baking times given are for 2.5 oz. rolls. If you make yours smaller or larger you will need to adjust accordingly. Remember, the internal temperature should reach 210º, check- don’t guess, use a thermometer!
Notes ♫ For instructions on how to make a gluten free sourdough starter, read this post and meet my sourdough starter Sophie!
Notes ♪♫ For rice flour, always use a superfine grind. I like the Superfine White Rice Flour from Authentic Foods, available on Amazon.
Notes ♫♫Check out this cute little Kaiser Cuttertool, from Ateco! My favorite Chef friend, Patrick Auger told me about it!
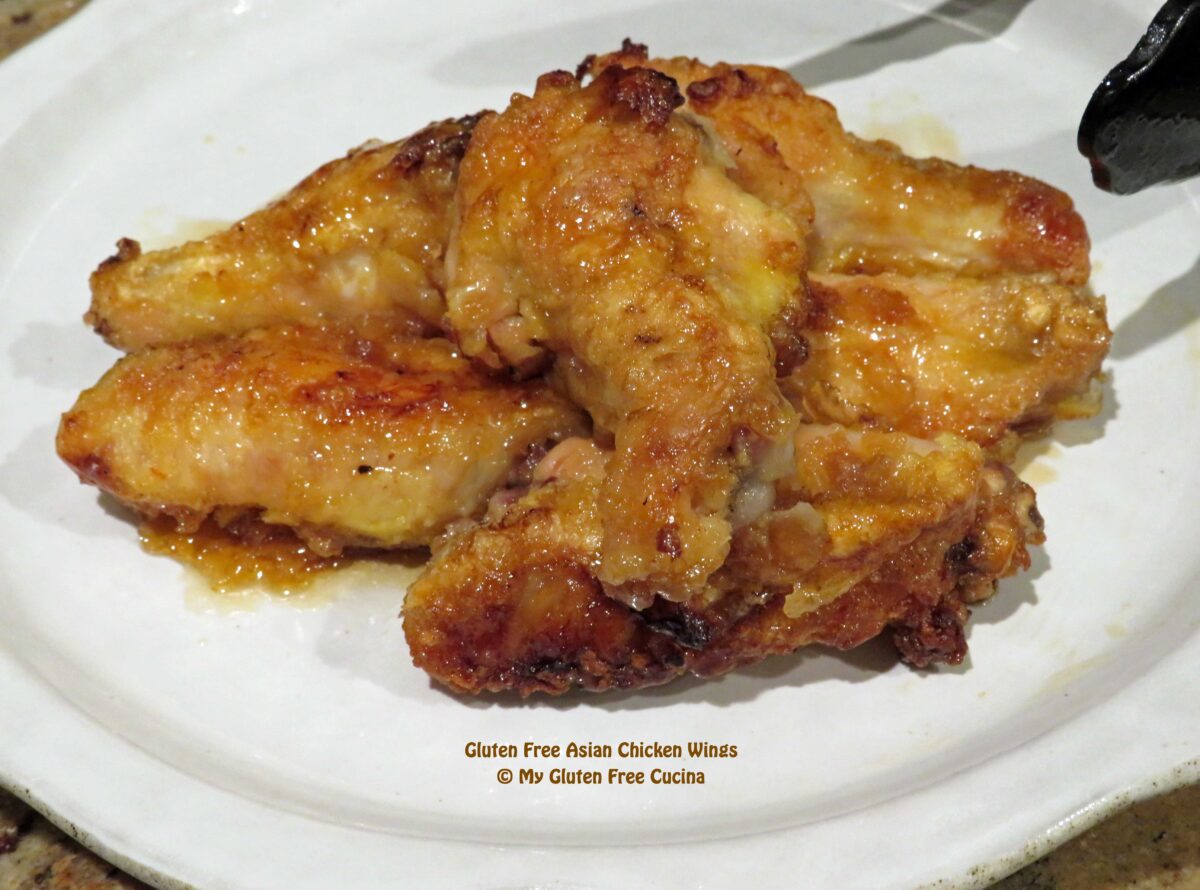
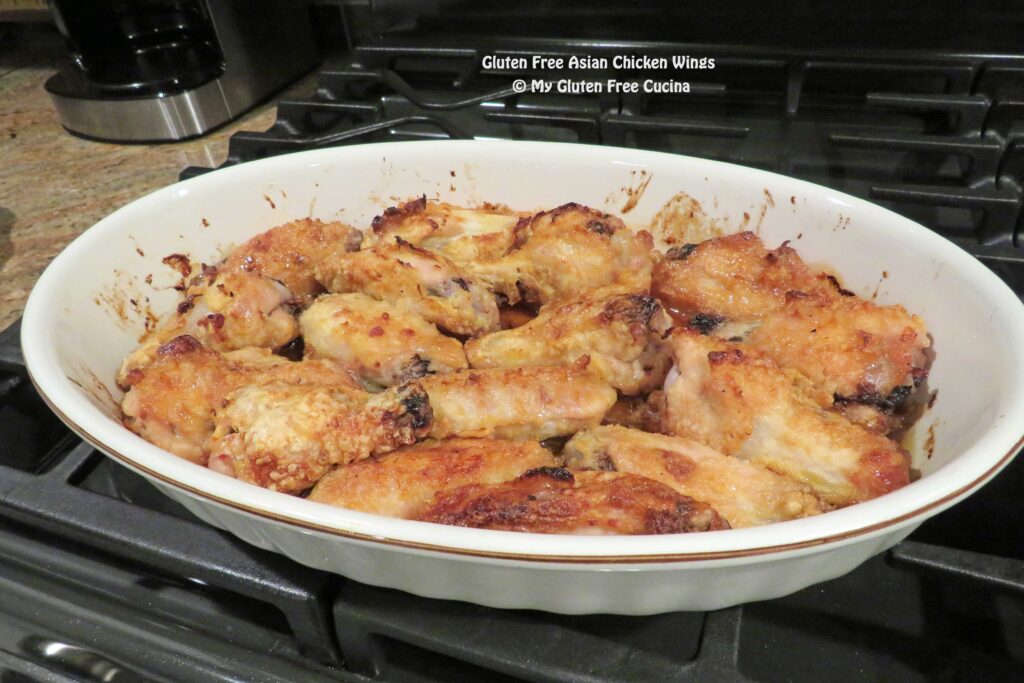
Move over BBQ, these Asian inspired chicken wings are incredible! Sticky and sweet, you’ll want to double or triple the recipe because these wings are addictive!
The preparation begins with a coating of cornstarch and egg. The wings are then quickly pan fried and drizzled with a sticky sweet syrup and baked in the oven. Yes, it is a bit labor intensive but oh my goodness! I could not stop eating them!
Are Asian condiments gluten free?
This is an area where you have to be careful. While many Asian condiments are gluten free, others like soy sauce are not. Generally, I recommend looking for the gluten free label and if you’re not sure check the manufacturer website.
This small batch (1-½ lbs. wings) would be a nice appetizer or small plate. Throw in a salad and side and make it a meal. Or quadruple the recipe and have a party 😋
Arrange the wings on a baking sheet and sprinkle both sides with ginger and garlic powder. Cover and refrigerate for 1 hour.
Whisk together the sugar, mirin, ketchup, tamari and chicken broth in a small saucepan. Add a pinch of salt. Bring the mixture to a simmer, whisking frequently then cover and set aside.
Set up 2 breading trays, one with the cornstarch and the other with 2 beaten eggs. Heat a large nonstick skillet with enough canola oil to coat the surface completely.
Dredge the wings in the cornstarch, then dip in the beaten eggs. Add to the hot skillet, leaving space in between (fry them in batches if needed). Turn the wings to get a crust on all sides.
Mist a casserole dish with cooking spray. As the wings finish cooking, arrange them in a single layer. Preheat the oven to 350º.
Spoon the sauce evenly over the wings and bake for one hour, turning halfway through.
Serve hot, spooning a little of the pan juices over the wings.
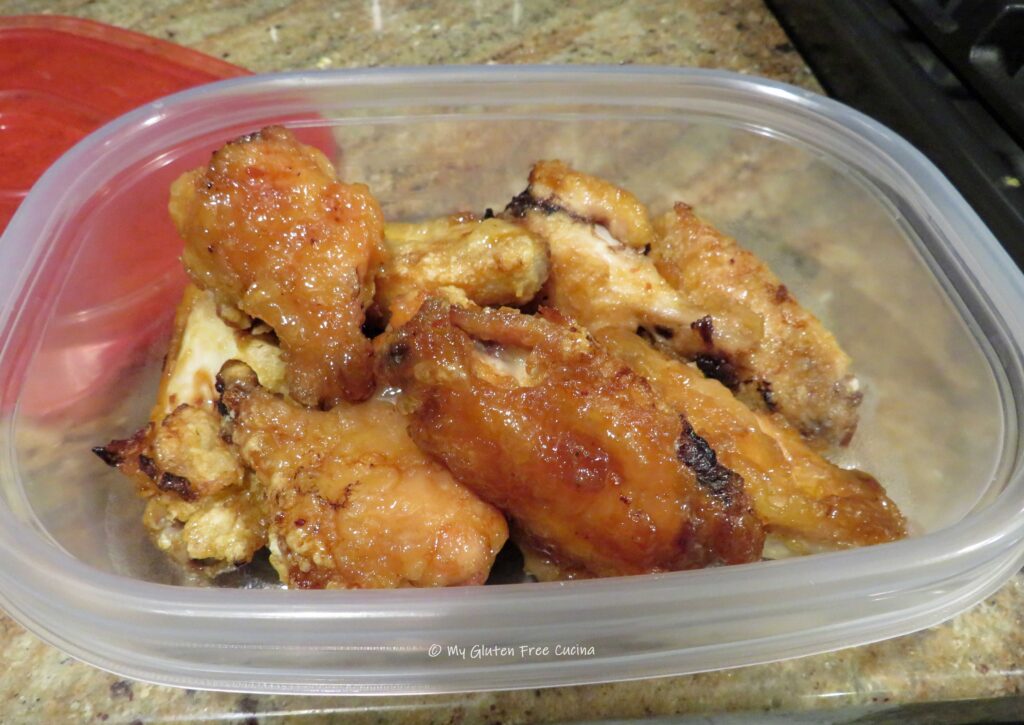
I made these for game day, SO good!
I could have eaten the entire batch, but I restrained myself and saved some for lunch the next day. They were just as good reheated in the microwave!
Notes ♪♫ Mirin is a sweet rice cooking wine that can be found with other Asian condiments at your local market. I like Eden brand premium mirin, for its authentic, quality ingredients that are gluten free, low sodium and contain no added sugar or syrup. As a bonus, it is fermented from Lundberg organic rice, one of my favorites!
In an homage to the great Julia Child who I still love to watch on old reruns, I decided one day to challenge myself to make her iconic dish, Coq au Vin.
I learned by watching the master herself prepare this dish on her show The French Chef. After watching this episode a few times, I felt confident enough to head to the kitchen.
I learned a few things from Julia in addition to her recipe. First, this fancy-pants sounding dish is actually a stew. More comfort food than gourmet. Second, Julia is a good teacher, and you will not need a culinary degree to recreate this French dish at home.
I even made a gluten free beurre manié! Check it out!
Is Coq au Vin gluten free?
Except for the flour used to thicken the sauce, the ingredients are naturally gluten free!
This post contains affiliate links.
Ingredients:
6 bone-in, skin on chicken thighs
3 slices of bacon, diced
1 carton (6 oz.) pearl onions, peeled and trimmed
1 carton (8 oz.) white button mushrooms, rinsed and quartered
Per the master herself, I started by poaching the bacon. According to Julia this step keeps the bacon flavor from overwhelming the entire dish. I don’t know if I would necessarily do this again other than for the sake of authenticity.
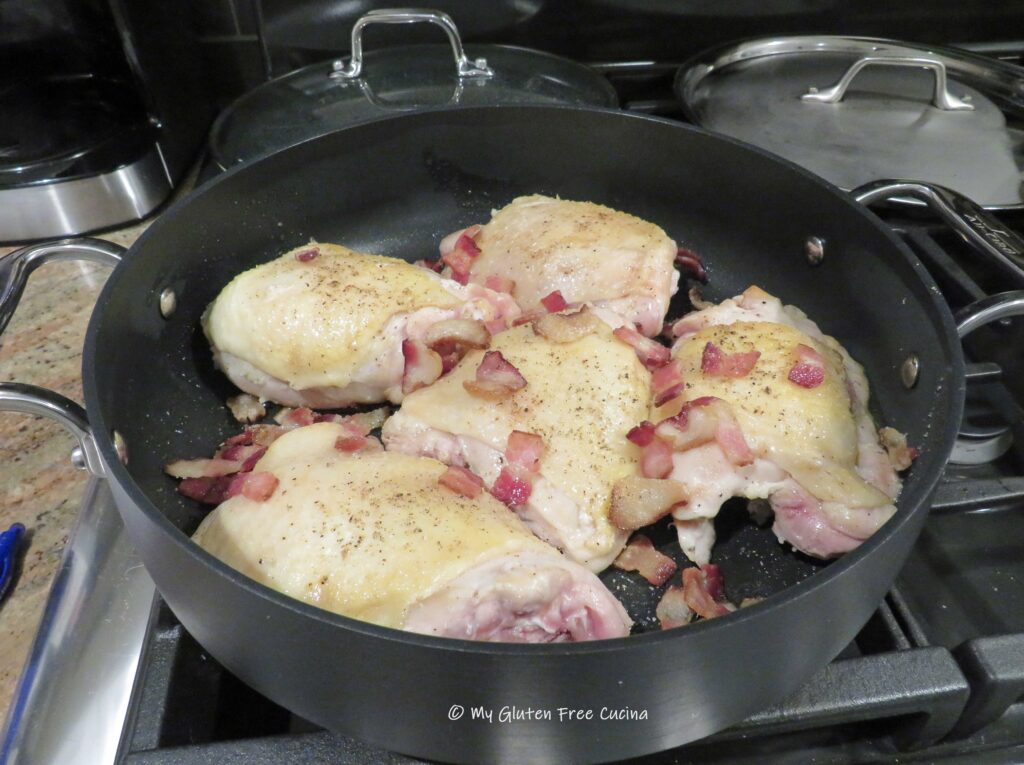
After the bacon was poached and drained, I browned it in a stainless-steel skillet and set it aside to drain on paper towels. The chicken was browned in the same pan, to take advantage of the bacon grease left behind.
For the next step, I moved the browned chicken and bacon to a nonstick sauté pan (you will need a pan with a lid), leaving the stainless-steel pan available for cooking the onions and mushrooms.
Here is where Julia adds the cognac and flambés the chicken. That’s not something I would be eager to try (imagining the smoke alarm going off!)
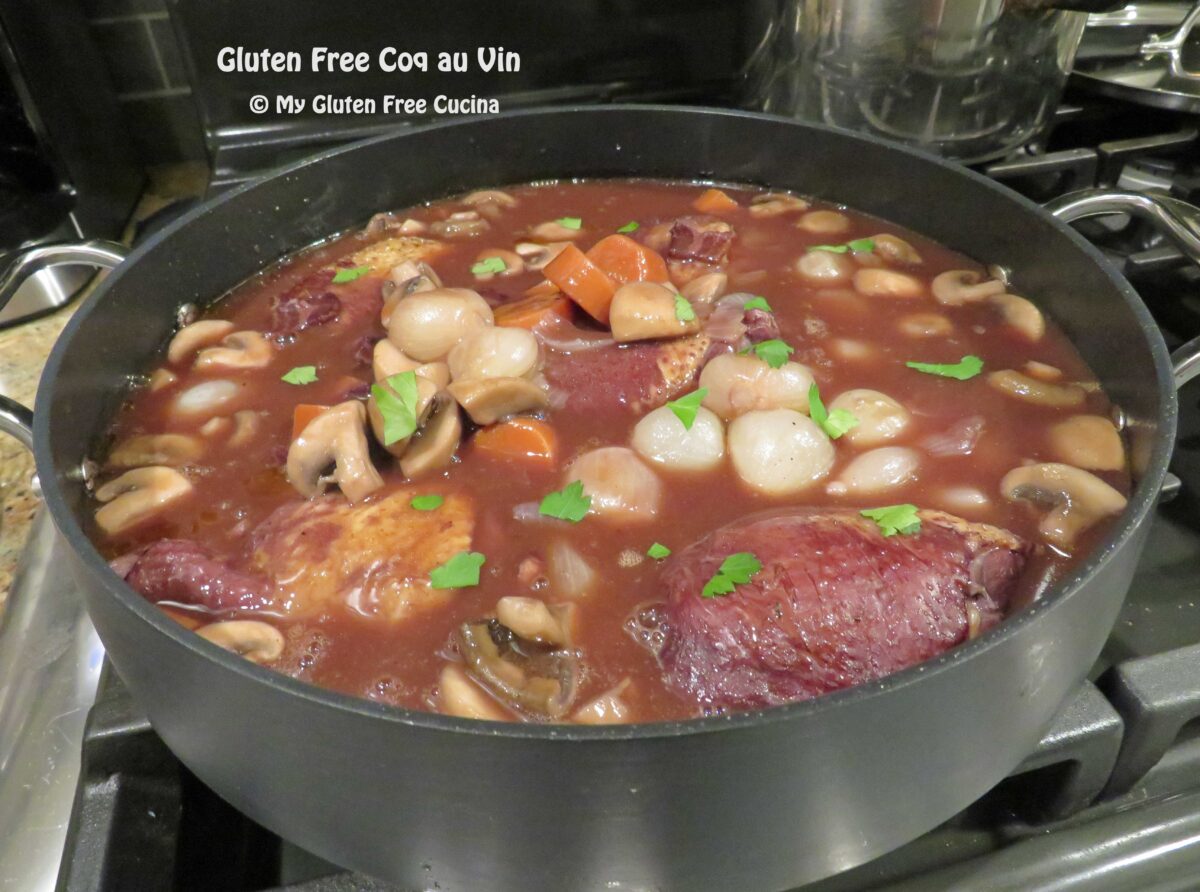
I added all of the wine, stock, tomato paste and seasonings. Honestly, there was a bit too much liquid and I would cut back next time. Julia did not add carrots in her recipe, but I went rogue and put a few in. Lid on, time to simmer!
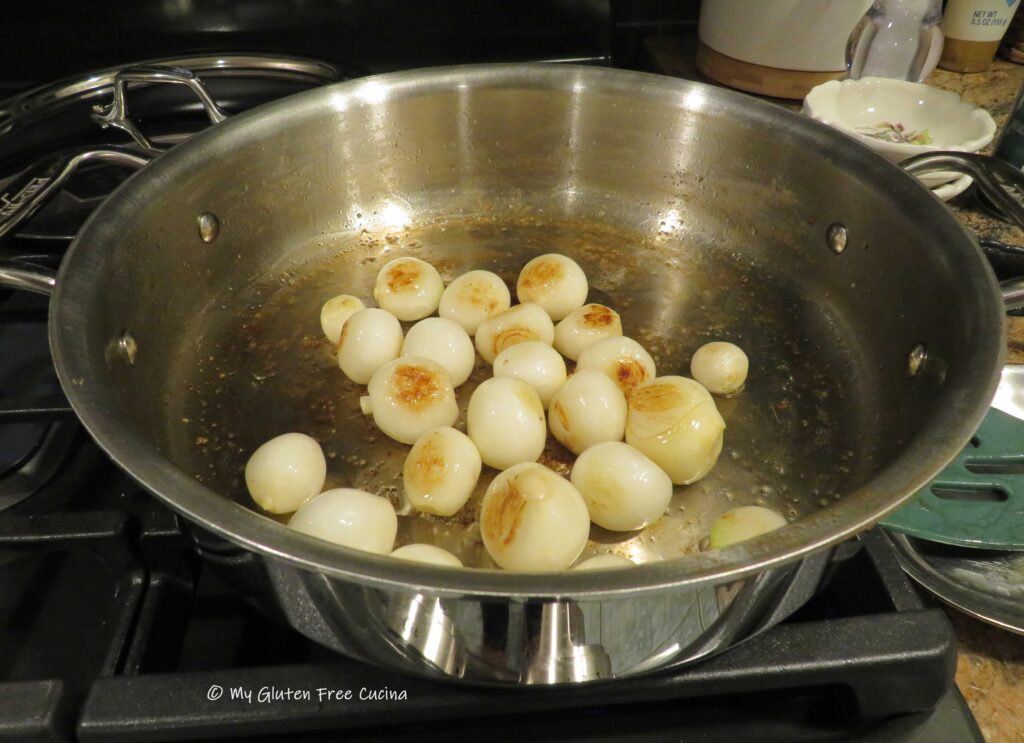
Since my pearl onions were already peeled and trimmed, I was able to begin browning them in oil without all the prep work. After this step, I added water to the pan and simmered the onions for 30 minutes, after which they were removed and set aside.
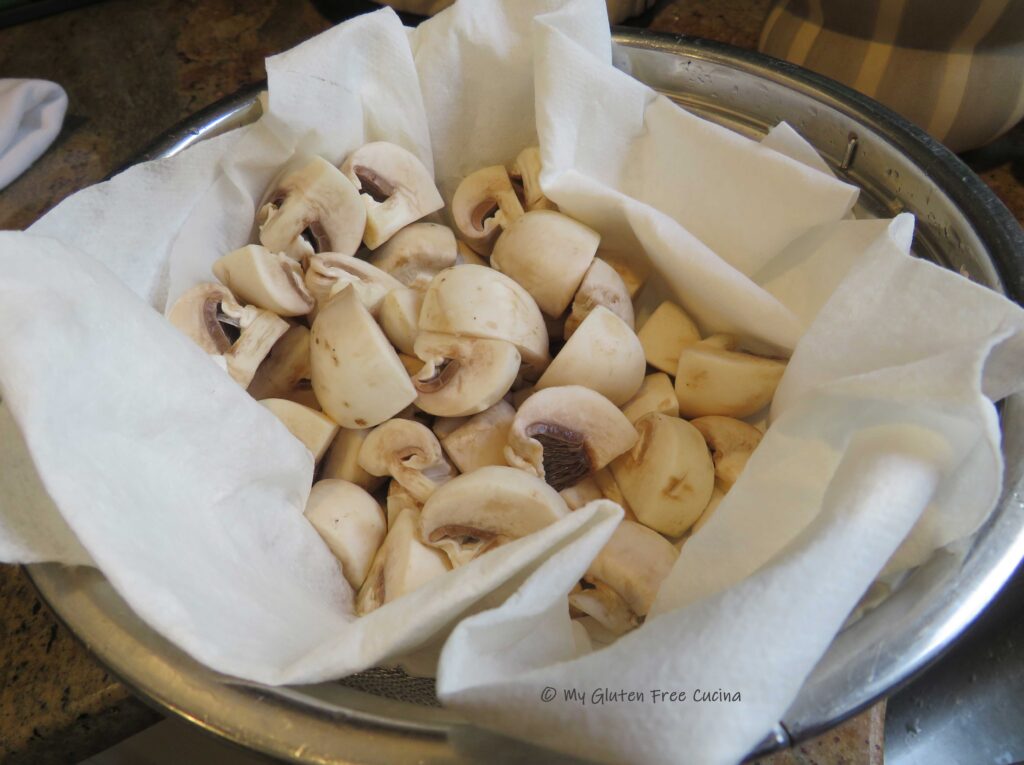
For the next addition, I rinsed and quartered one 8 oz. carton of button mushrooms, cooking them in olive oil and butter.
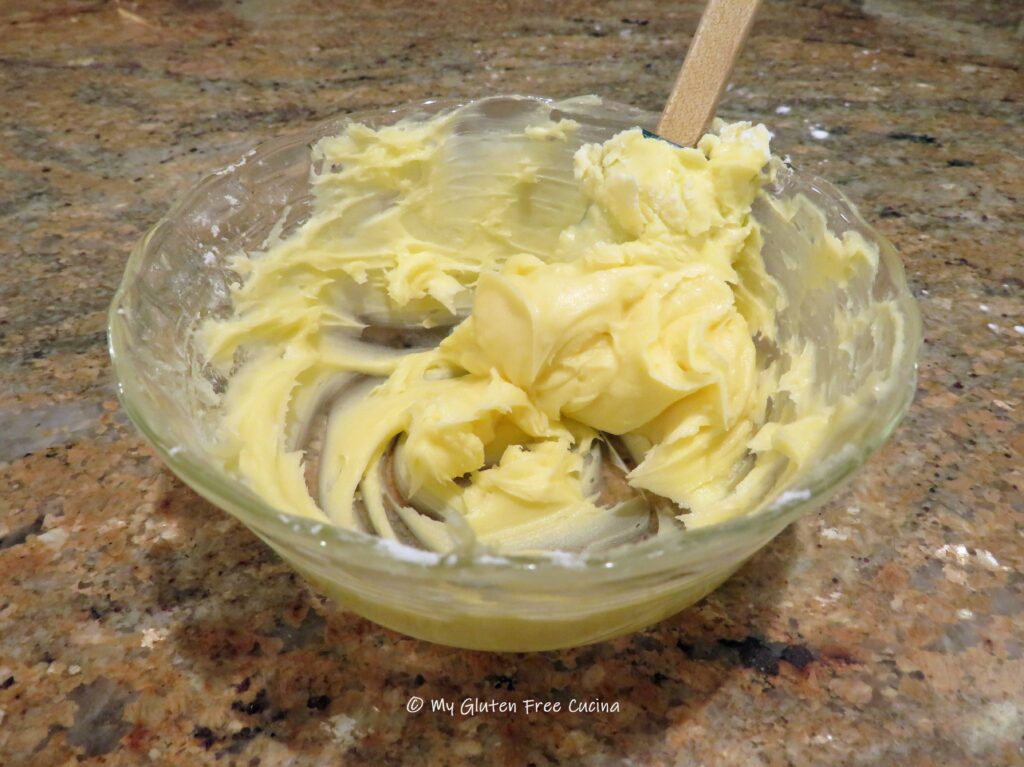
Now, for the finale. To put it all together, I made the beurre manié (a/k/a kneaded butter). This was as easy as stirring together soft, room temperature butter with arrowroot flour until well incorporated.
I transferred all of the liquid from the sauté pan into a stock pot and whisked in the beurre manié until it was smooth and silky.
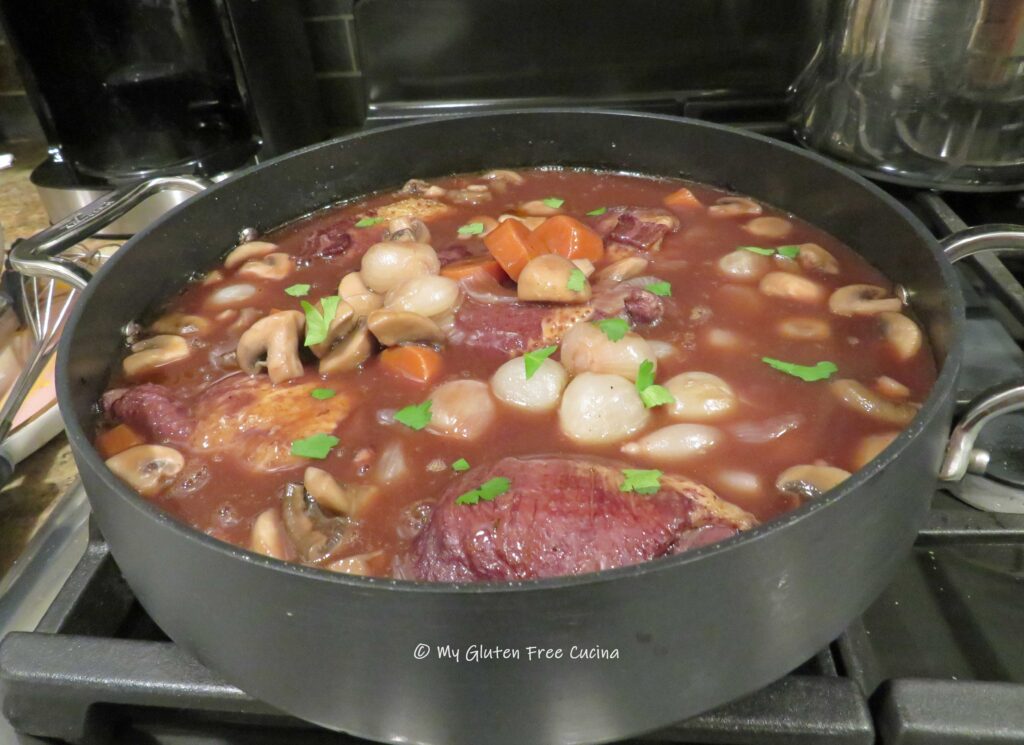
I added the onions and mushrooms to the sauce, then poured it over the chicken, bringing to a simmer one last time before serving.
There it is. So many little steps to develop the flavor profile of this famous dish. Yes, it was delicious. Yes, I will take a few shortcuts next time, but I do intend to make this again.
Notes ♪♫ I took a few (but not many) liberties with Julia’s recipe. I omitted the cognac, so no flambéing! 🔥While Julia used a whole fryer chicken and took great pains to explain how to cut it up, I opted for bone-in, skin-on chicken thighs. My grocer had pearl onions, already peeled and ready to cook (thank you!) so that was another tedious step that I was able to skip. Finally, I substituted arrowroot for the flour to make the beurre manié. With that, the recipe is gluten free!
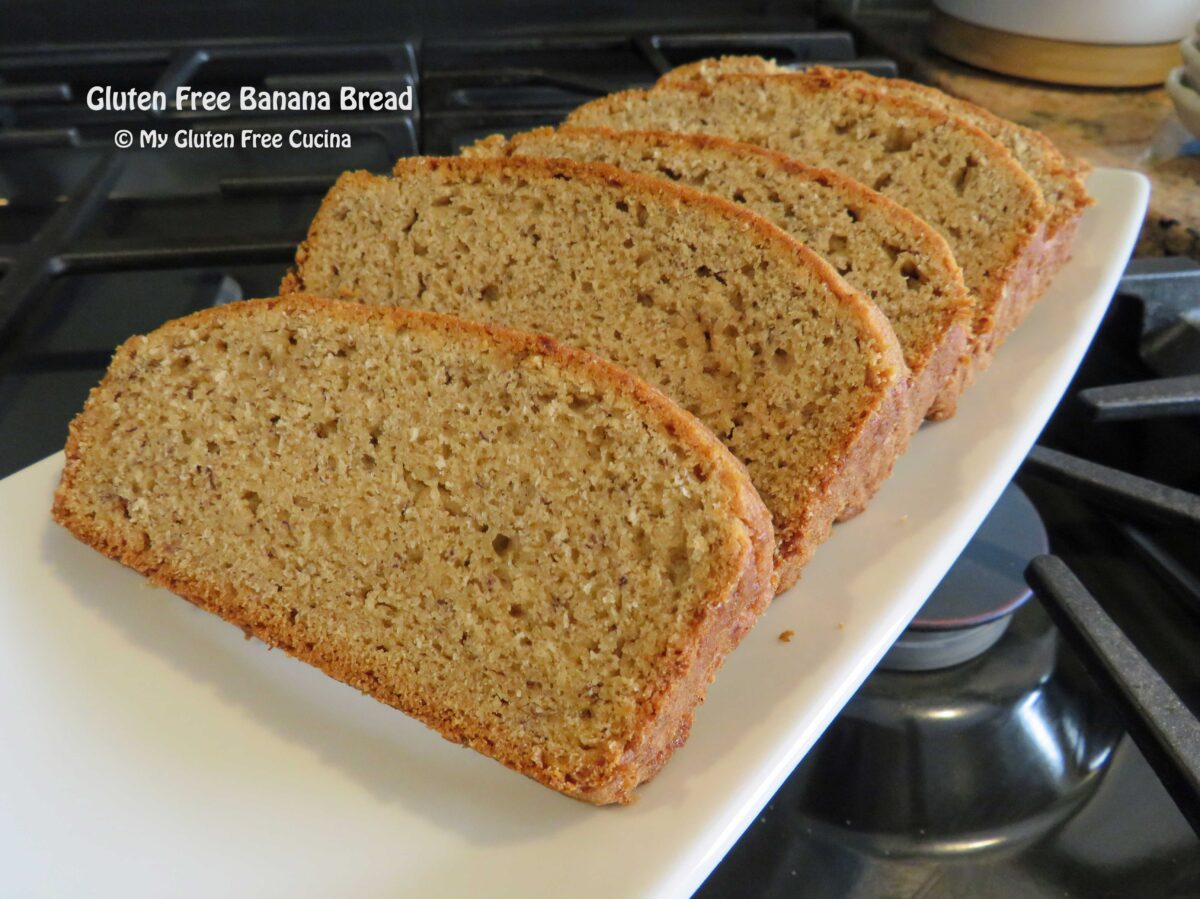
Gluten Free Banana Bread was one of my very first posts when I started this blog in 2018. After 8 years, it was definitely in need of an update. Not only am I a better photographer, but I also like to think I’m a better baker. 😉
Looking back at life before my Celiac diagnosis, making a quick bread was so second nature to me. I could throw one together without a recipe!
Today things are different of course, but I still love a good quick bread and there are now some very high-quality, gluten free all-purpose flour blends to work with.
I promise, this moist, gluten free loaf will make you smile. It is SO good and best of all it tastes just like a classic banana bread.
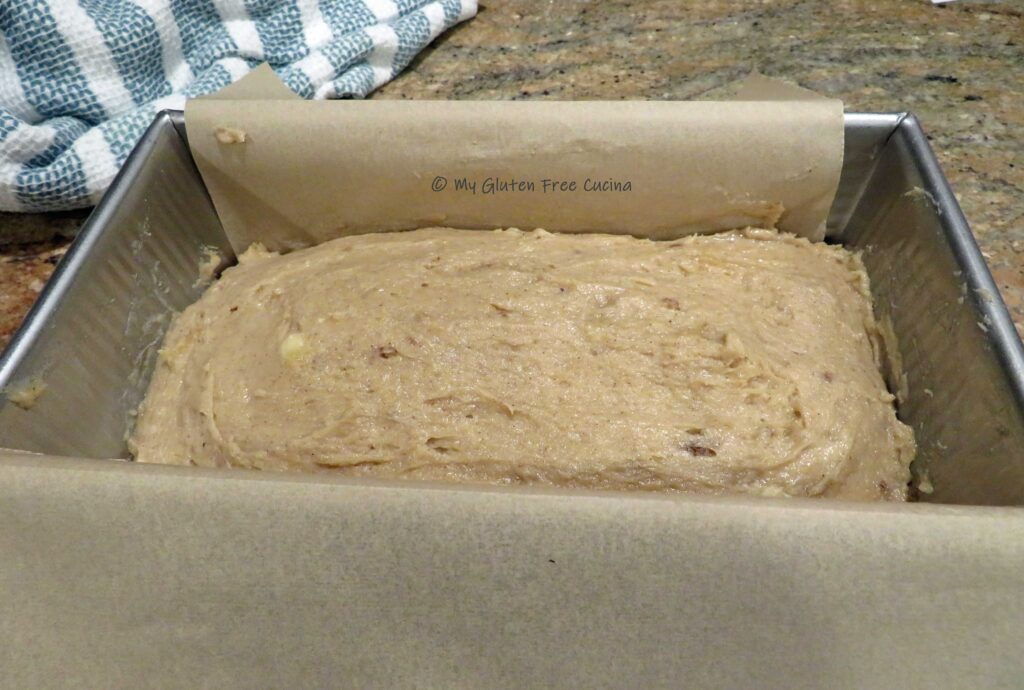
Preheat the oven to 350º. Line a 9 x 5″ loaf pan (1.25 lb.) with parchment paper (do this, you’ll thank me later).
Whisk together the dry ingredients, flour through cardamom. In the bowl of a stand mixer with the paddle attachment, beat together the sugars and the cubed butter. Add the eggs, vanilla, bananas and ricotta.
Finally add the dry ingredients and beat until smooth.
Transfer to the prepared loaf pan and use a wet spatula to smooth the top out.
Bake for 1 hour and check the center with a toothpick. The top should be nice and golden brown.
Cool in the pan for 10 minutes, then lift the loaf out of the pan by grasping both sides of the parchment paper (you’re welcome).
Remove the parchment and cool on a rack before slicing. Cover any leftovers in plastic wrap and store at room temperature for up to 3 days.
Notes:
♪ Parchment paper provides an easy way to lift out the finished loaf without tipping the pan over and guarantees that your loaf won’t stick to the bottom of the pan.
♫ In my original recipe, I used 3/4 cup white rice flour, 1/2 cup sorghum flour, 1/2 cup cornstarch, 1/4 cup potato starch and 2 tsp. xanthan gum. If you want to make your own flour blend, be sure to use superfine white rice flour for texture that is moist and not gritty.
Tartine Bread is a type of sourdough originating from The Tartine Bakery in San Francisco. It is a “no-knead” bread, made with a very small amount of sourdough starter (only 1 tbsp.) and no commercial yeast at all! The dough is developed by stretching and folding it at intervals, instead of machine mixing.
You will need a fully active and very robust sourdough starter to make this bread. Honestly, I wondered if Sophie (my sourdough starter) was up to the task and was pleasantly surprised. Way to go, Sophie!
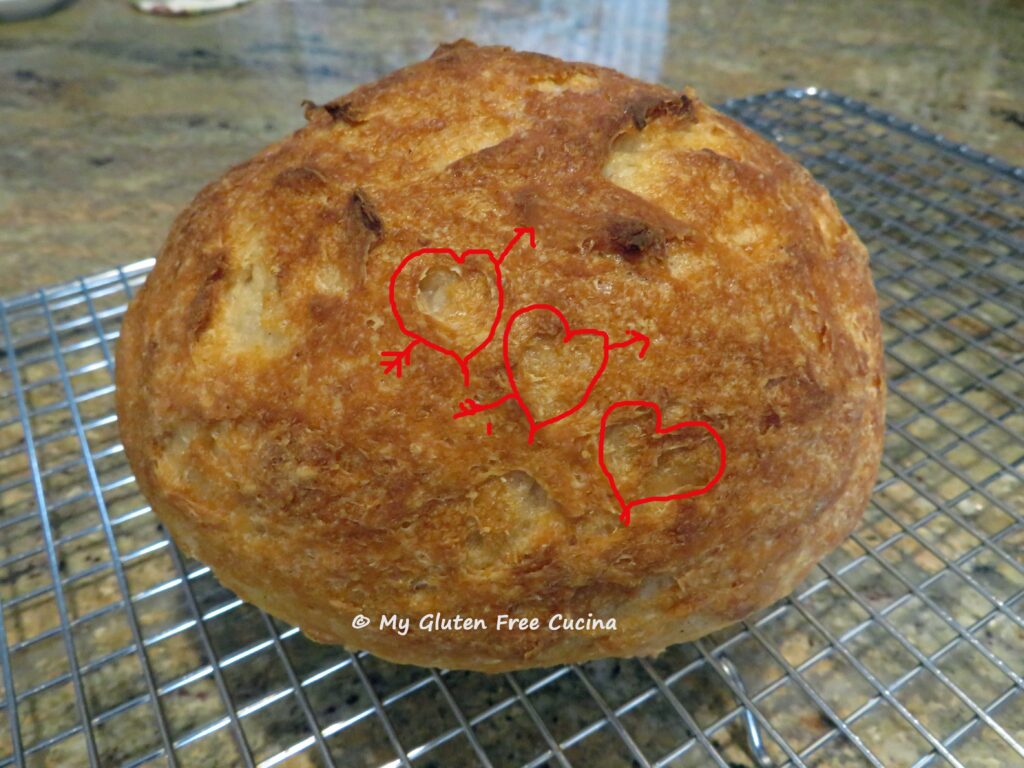
There was so much I wanted to get right with this bread. The blistered, caramelized exterior and soft crumb. After much trial and error, I was making some very nice loaves. Do you see little hearts in the crust? 💕🥰
Do you see little hearts in the crust?
Developing the dough is a process, beginning with a well-fed starter, a preferment, and final dough. After an overnight rest in the fridge, the loaf is baked in the morning. This long fermentation is what takes you from a mere tablespoon of starter to the beautiful risen loaf you see in the photos.
Oh, and as if you hadn’t waited long enough, the baked loaf will need to rest a full day before slicing! Most gluten free breads need extra time to release their moisture but for this one I don’t slice for a full 24 hours. It is worth the wait.
This post contains affiliate links.
Like many sourdough loaves, Tartine is traditionally baked in a cast iron Dutch oven. If you don’t have one, or if like me you find that cast iron pots are getting too heavy to lift, then a lighter weight enamel roasting pan or ceramic pan with a lid will get the job done.
If you work full time, you may be thinking “I don’t have time for all this”. Rest assured though, you can fit this into your workday. Just follow the steps!
Day 1 –
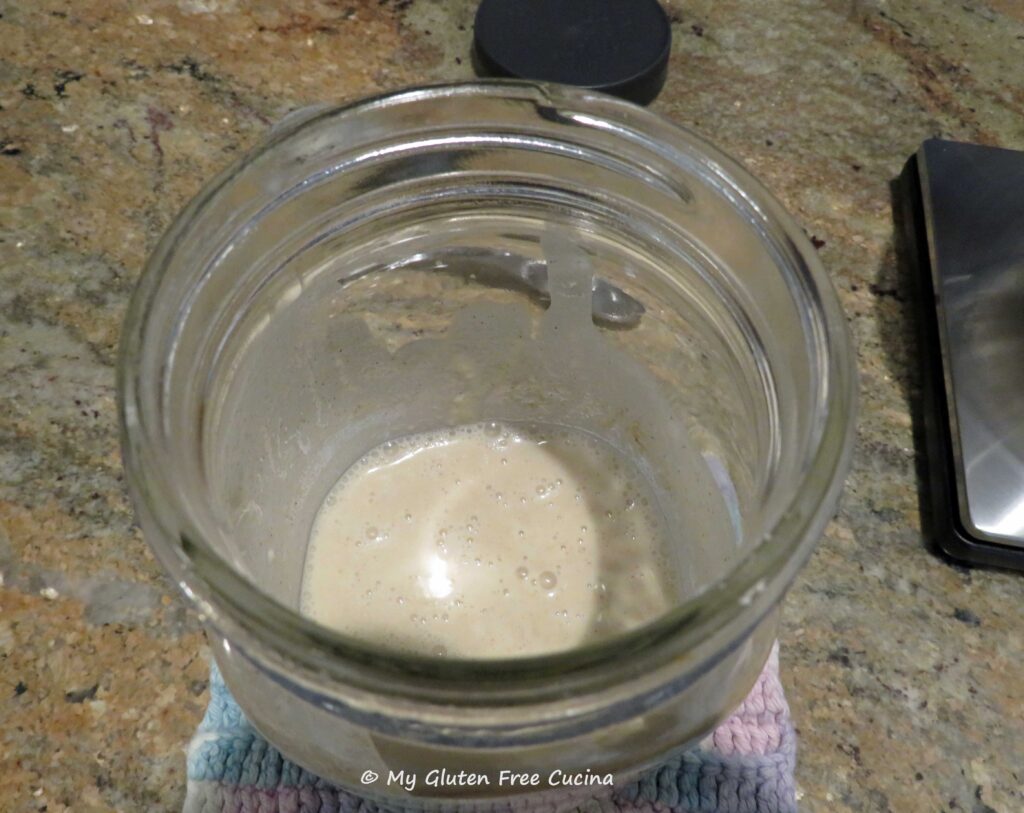
Evening – Take your starter out of the refrigerator, feed it and leave it out on the counter overnight.
Day 2 –
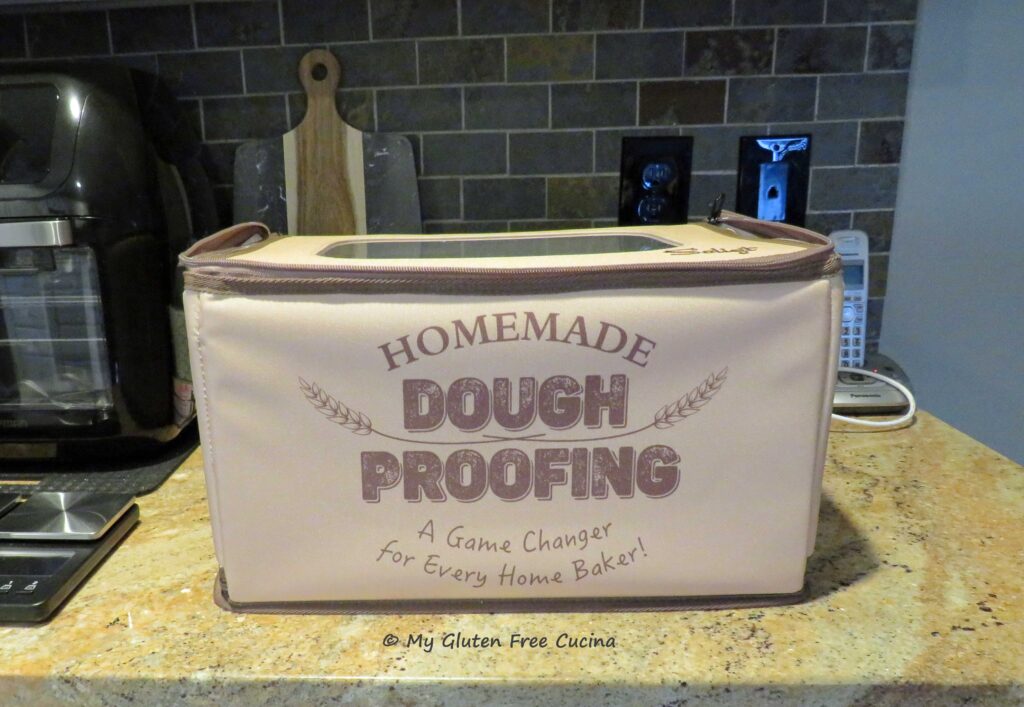
Morning – Stir together the preferment ingredients, cover with plastic wrap and let sit in a warm place for at least 7 hours (I used my proofing box). As the day goes on, it will become increasingly puffy and smooth.
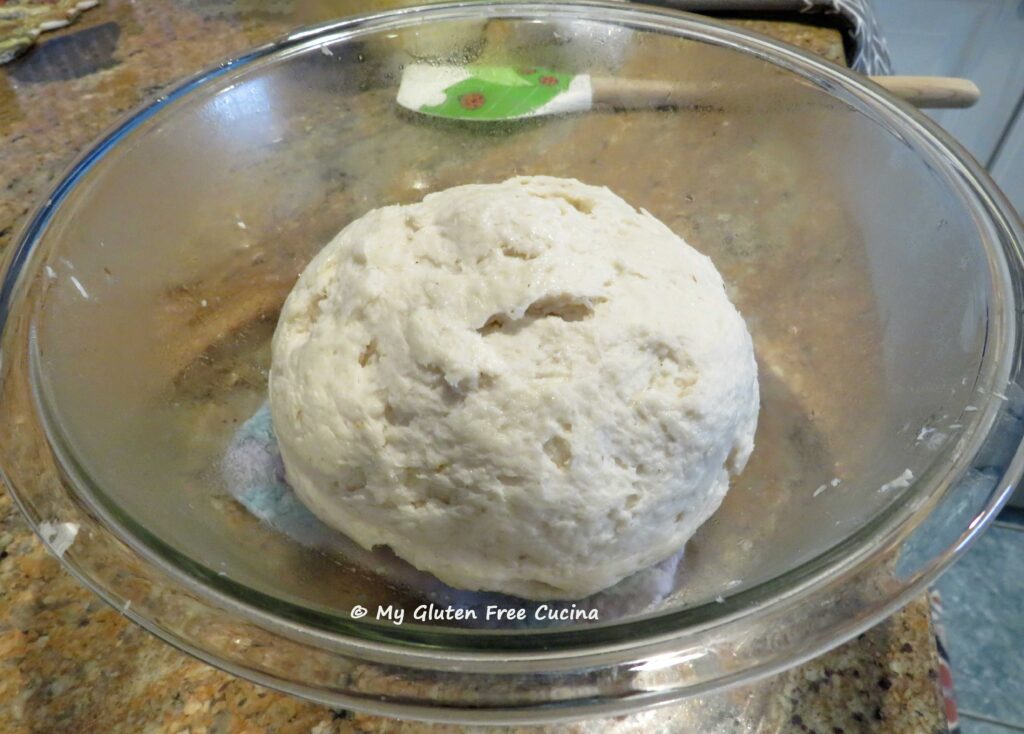
Late Afternoon – Combine the final dough ingredients with the preferment in the bowl of a stand mixer with the paddle attachment. Mix just until combined to form a wet shaggy dough. You can also mix the dough together by hand with a stiff spatula or dough whisk.
Transfer the dough to a lightly oiled bowl, cover with plastic wrap and let it rest 45 minutes while you have dinner.
Evening – Rub a large cutting board with olive oil and turn the dough out. Use a bench knife to spread the dough and fold it over on itself, rotating the cutting board as you fold.
The dough will be sticky, and you won’t be able to handle it like you would a wheat dough (i.e. “stretch and fold”). But- after a few dozen folds you should have a nice smooth ball.
Return it to the bowl and cover with plastic wrap. Leave it out on the counter until you go to bed.
Night – Refrigerate the dough overnight to be baked in the morning.
Day 3 –
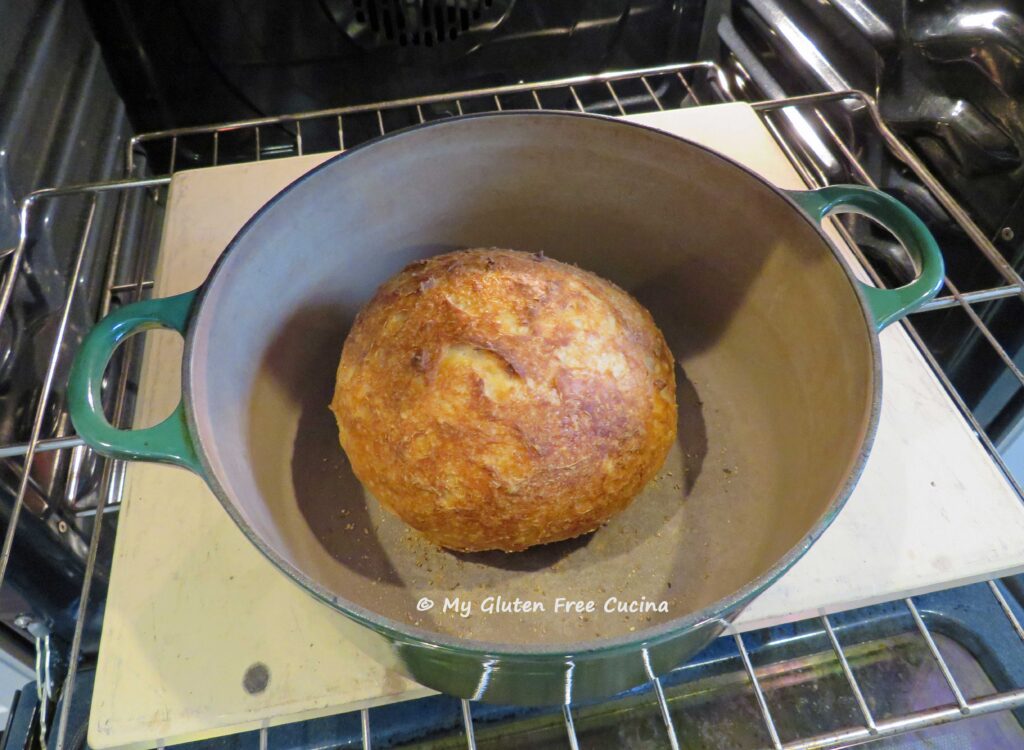
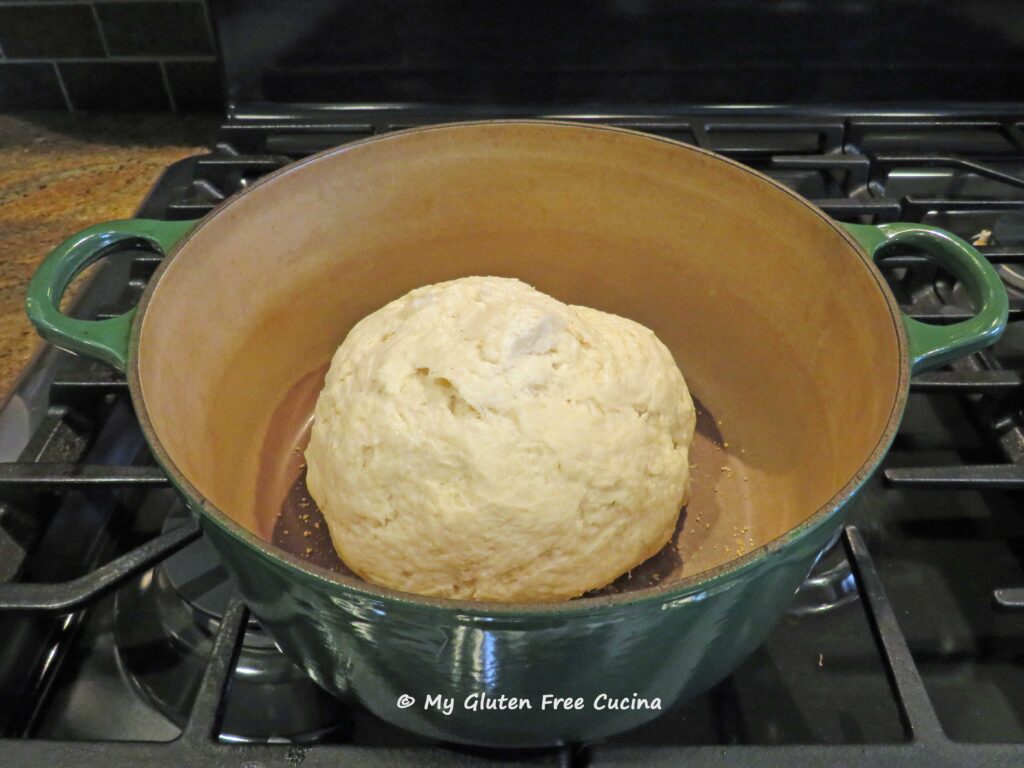
Morning – Take the dough out of the refrigerator and let it stand at room temperature while you preheat the oven to 475º. Place a Dutch oven on the middle shelf while the oven is heating for 1/2 hour prior to baking (note- if you are not using cast iron be careful, read the instructions for your pot to make certain it can withstand being heated while empty).
Remove the preheated Dutch oven to the stovetop, sprinkle the bottom with cornmeal and use a stiff spatula to carefully nudge the dough from the bowl without deflating it. Cover and return the pot to the oven.
Reduce the oven temperature to 450º and bake for 30 minutes. Then remove the cover and continue baking another 20 minutes. Loaf is done when the internal temperature reaches 210º (check with a thermometer).
Carefully remove the loaf from the pan and place on a rack to cool. Once it reaches room temperature you can put it in a bread bag or use plastic wrap.
After all that, you will probably want to tear right into your loaf of bread. But- please be patient! This beautiful, artisanal loaf needs a full 24 hours to release its moisture. Rushing it can mean a wet sticky loaf instead of a gorgeous crumb like this!
Day 4-
Finally, the long-awaited moment! Slice and serve with dipping oil. What do you think? Was it worth the wait?
Notes:
♪ You do not need a stand mixer to make the preferment, but as mentioned above, I did use mine for the final dough. You can also stir the final dough together with a dough whisk or stiff spatula, just enough to form a wet shaggy dough, kneading is not required.
♪♪ I used Better Batter Gluten Free Flour in this recipe. When you shop Better Batter, remember to use my Promo Code MGFC30 for 30% off your full price purchase.
♪♪♪ Notice how small my loaf is? This loaf size is perfect for solo households, or a dinner for two. You can double the recipe if you wish, to make 2 small loaves or 1 large loaf. I kept it small for testing, and it is just right for me, a great size for gifting too!
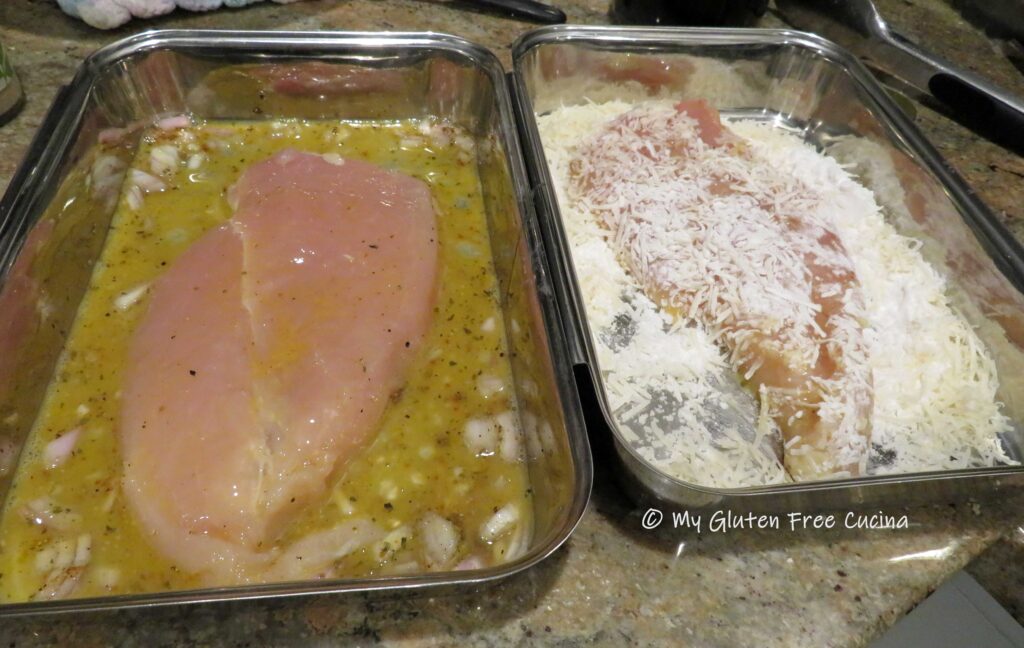
Lemon Chicken, the iconic dish from the sitcom Everybody Loves Raymond is famous for a reason. It’s easy and delicious! The boneless chicken breast comes out so juicy and tender, and the bright lemon flavor will make you an instant fan. Perfect for family dinner, company or date night. Make it for your special someone!
Butterfly the chicken breast then cut it in half lengthwise.
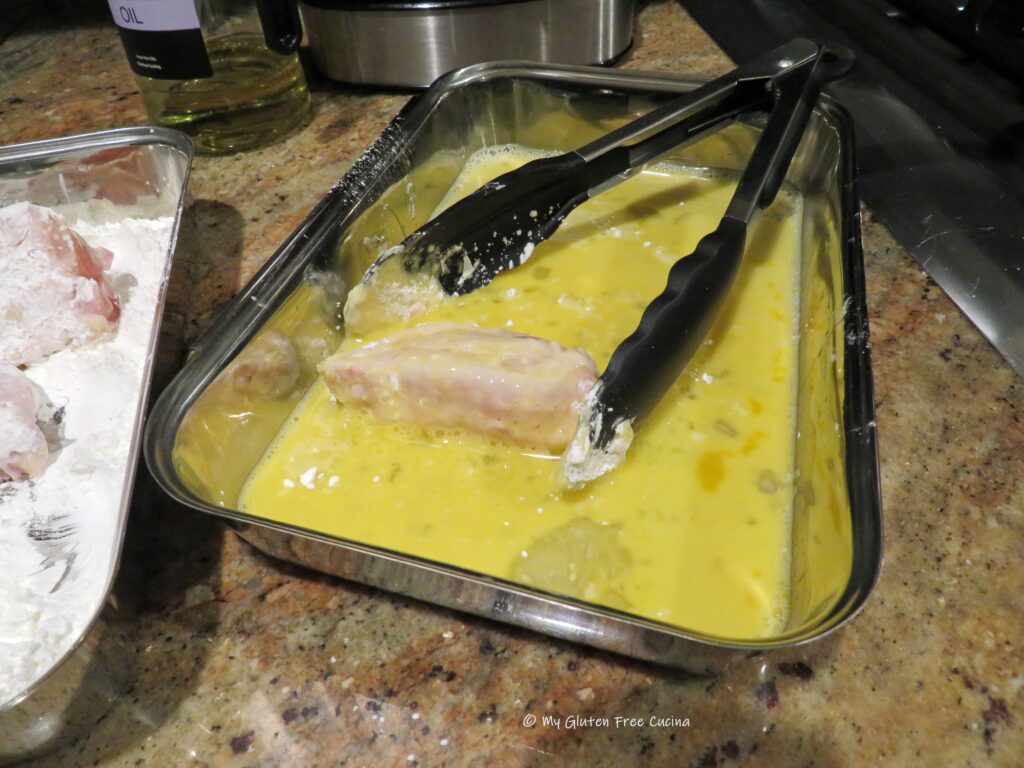
Set up 2 breading trays. In the first tray, beat the egg with 1 tbsp. water. Whisk in 1 tbsp. minced shallot, salt and pepper to taste. In the second tray, add the rice flour and grated cheese.
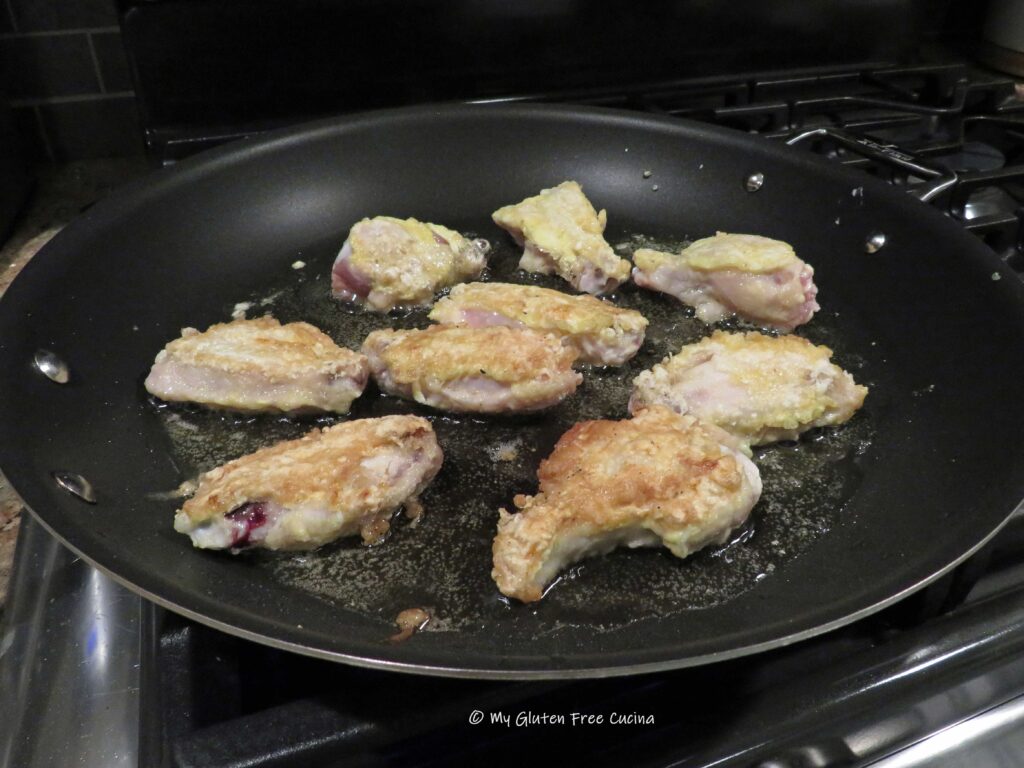
Heat a nonstick skillet over medium low. Coat the bottom with olive oil. Working with one piece at a time, dip the chicken in the egg mixture, then shake off the excess and dredge in the flour and cheese.
When the pan is hot, add the chicken and cook for 6-7 minutes per side, turning once.
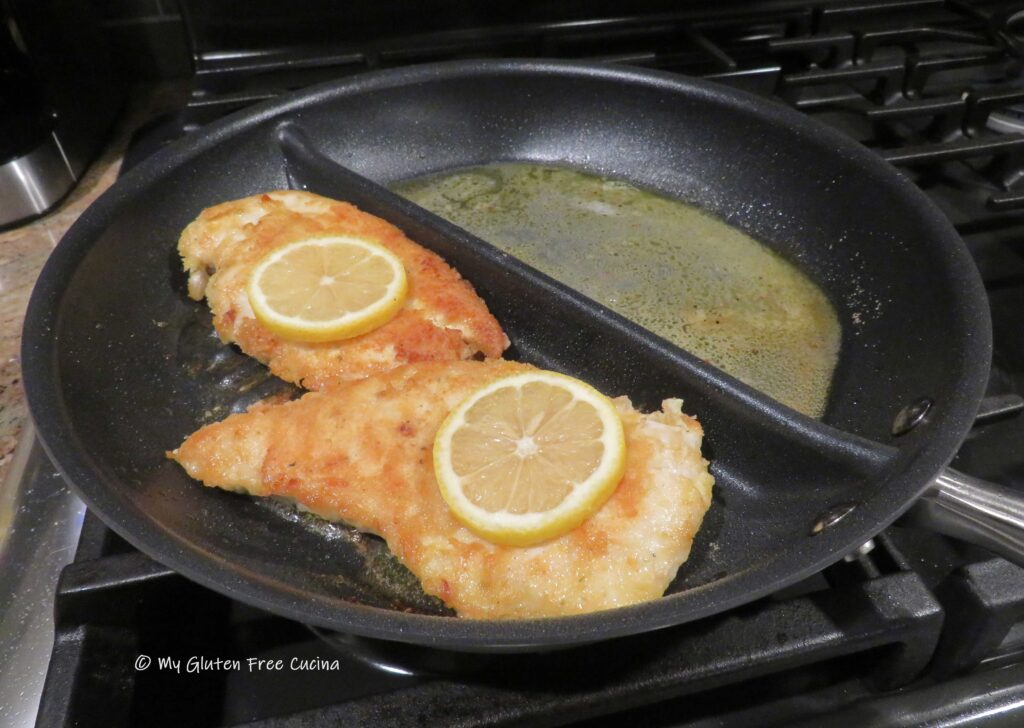
I cooked it all in this divided pan from Anolon, how cool is that?
To make the sauce, melt the butter and squeeze in the juice from one of the lemons, then stir in the chicken broth. Slice the other lemon for garnish.
I grilled the chicken on one side and made the sauce on the other!
To serve, transfer the chicken to a plate, garnish with lemon slices and drizzle with the sauce.
I served it with risotto and peas. You could definitely do a side of pasta or potato and veg as well.
Notes ♪♫ Don’t reach for the plastic lemon, freshly squeezed lemon juice is a must for this dish! 🍋🍋🍋 The same goes for the cheese, grate your own Parmigiano Reggiano cheese and taste the difference!
Cranberry muffins taste like Christmas all year long! These gluten free muffins are bursting with bright fresh cranberries, and the aroma as they bake will transport you into holiday mode!
Did you know that unlike other berries, cranberries are harvested in the fall? How convenient that these gorgeous red berries arrive just in time for holiday baking!
For best results with this recipe, I recommend that you weigh your flour. And don’t skip the orange zest! It adds a pop of flavor and freshness to the muffins.
Preheat the oven to 350º. Mist a 12-cup muffin tin with cooking spray.
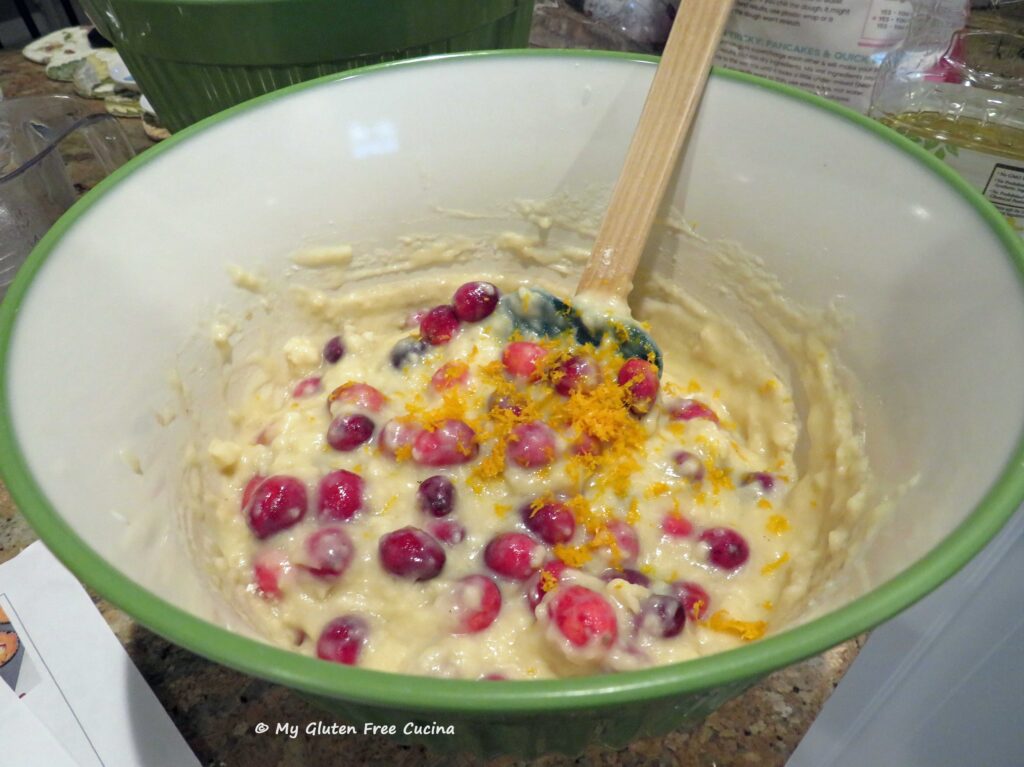
Whisk together the dry ingredients, flour through cardamom in one bowl. In another bowl, whisk together the wet ingredients, eggs through milk.
Stir the dry ingredients into the wet. Toss the cranberries with 1 tbsp. flour and add to the batter along with the orange zest.
Let the batter rest for 15 minutes, then spoon into 12 muffin cups. Smooth out the tops with a small spatula.
Bake for 25 minutes (check with a toothpick). Brush the tops with melted butter then cool in the pan for 10 minutes.
Transfer to a rack. If not serving immediately you can store them at room temperature in an airtight container for 1 day. Leftovers, if you have any can be frozen.
Notes ♪♫ I used and recommend Better Batter Original Blend in this recipe. With Better Batter, your favorite recipes for muffins and quick breads are easily converted to gluten free. Just substitute 130 grams of Better Batter flour per cup.
Don’t forget to use my Promo Code MGFC30 for 30% off your purchase at Better Batter!
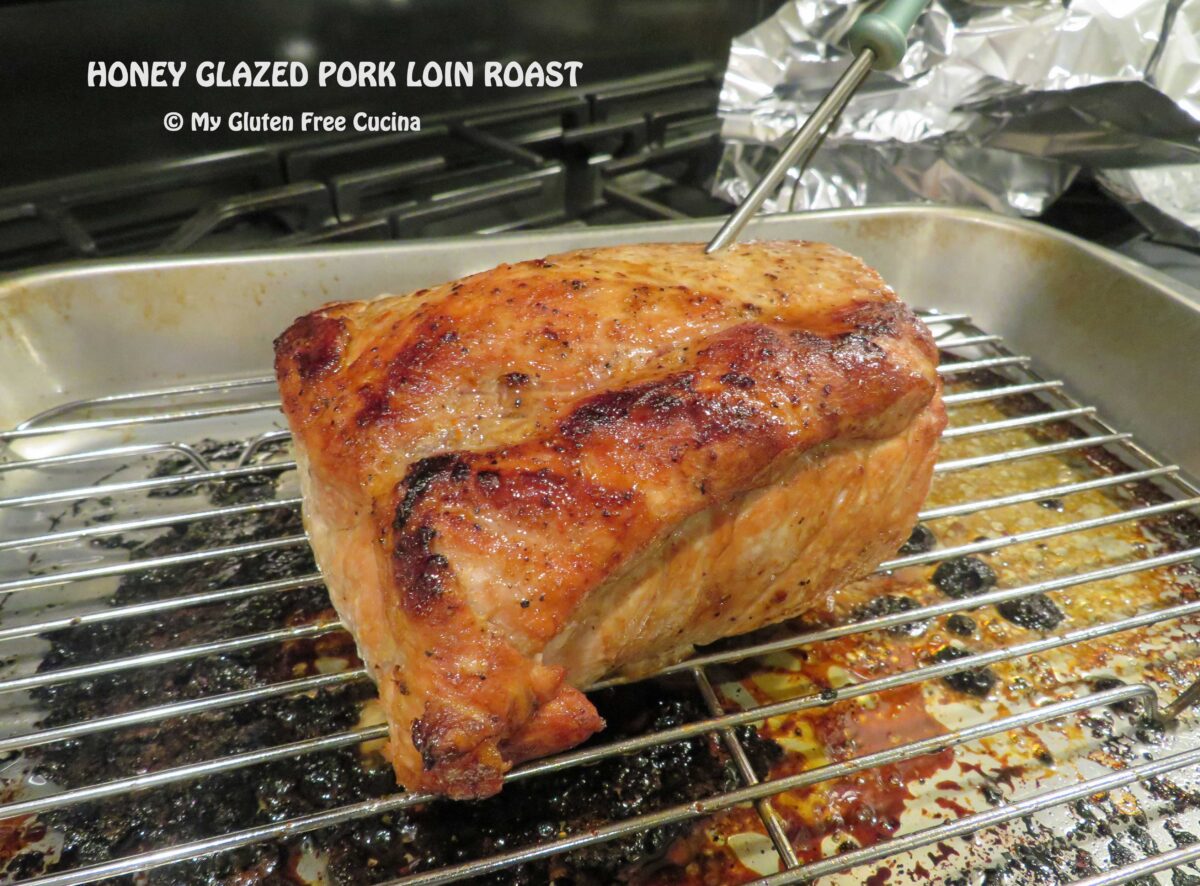
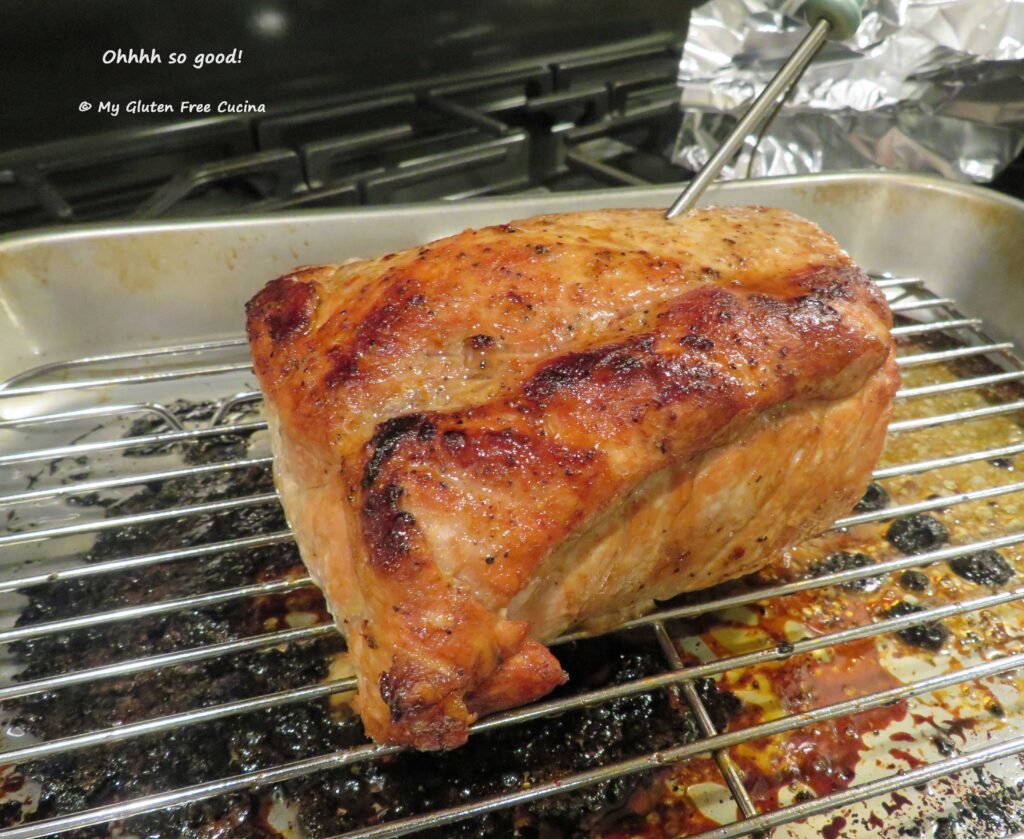
This pork roast was SO good, that I will be making it on repeat over the winter. It’s perfect for families, dinner guests or any time. The simple honey glaze perfectly complements the pork without overpowering it.
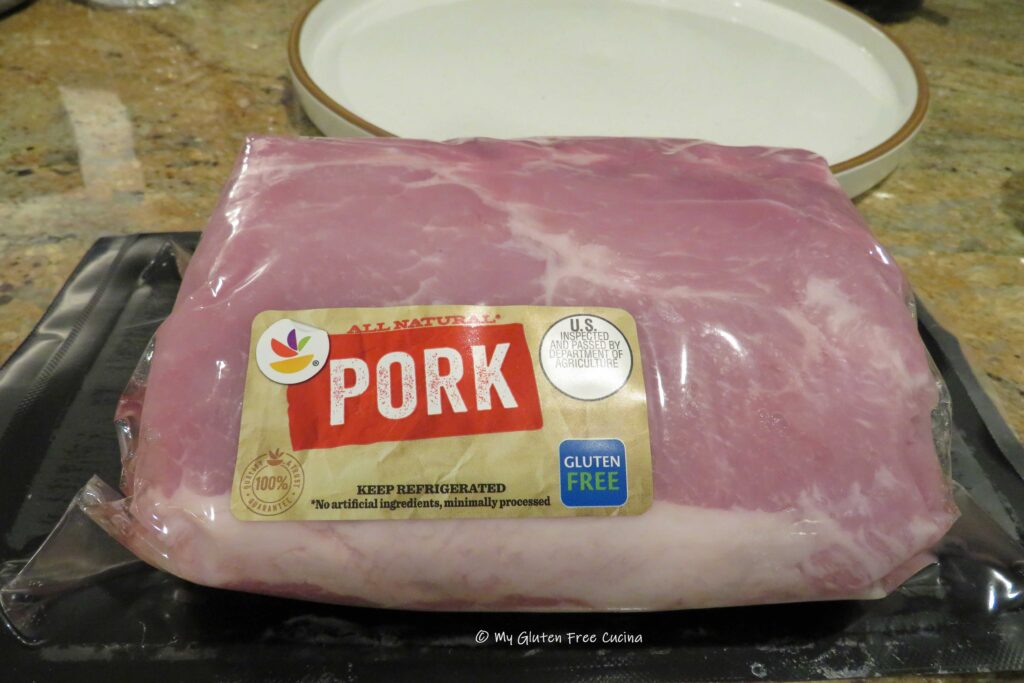
For this recipe, I used a pork loin roast. Not to be confused with tenderloin, the pork loin is a rectangular shaped roast with a layer of fat, or fat cap, which helps keep it juicy as it bakes.
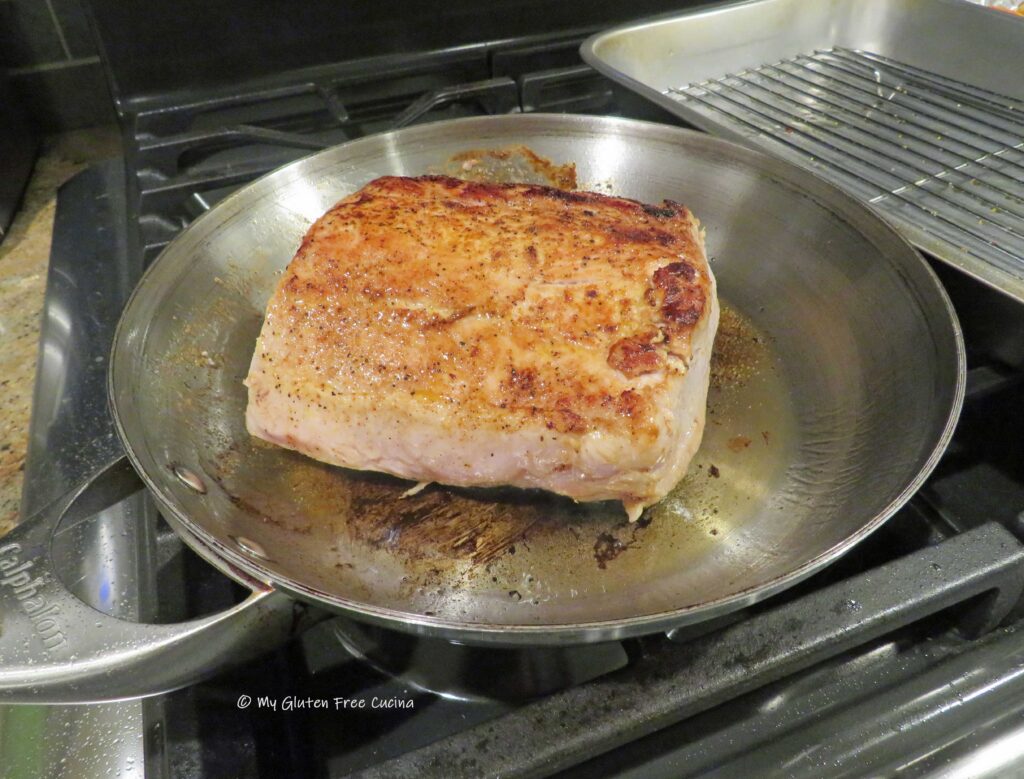
Preheat the oven to 450º. Heat a stainless-steel skillet with olive oil.
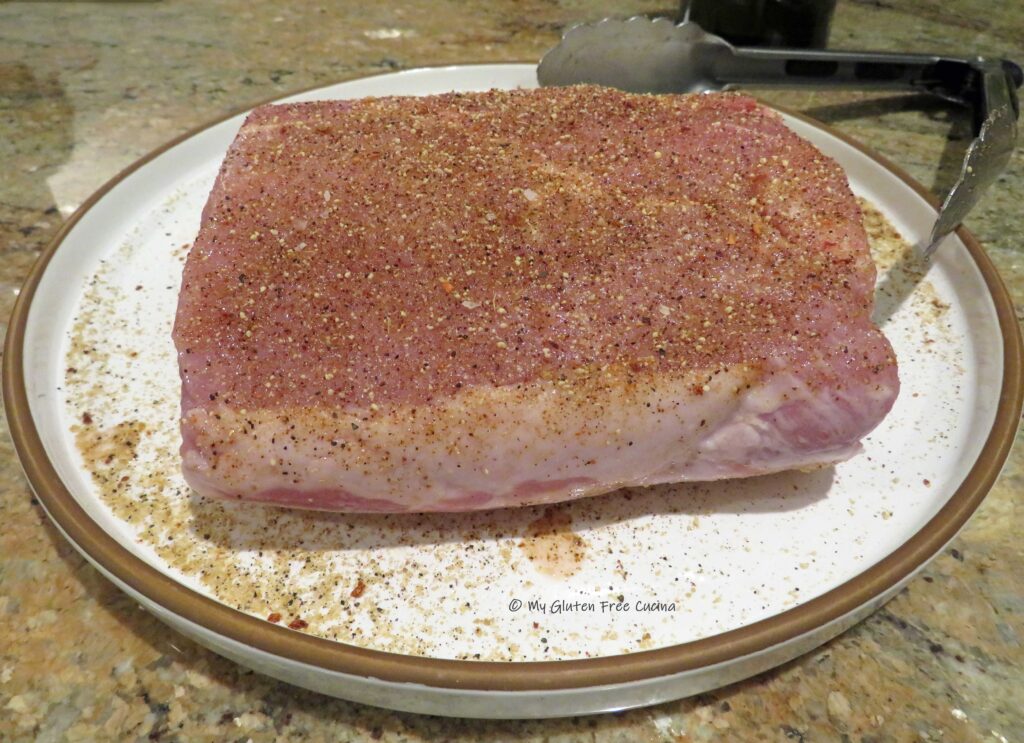
Season the roast all over with your dry rub of choice.
Sear the roast in olive oil, browning all sides.
Next set up a small roasting pan with a rack, and mist with cooking spray. Add the roast and brush with half of the honey mixture.
Place the roast in the oven on the middle rack and lower the heat to 375º. Insert a thermometer and bake for 25 minutes.
After 25 minutes, carefully brush with the remaining glaze, tent with foil and continue roasting until the internal temperature reaches 140º, about 35 minutes longer.
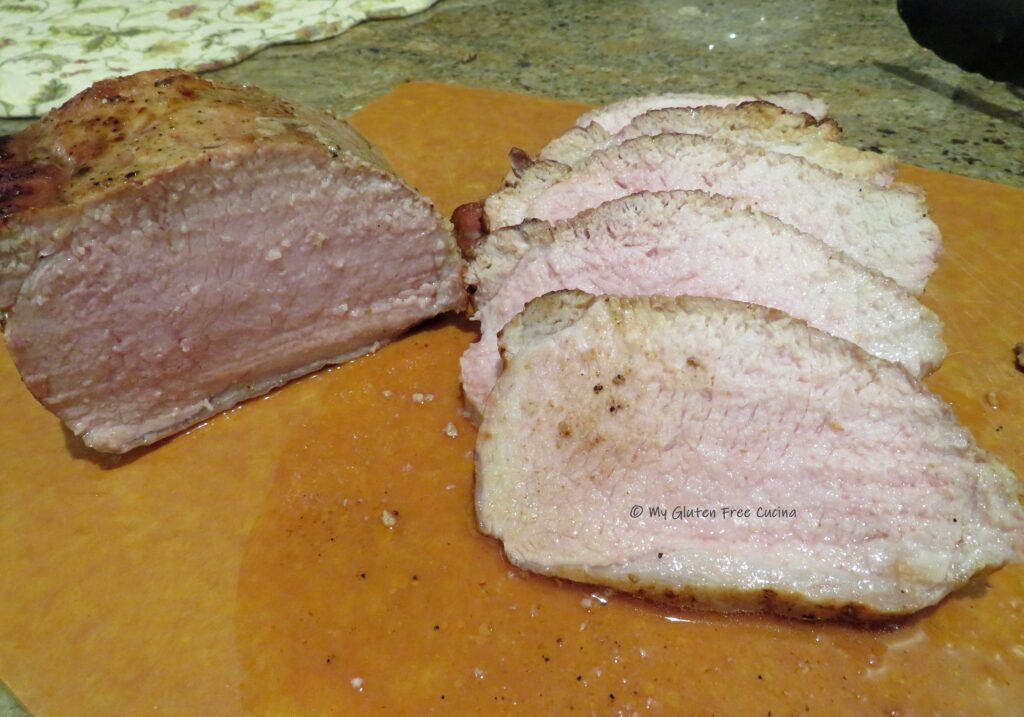
Remove from the oven and let it rest 10 minutes before slicing. As it rests, the internal temperature should continue to rise to 145º, which is perfect for me. If you like your meat well done, you can leave it in the oven a little longer.
Doesn’t that look great? SO juicy! I served it with potatoes and carrots, but this versatile roast would go equally well with rice or noodles.
Notes ♪♫ This is not an ad, just a recommendation to try the Ginger Chile Espresso Maple Rub from The Spice House, which is what I used in this recipe. It is currently one of my favorite seasoning blends and goes especially well with pork dishes!


 Cover the bowl with oiled plastic wrap and let the dough rise for 30 minutes while you preheat the oven to 375º.
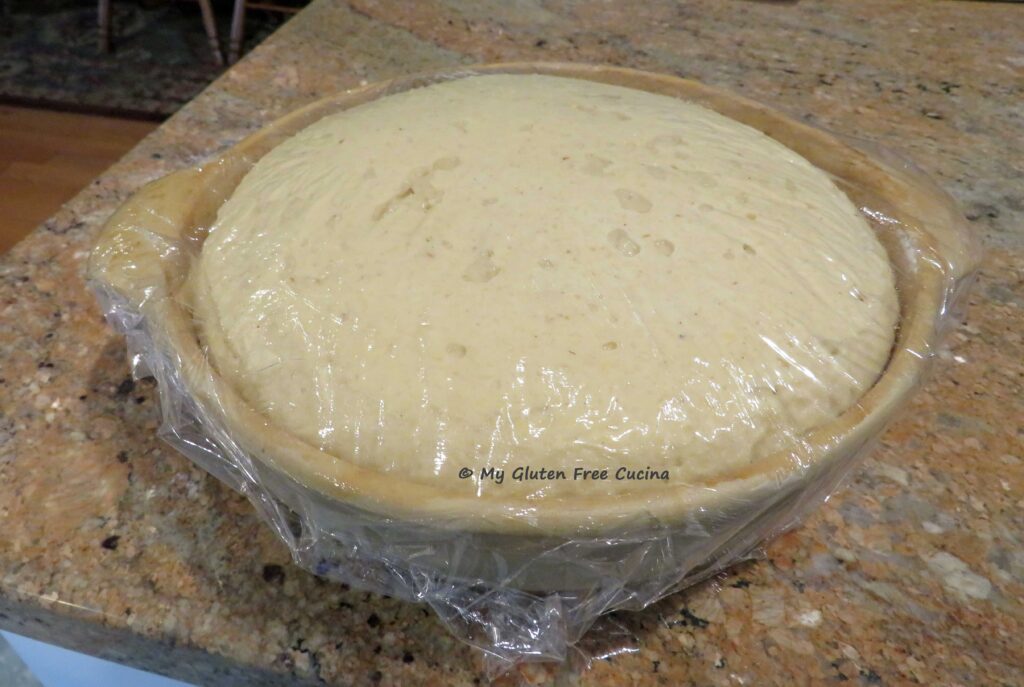 Just before baking, whisk together one egg with 1 tbsp. water or milk. Brush over the entire loaf and score the top (reserve the leftover egg for breakfast).
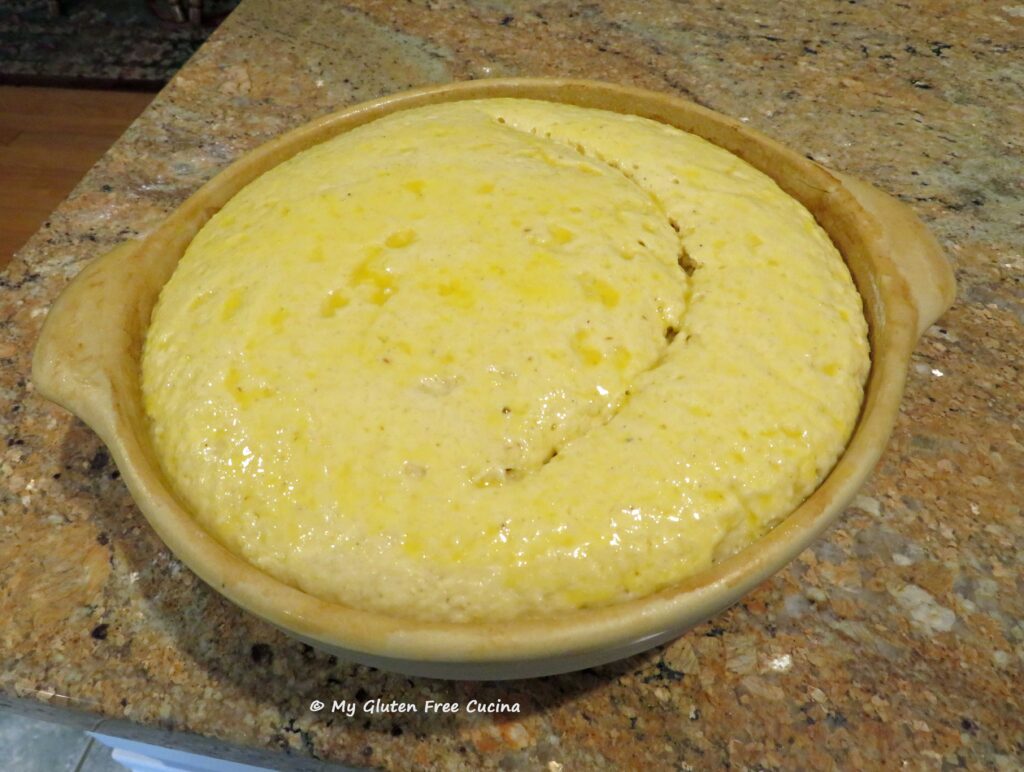 Bake on the middle rack for 40-45 minutes, or until the internal temperature reaches 195-200º (use a thermometer).
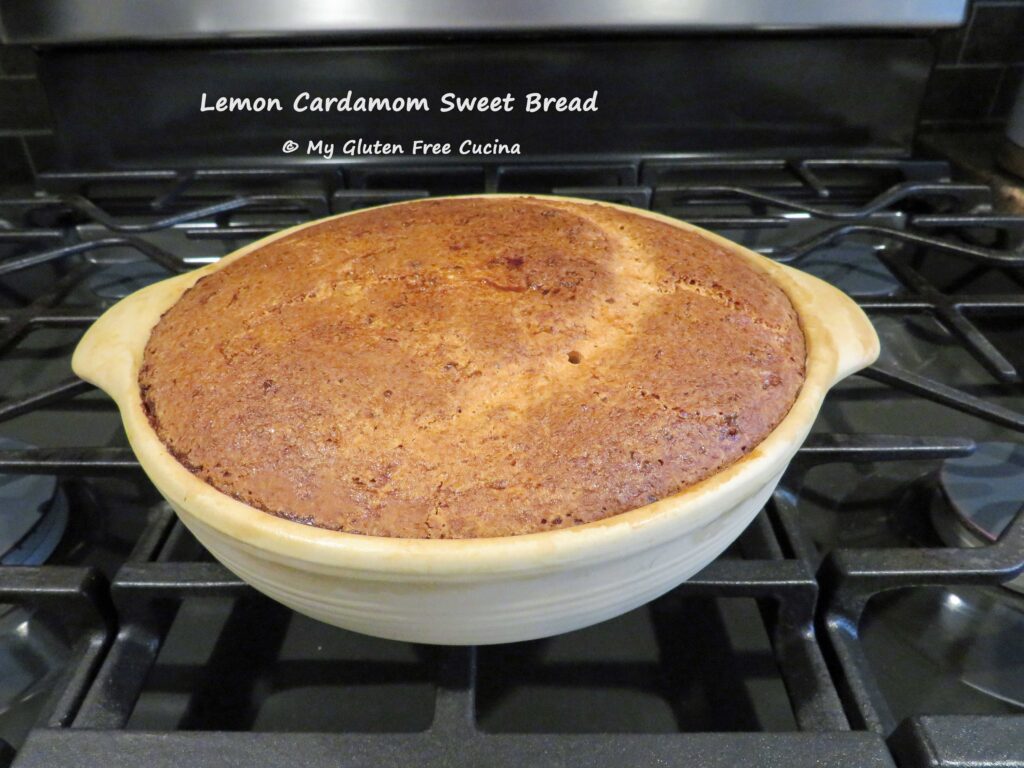 Cool in the pan for 10 minutes then transfer to a rack. You may need to run a knife around the edges.
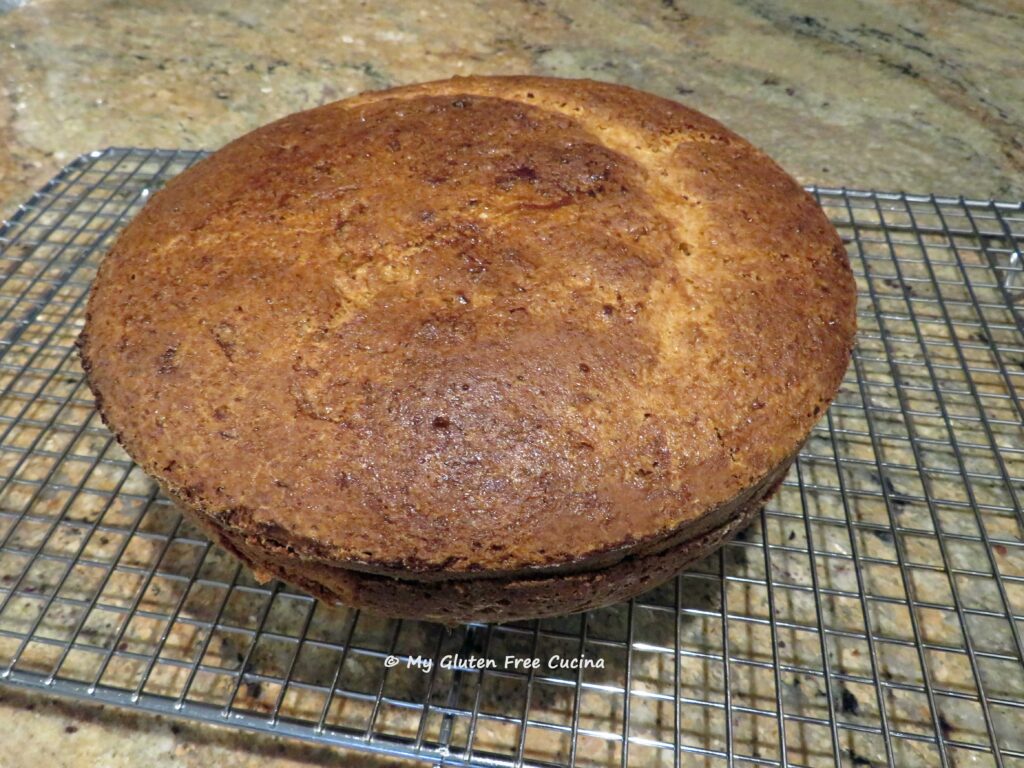 Let the loaf cool for at least 6 hours before slicing. Letting it rest overnight is even better, store in a bread bag once it has completely cooled.
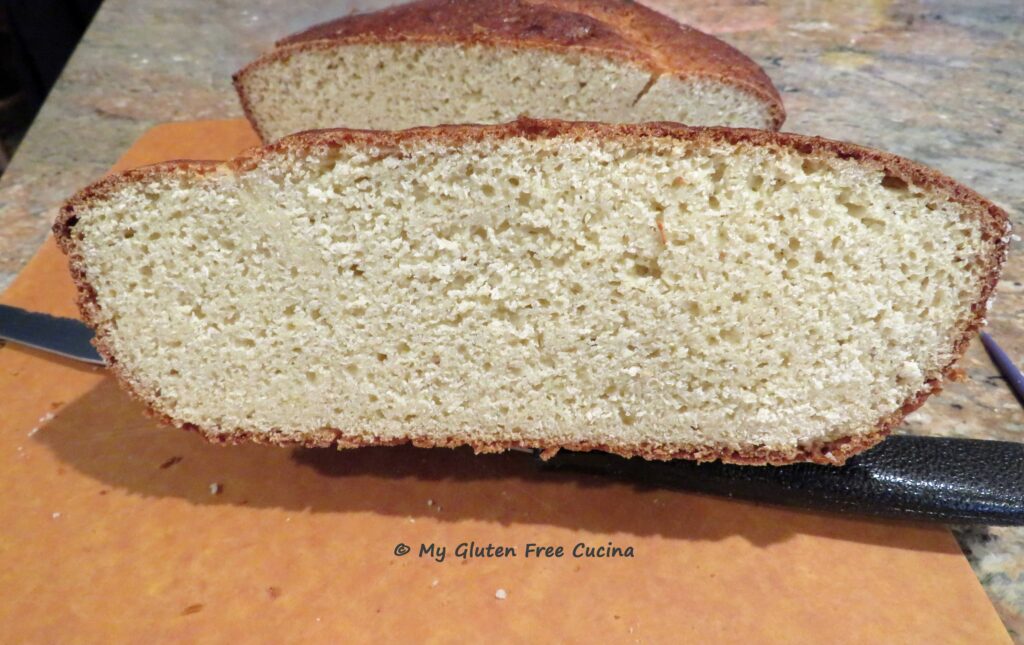
 Notes ♪♫ I adapted this recipe from my Gluten Free Millet Bread, which has a softer texture. If you prefer a soft loaf for sandwiches, check out this recipe.


 This post contains affiliate links.
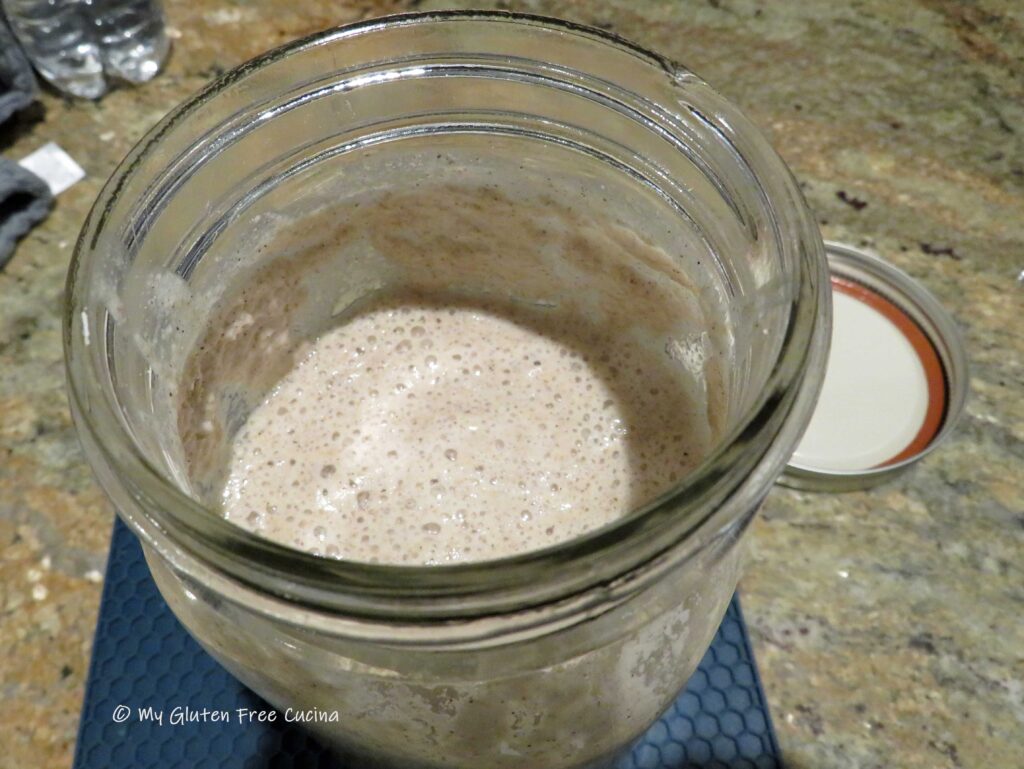 Combine the wet ingredients, starter through canola oil, in the bowl of a stand mixer. In another bowl, whisk together the dry ingredients, dry milk powder through instant yeast. Add the dry ingredients to the mixer bowl with the paddle attachment and beat on low speed for 5 minutes to form a smooth, sticky dough.
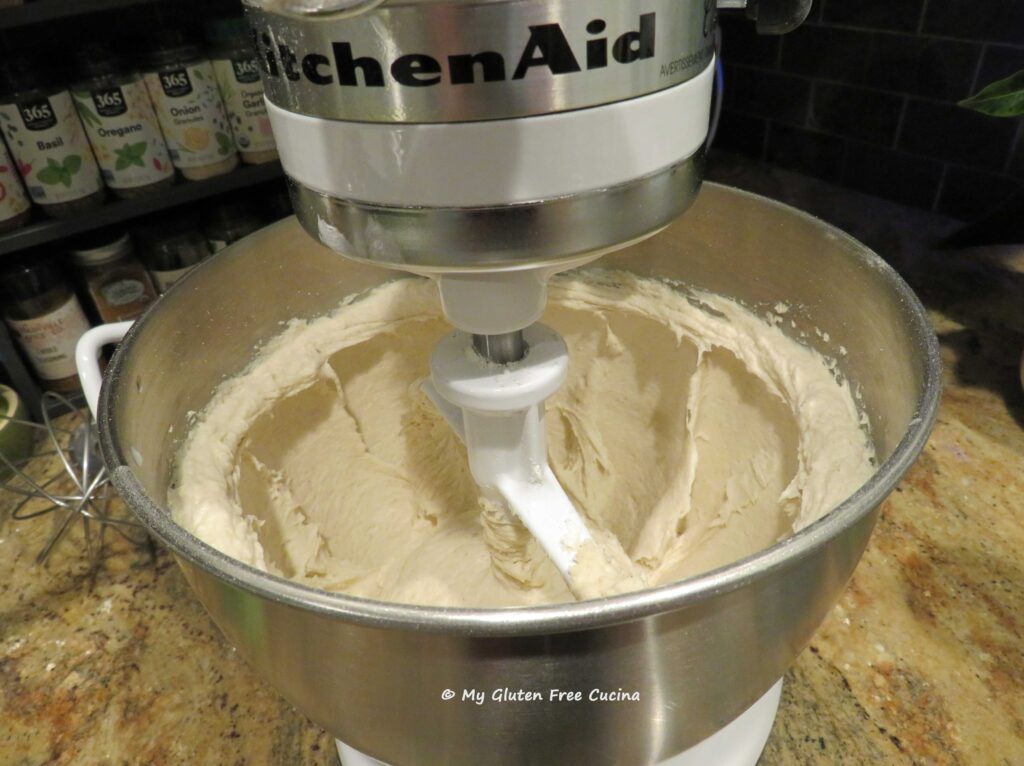
 Transfer the dough into an oiled bowl and smooth the top with a wet spatula. Cover with plastic wrap and refrigerate overnight, up to 15 hours.
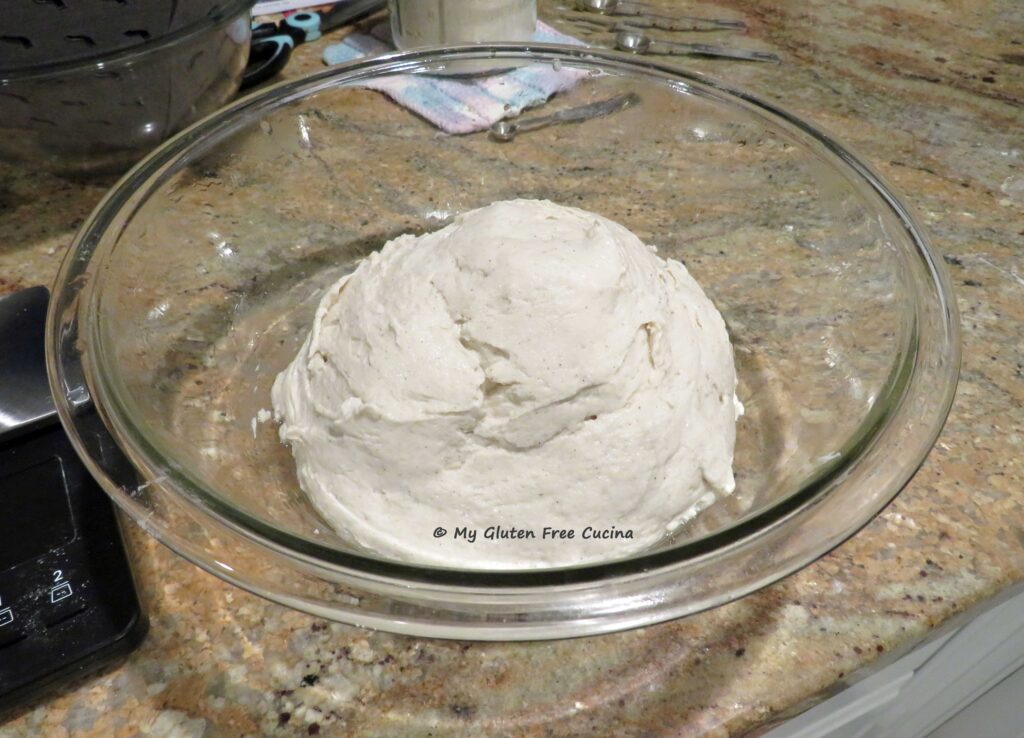 I usually make small rolls for my lunch sandwiches, so I divided my dough into 13 rolls that weighed about 2½ oz. each. You could do 2 oz. each for dinner rolls or sliders. For hamburger buns, 3-4 oz. is a good size.
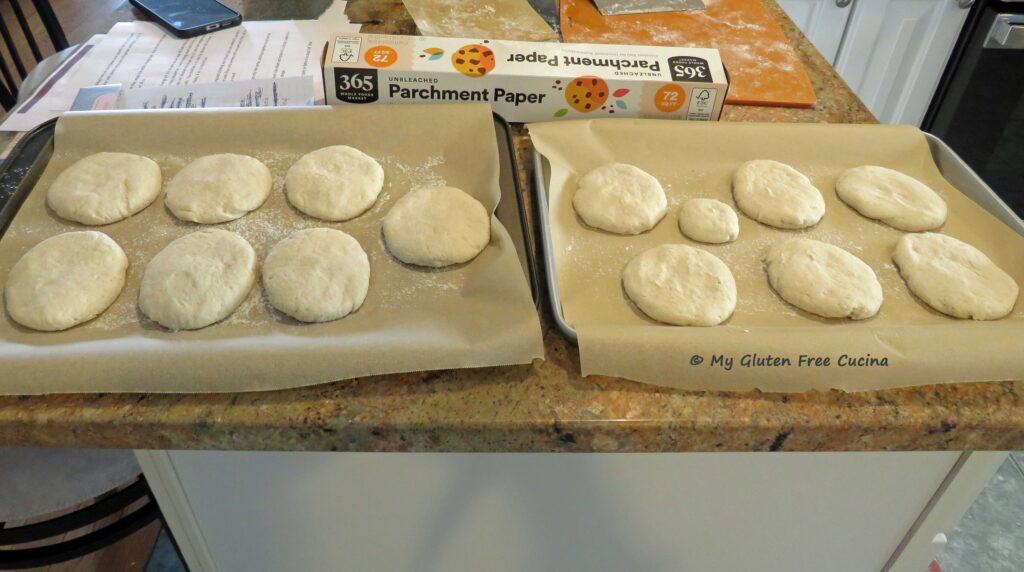 Continue with the rest of the dough, arranging your shaped rolls on a
  Cover the rolls and let them rest for 30 minutes while you preheat the oven to 475º. Score the top of each roll.
 Just before baking, brush the rolls with milk, or spray with water (you can also use an egg wash). Sprinkle the rolls with poppy seeds and coarse salt (optional).
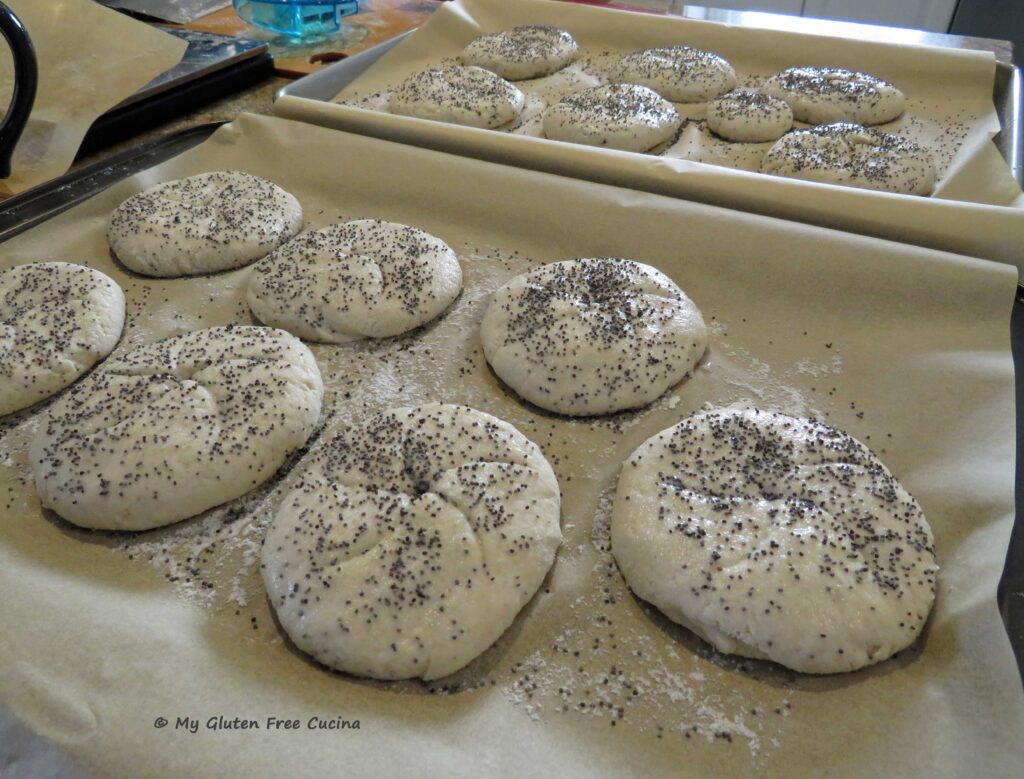 Place the pans on the center rack and throw a few ice cubes into the bottom of the oven. Bake for 5 minutes, then lower the oven temperature to 375º.
 Here’s the crumb shot. The rolls don’t need to be toasted, but they are great either way. Just the right size for me.
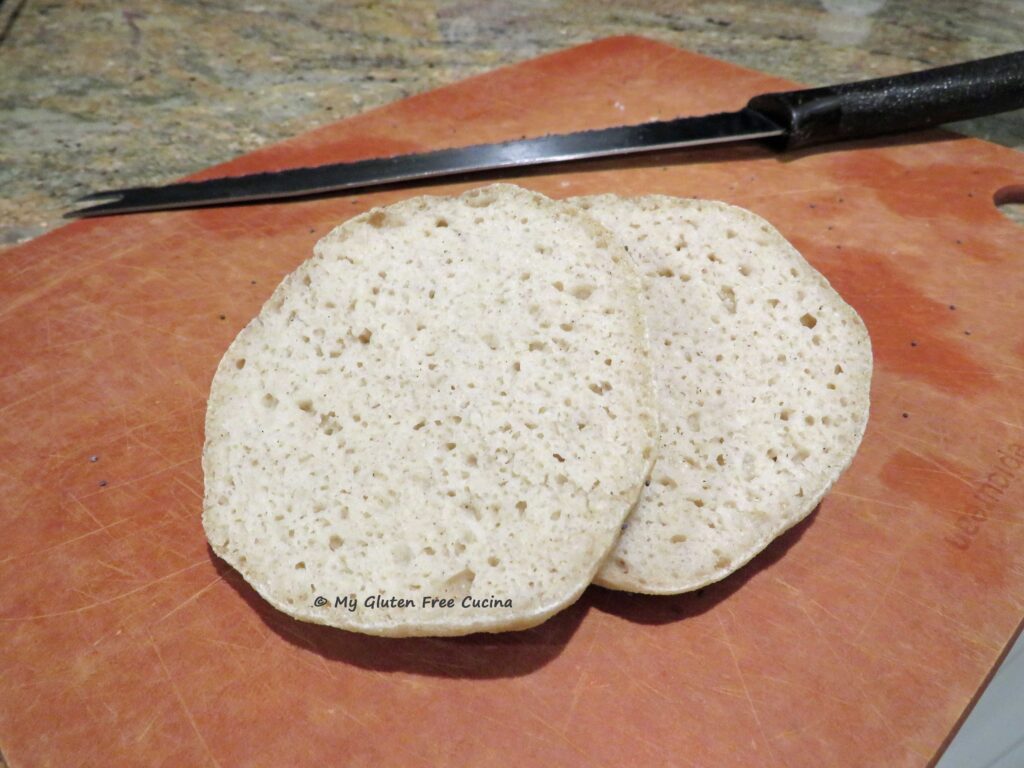

 The preparation begins with a coating of cornstarch and egg. The wings are then quickly pan fried and drizzled with a sticky sweet syrup and baked in the oven. Yes, it is a bit labor intensive but oh my goodness! I could not stop eating them!
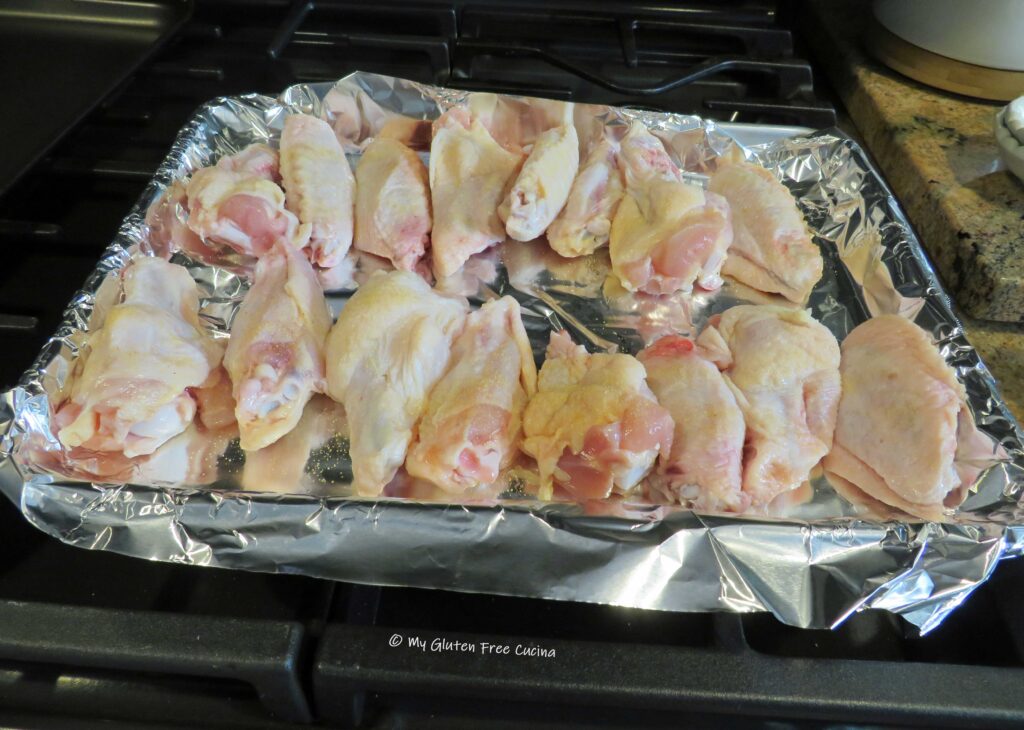 Whisk together the sugar, mirin, ketchup, tamari and chicken broth in a small saucepan. Add a pinch of salt. Bring the mixture to a simmer, whisking frequently then cover and set aside.
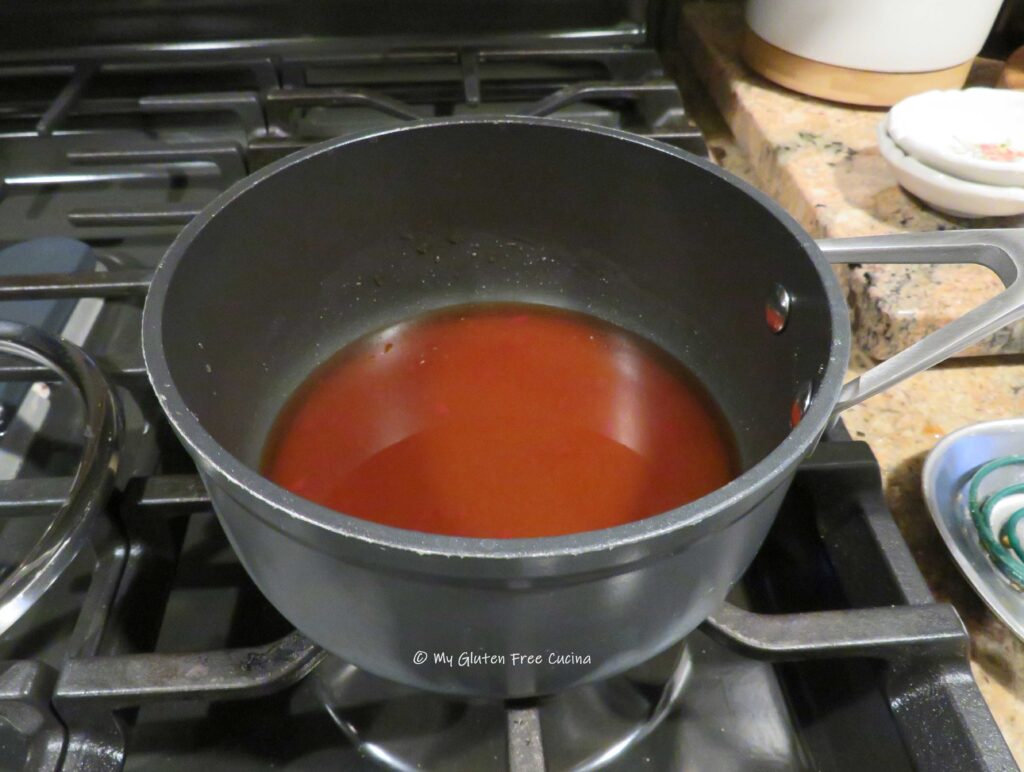 Set up 2 breading trays, one with the cornstarch and the other with 2 beaten eggs. Heat a large nonstick skillet with enough canola oil to coat the surface completely.
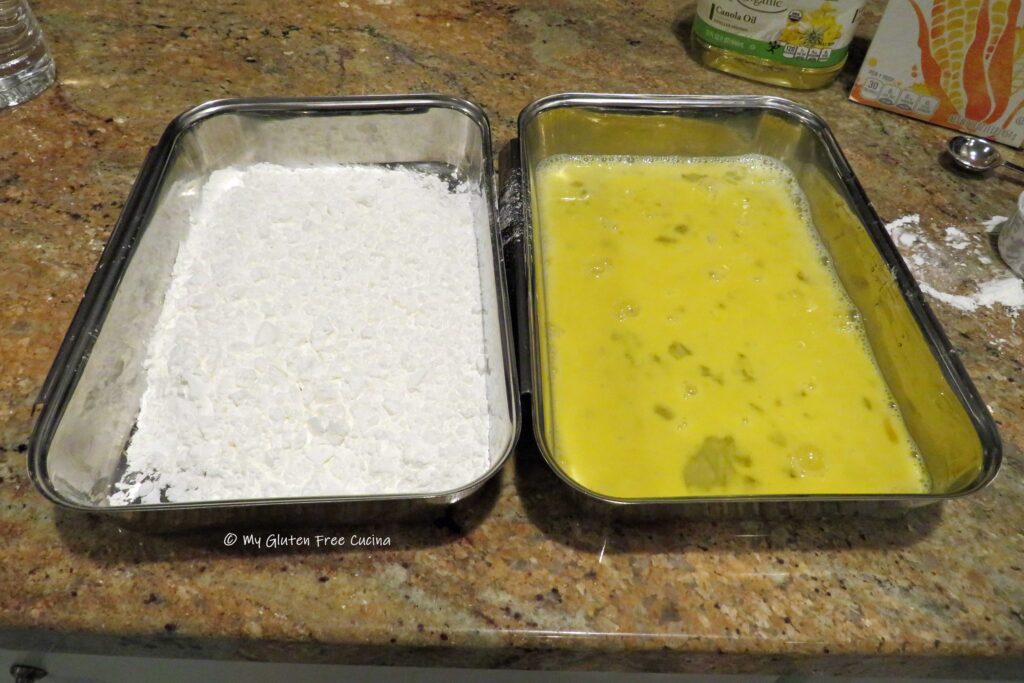 Dredge the wings in the cornstarch, then dip in the beaten eggs. Add to the hot skillet, leaving space in between (fry them in batches if needed). Turn the wings to get a crust on all sides.
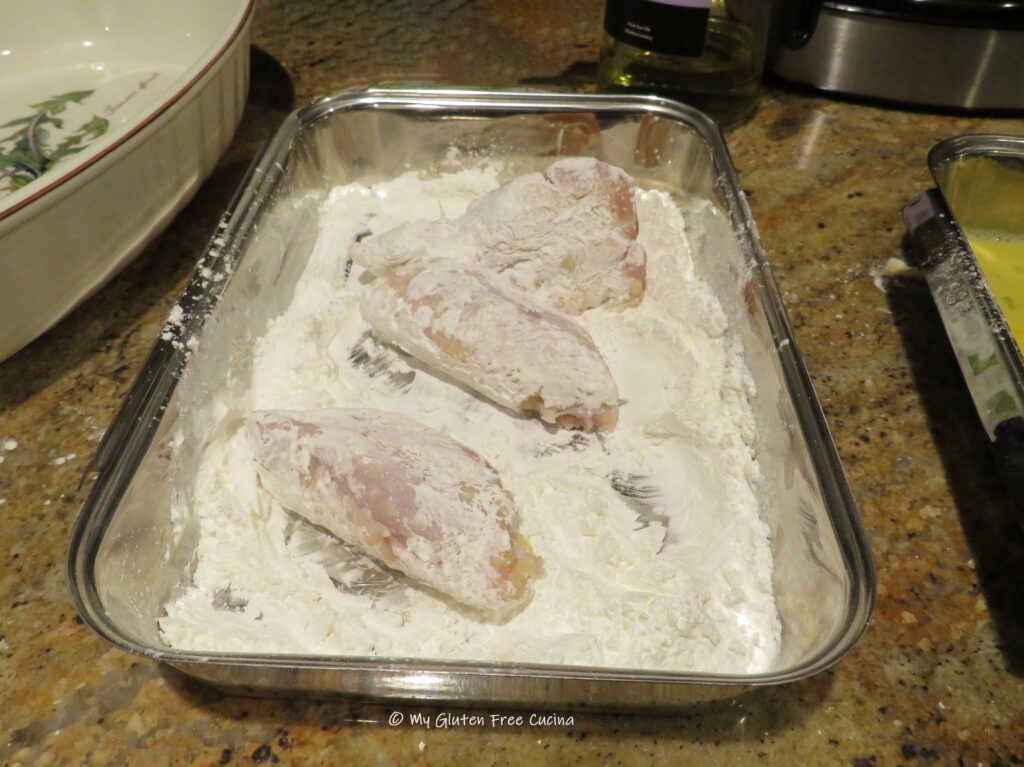
 Mist a casserole dish with cooking spray. As the wings finish cooking, arrange them in a single layer. Preheat the oven to 350º.
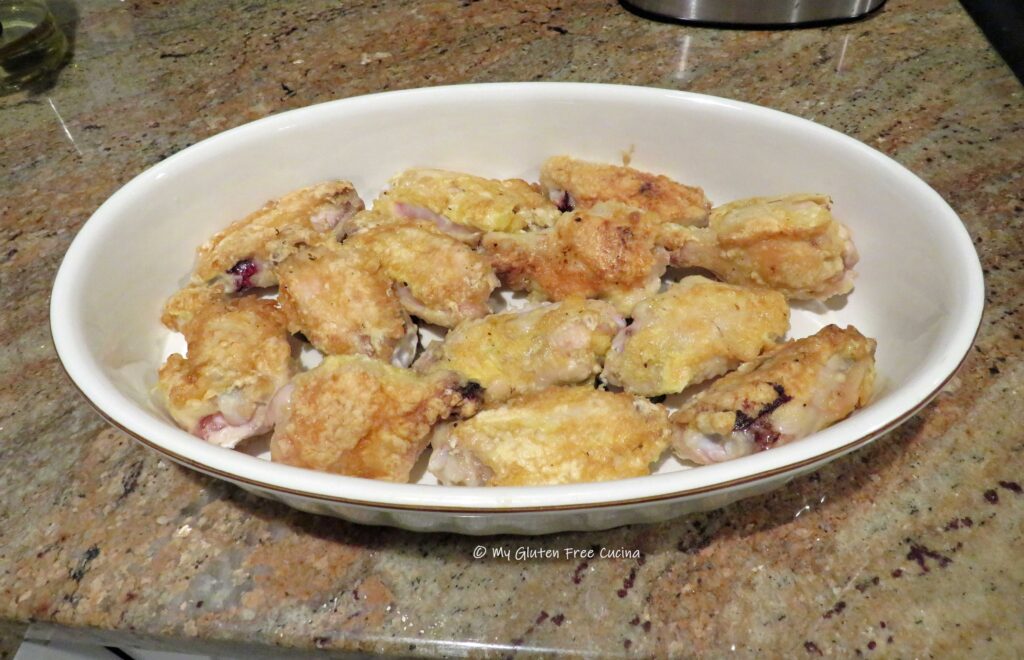 Spoon the sauce evenly over the wings and bake for one hour, turning halfway through.
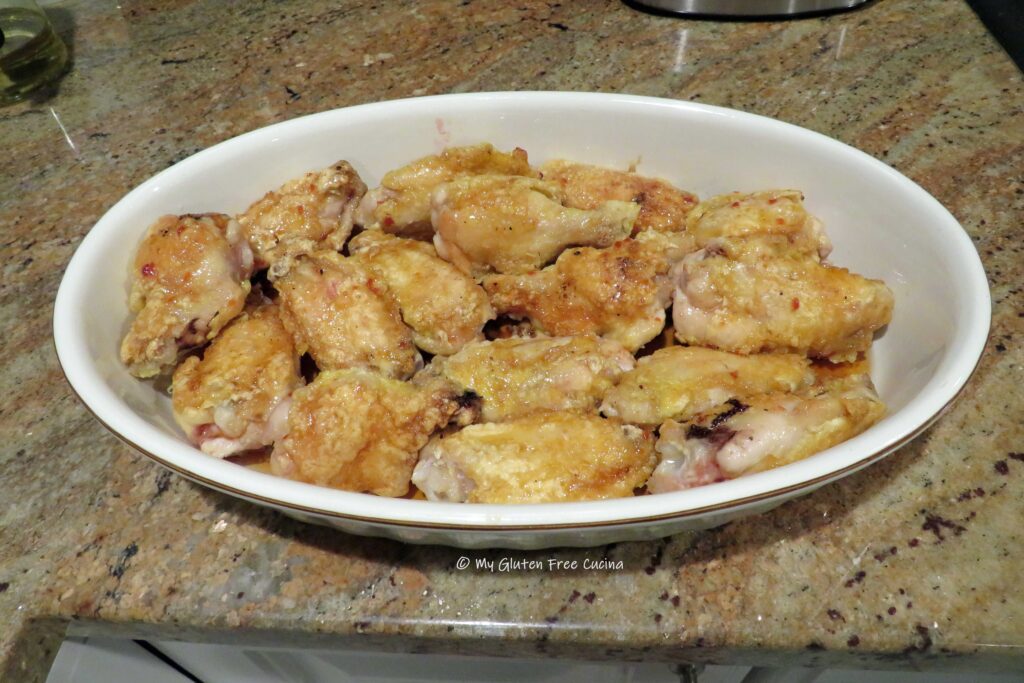 Serve hot, spooning a little of the pan juices over the wings.
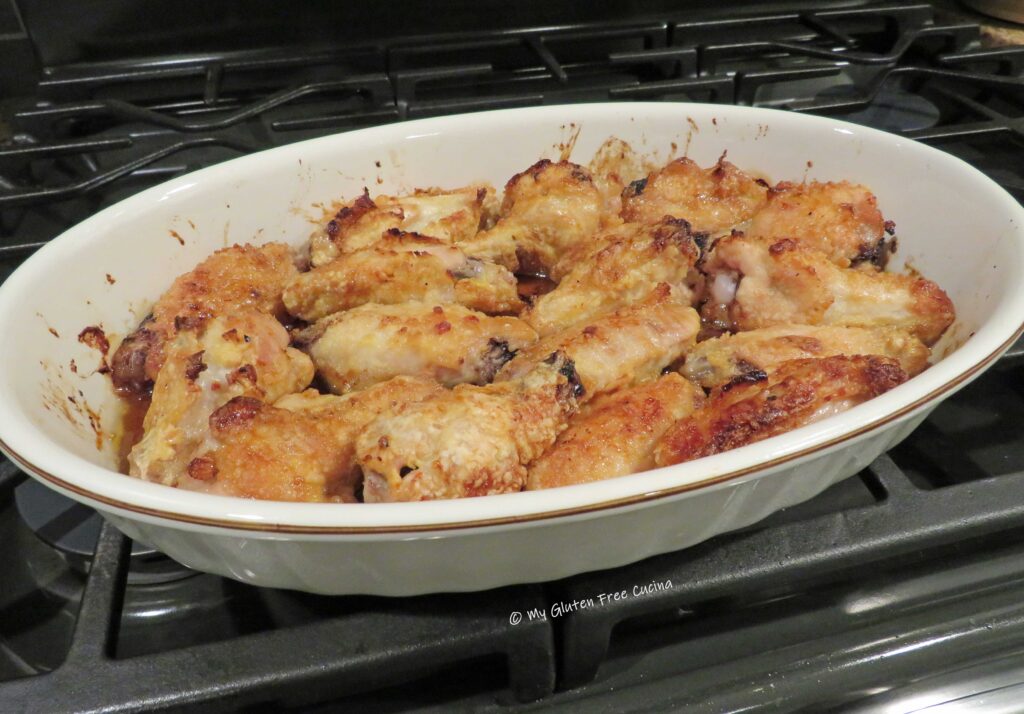

 Ingredients:
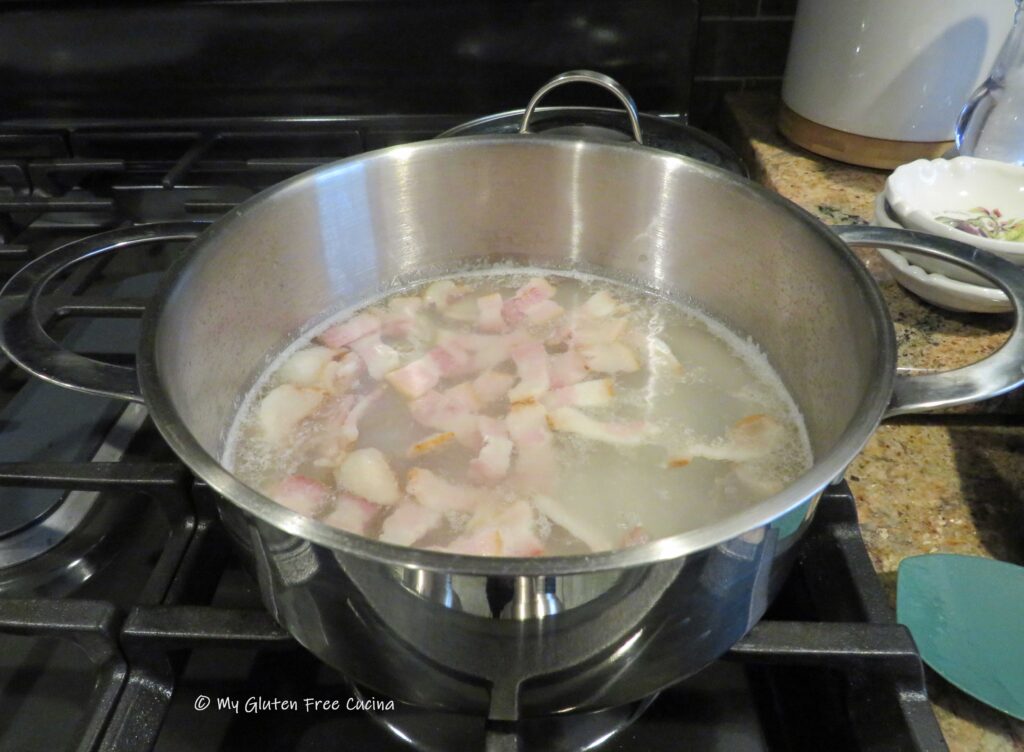
 After the bacon was poached and drained, I browned it in a
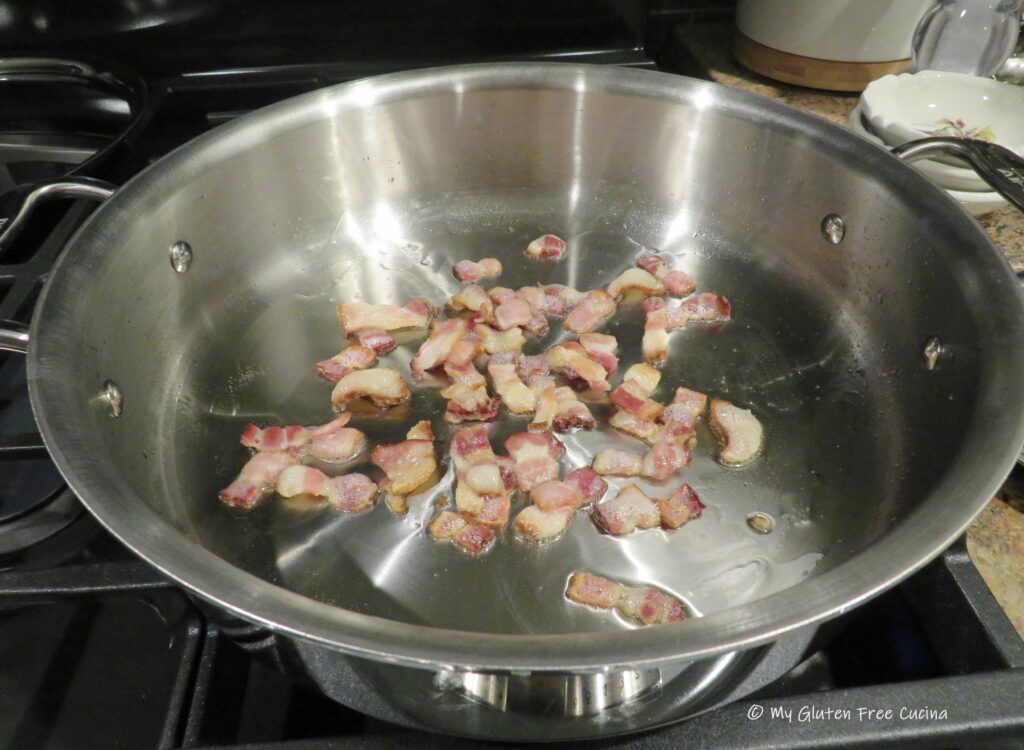
 I added all of the wine, stock, tomato paste and seasonings. Honestly, there was a bit too much liquid and I would cut back next time. Julia did not add carrots in her recipe, but I went rogue and put a few in. Lid on, time to simmer!
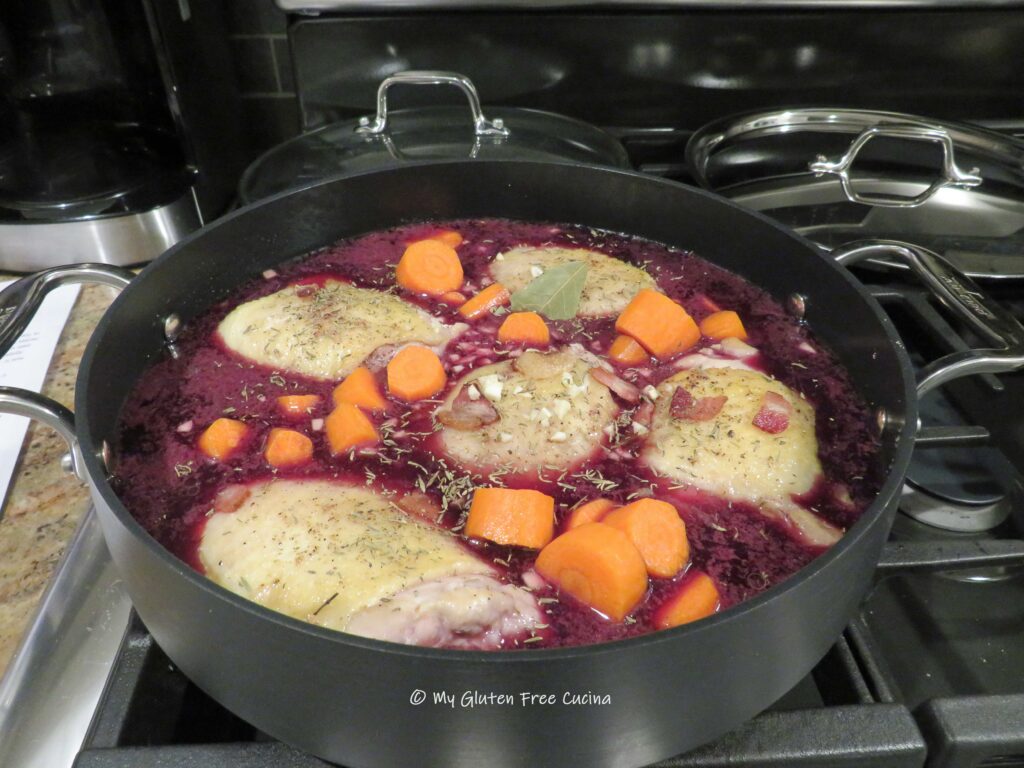
 I transferred all of the liquid from the sauté pan into a stock pot and whisked in the beurre manié until it was smooth and silky.
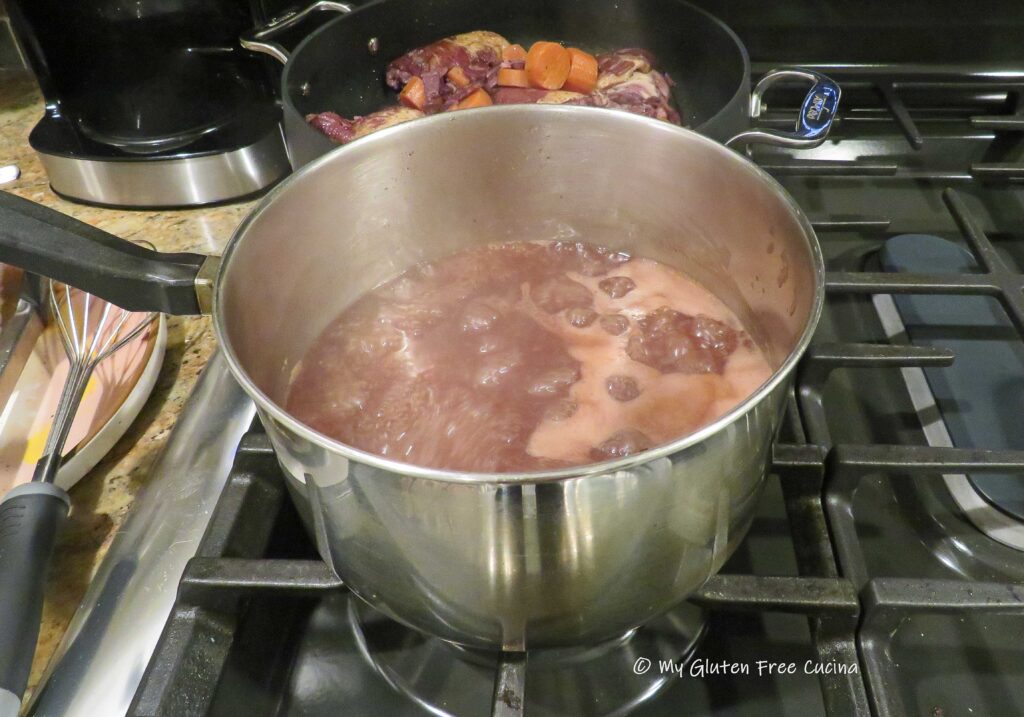 I added the onions and mushrooms to the sauce, then poured it over the chicken, bringing to a simmer one last time before serving.
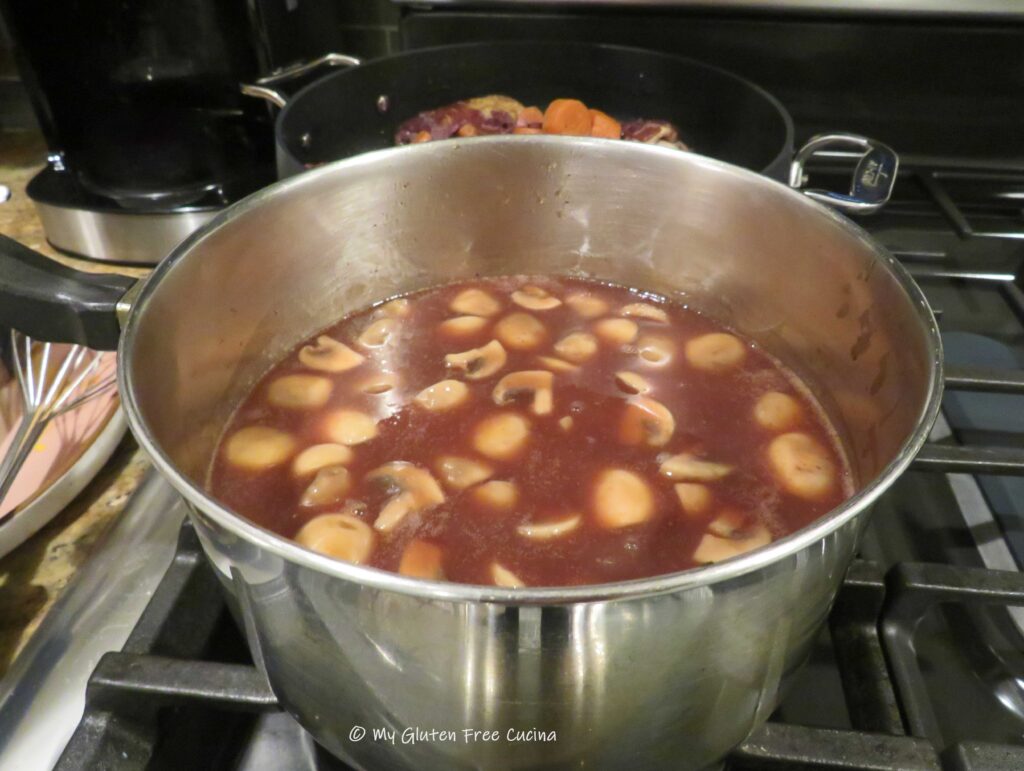 There it is. So many little steps to develop the flavor profile of this famous dish. Yes, it was delicious. Yes, I will take a few shortcuts next time, but I do intend to make this again.
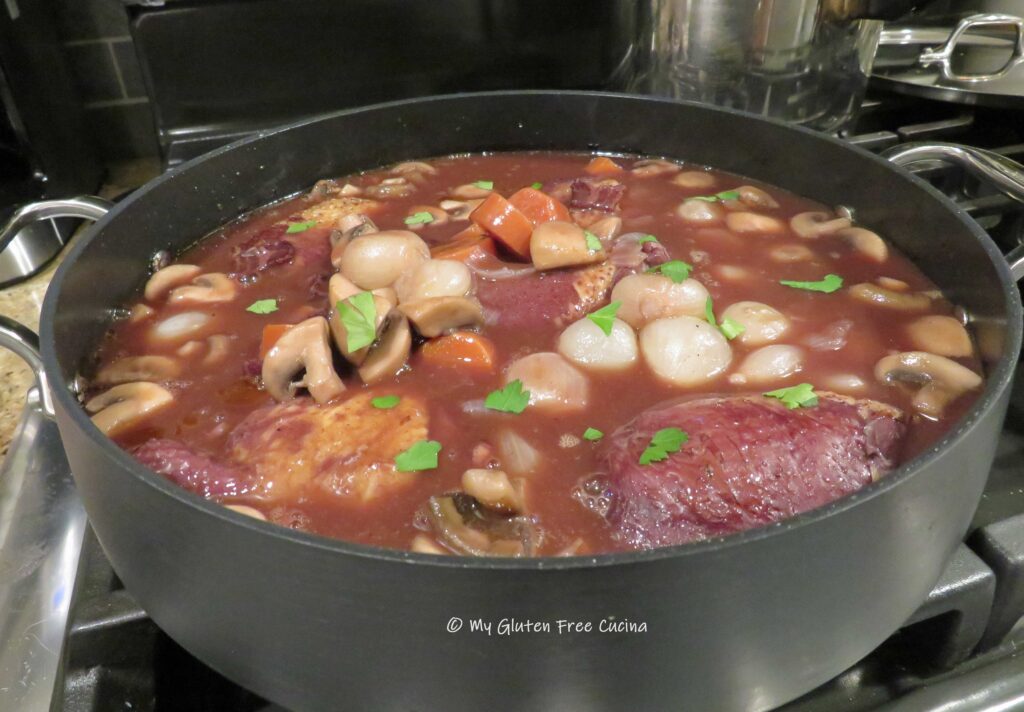
 Transfer to the prepared loaf pan and use a wet spatula to smooth the top out.
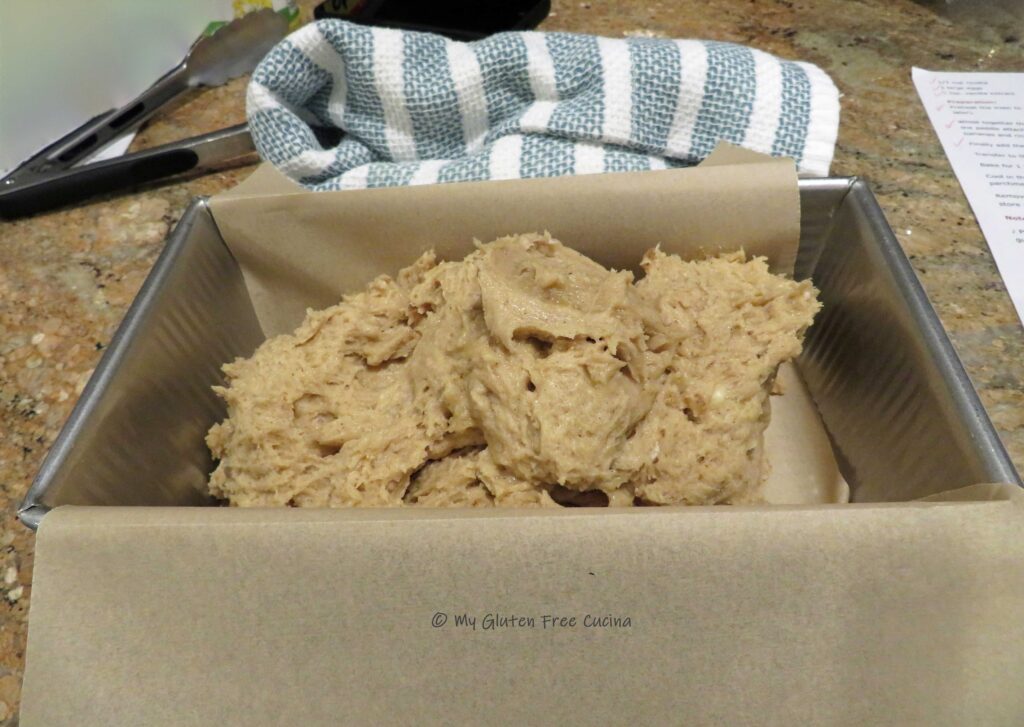
 Bake for 1 hour and check the center with a toothpick. The top should be nice and golden brown.
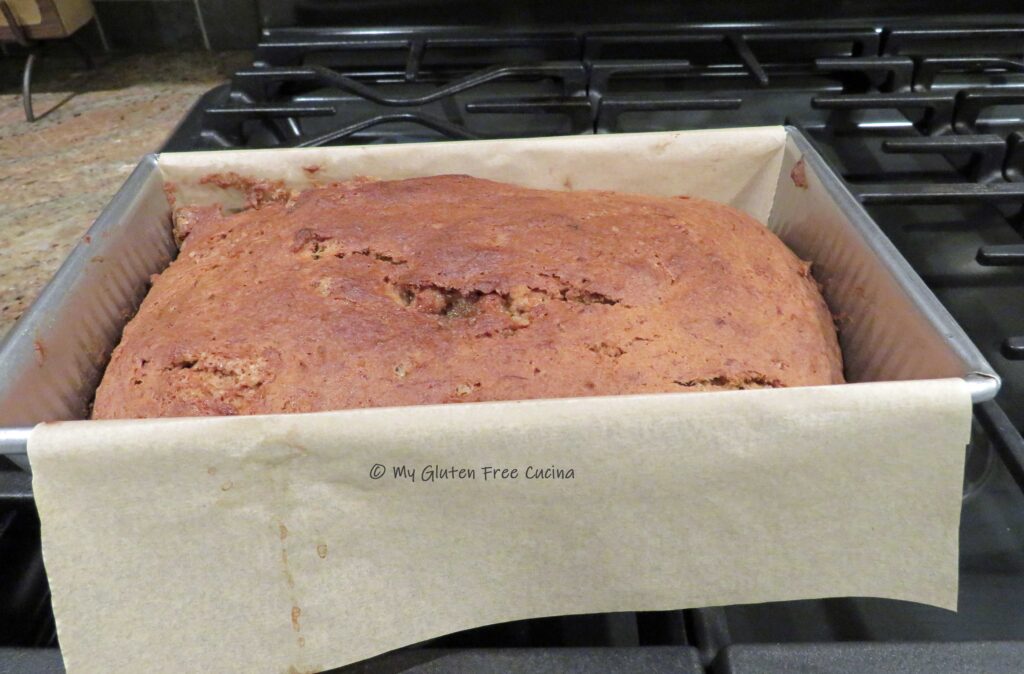 Cool in the pan for 10 minutes, then lift the loaf out of the pan by grasping both sides of the parchment paper (you’re welcome).
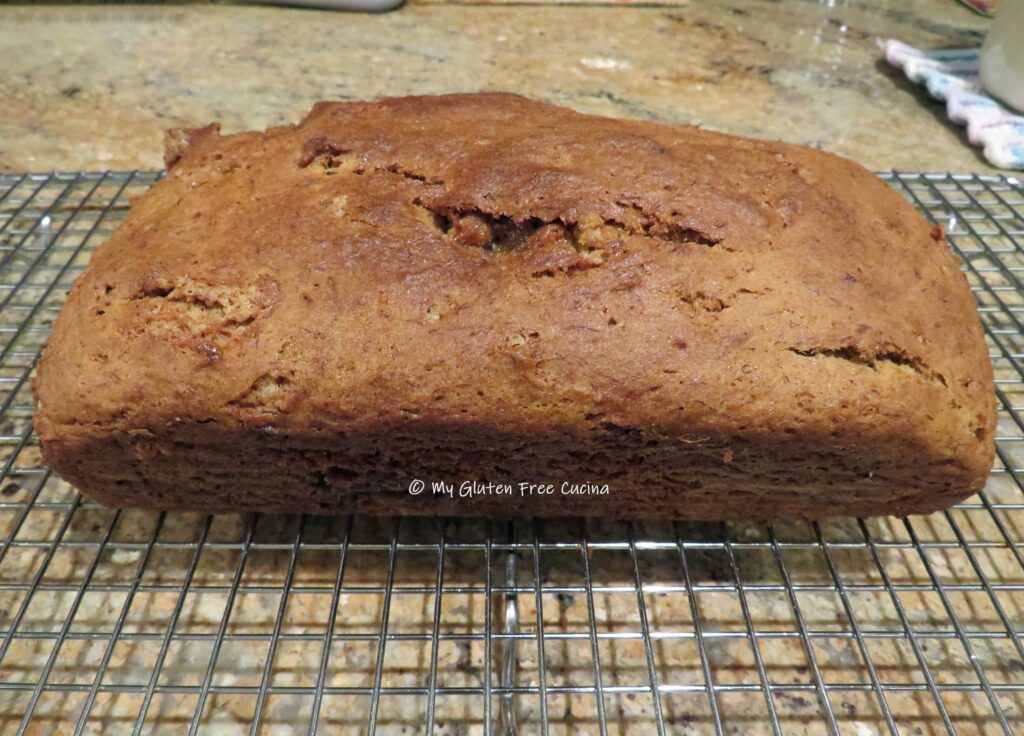 Remove the parchment and cool on a rack before slicing. Cover any leftovers in plastic wrap and store at room temperature for up to 3 days.
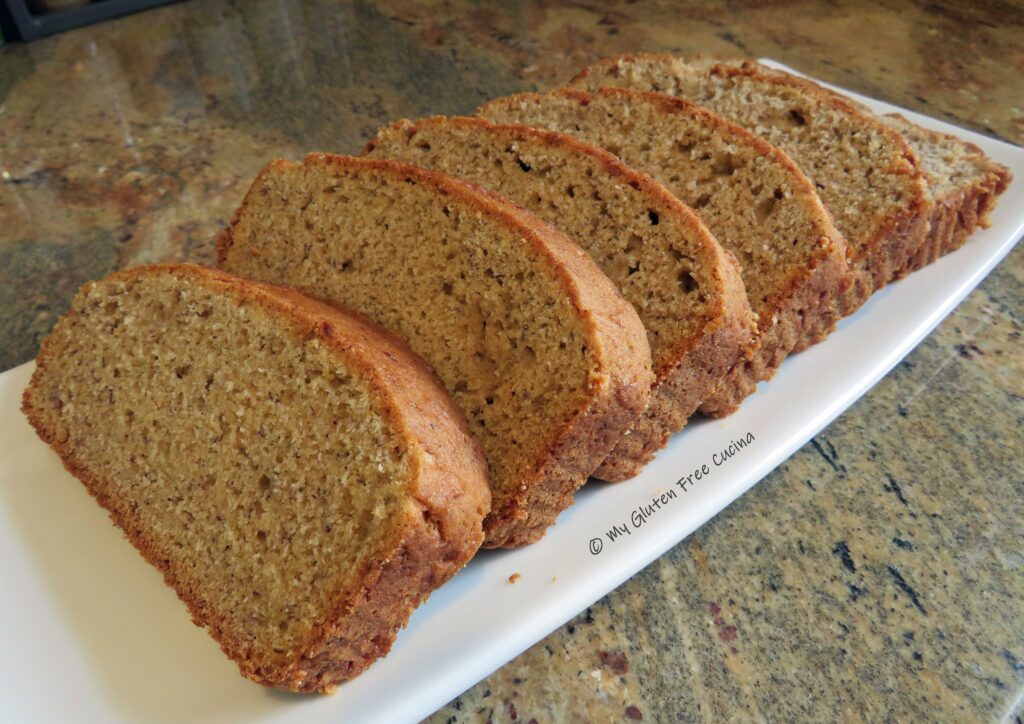 Notes:
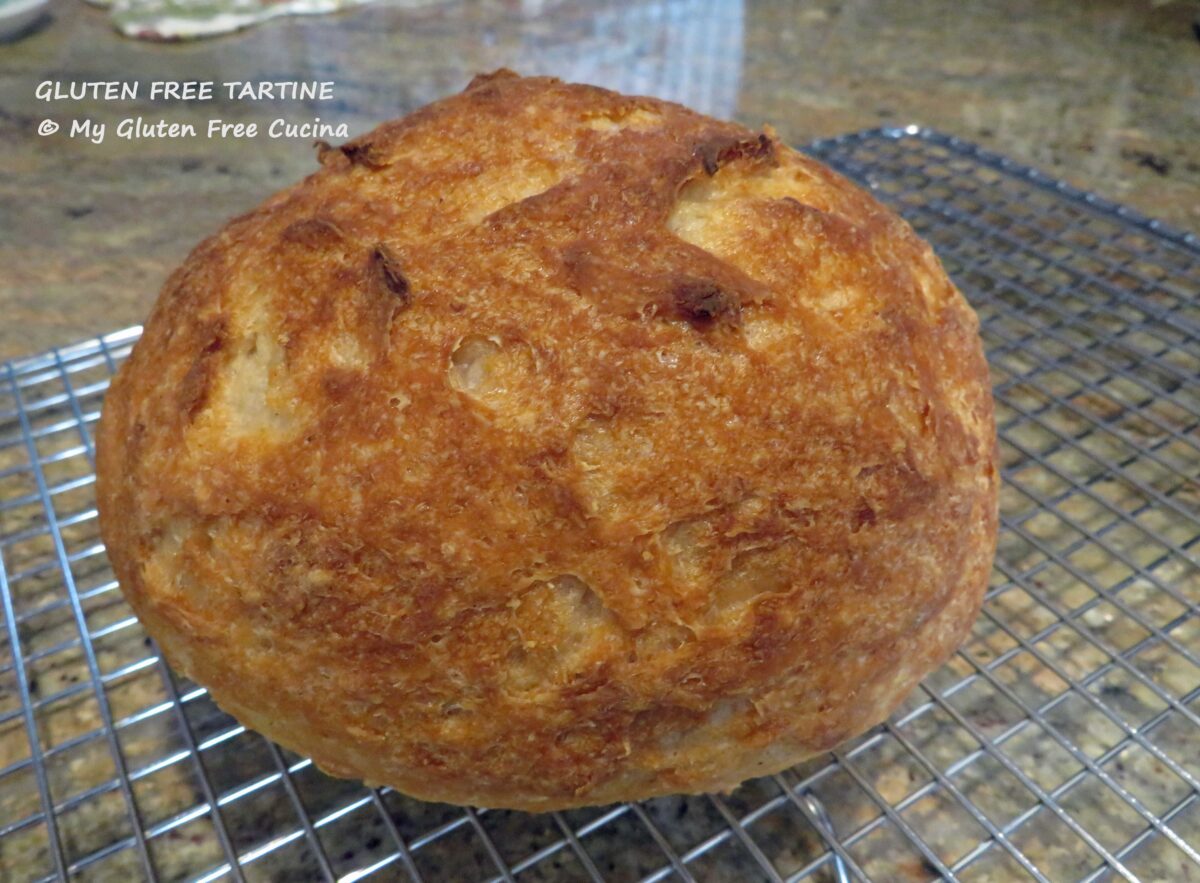
 Oh, and as if you hadn’t waited long enough, the baked loaf will need to rest a full day before slicing! Most gluten free breads need extra time to release their moisture but for this one I don’t slice for a full 24 hours. It is worth the wait.
 Day 2 –
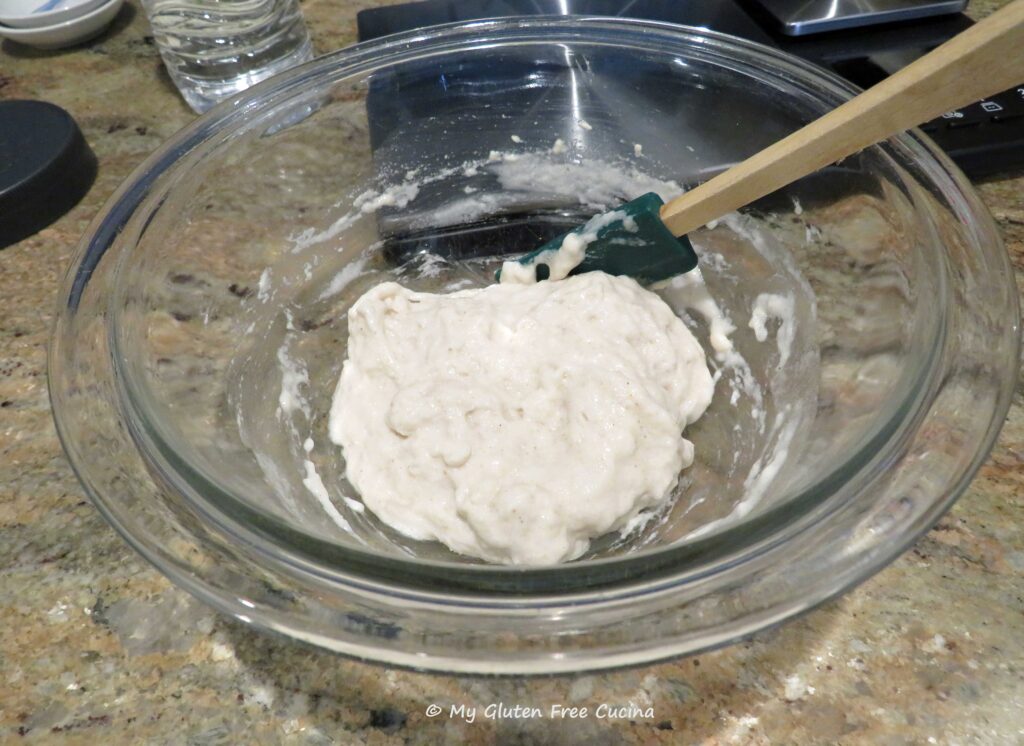
 Transfer the dough to a lightly oiled bowl, cover with plastic wrap and let it rest 45 minutes while you have dinner.
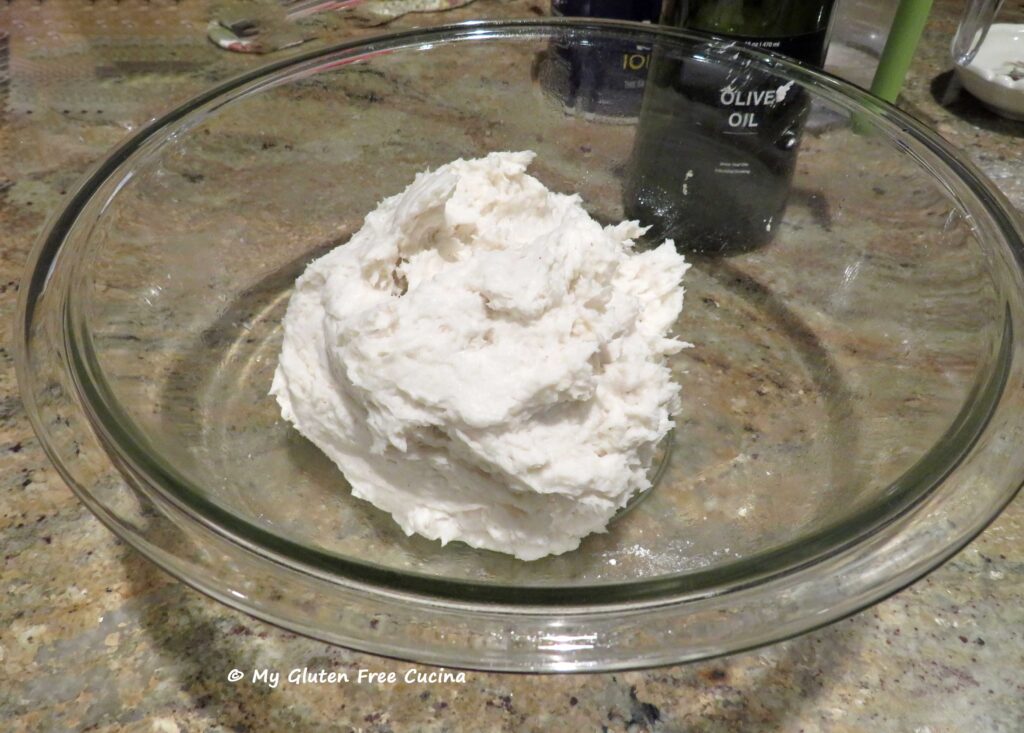 Evening
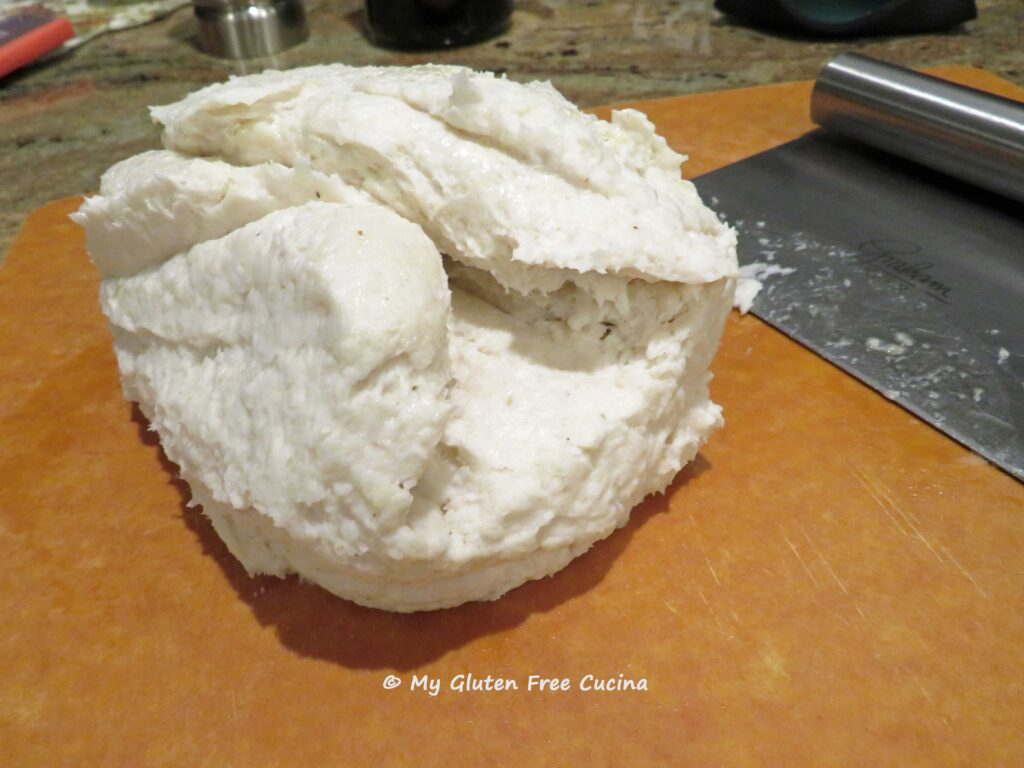
 Reduce the oven temperature to 450º and bake for 30 minutes. Then remove the cover and continue baking another 20 minutes. Loaf is done when the internal temperature reaches 210º (check with a
 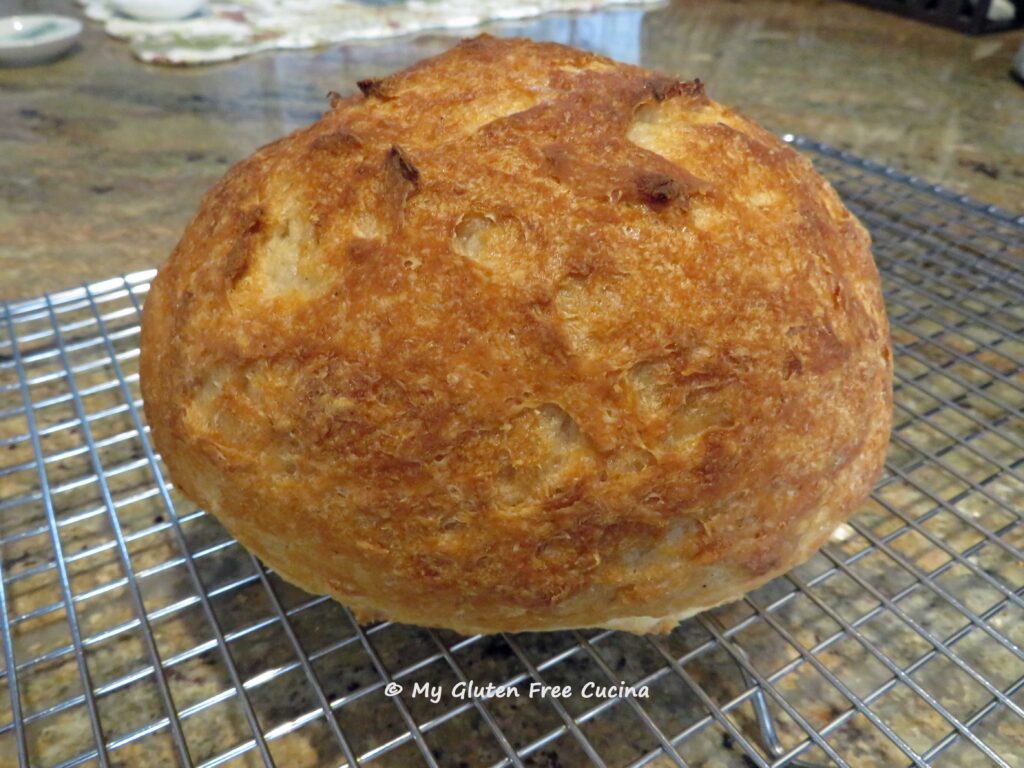 After all that, you will probably want to tear right into your loaf of bread. But- please be patient! This beautiful, artisanal loaf needs a full 24 hours to release its moisture. Rushing it can mean a wet sticky loaf instead of a gorgeous crumb like this!
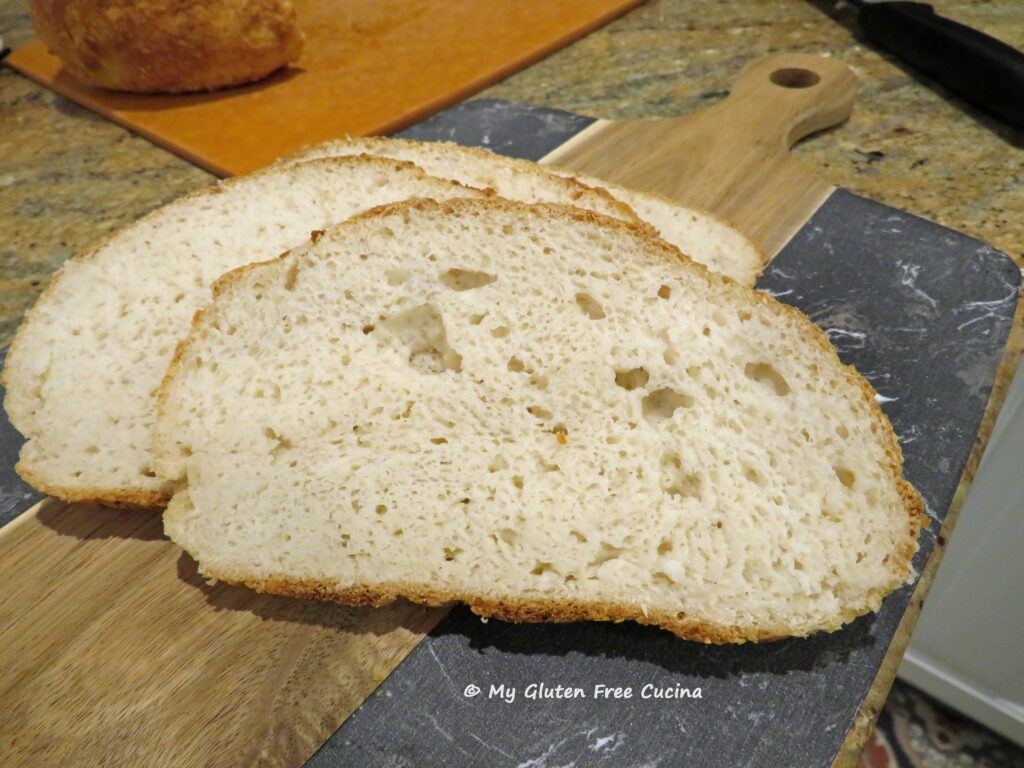 Day 4-
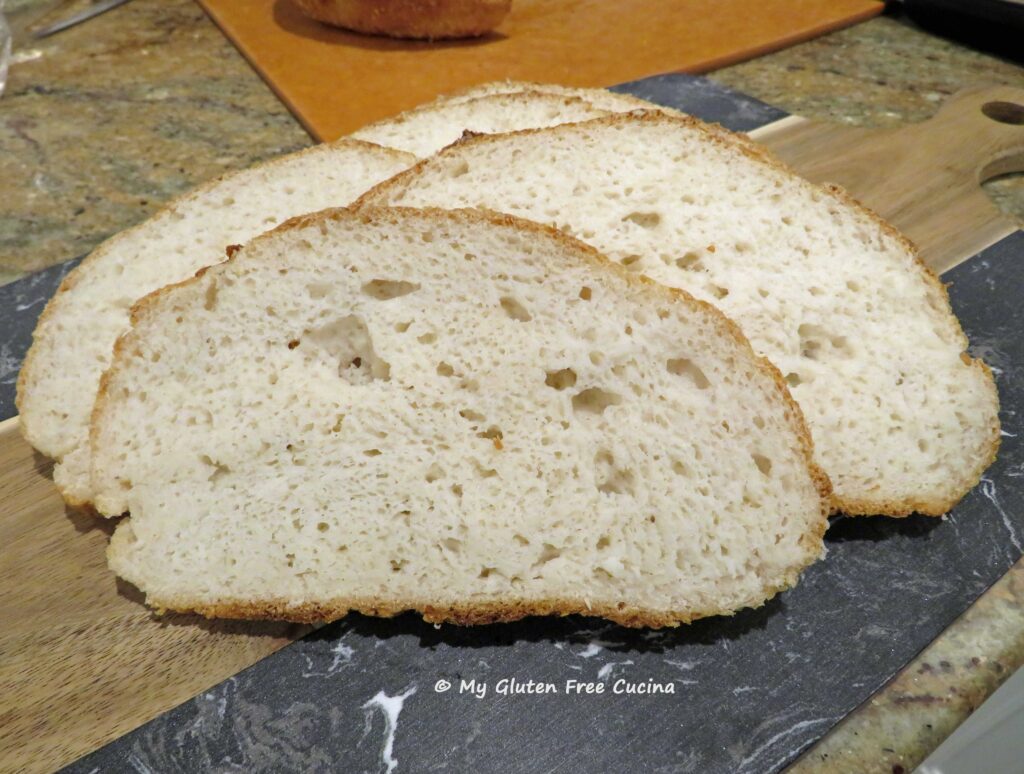 Notes:

 When the pan is hot, add the chicken and cook for 6-7 minutes per side, turning once.
 I served it with
 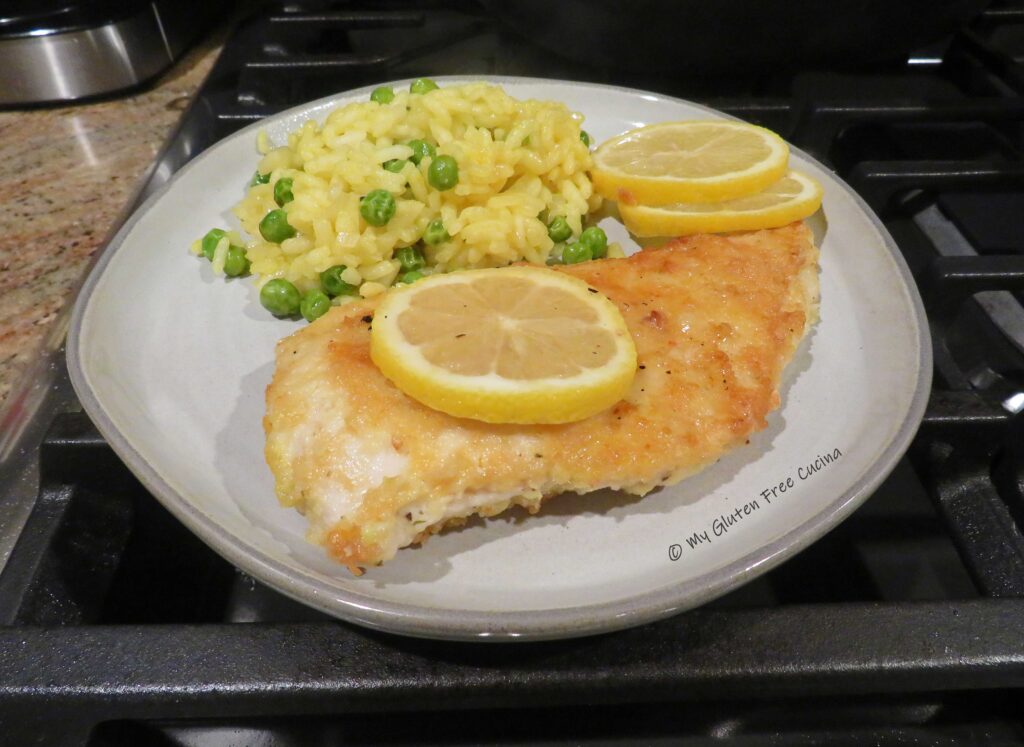 Notes ♪♫
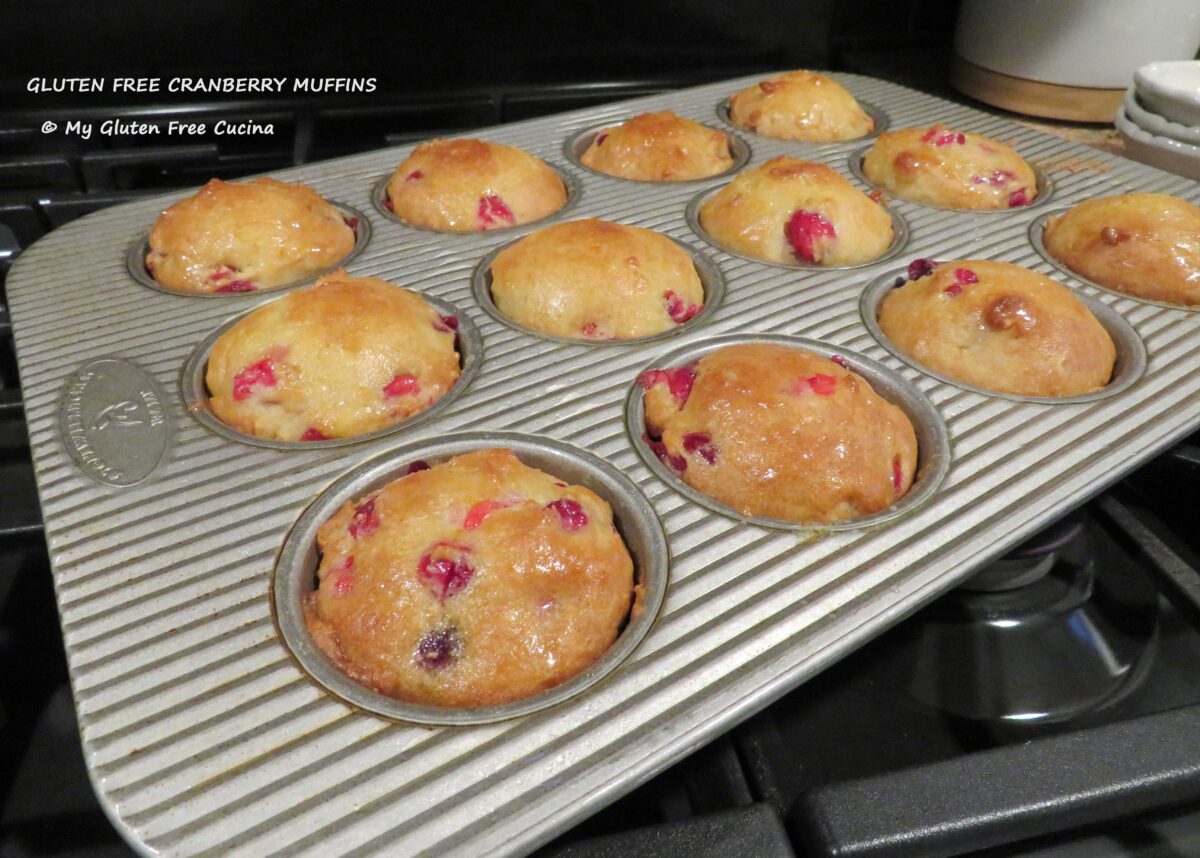


 Bake for 25 minutes (check with a toothpick). Brush the tops with melted butter then cool in the pan for 10 minutes.
 Transfer to a rack. If not serving immediately you can store them at room temperature in an airtight container for 1 day. Leftovers, if you have any can be frozen.