GLUTEN FREE TARTINE COUNTRY LOAF BREAD
What is Tartine?
Tartine Bread is a type of sourdough originating from The Tartine Bakery in San Francisco. It is a “no-knead” bread, made with a very small amount of sourdough starter (only 1 tbsp.) and no commercial yeast at all! The dough is developed by stretching and folding it at intervals, instead of machine mixing.
You will need a fully active and very robust sourdough starter to make this bread. Honestly, I wondered if Sophie [1] (my sourdough starter) was up to the task and was pleasantly surprised. Way to go, Sophie!
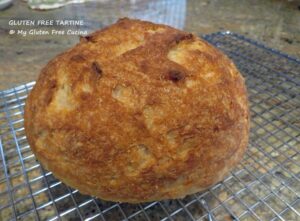
There was so much I wanted to get right with this bread. The blistered, caramelized exterior and soft crumb. After much trial and error, I was making some very nice loaves. Do you see little hearts in the crust? 💕🥰
Developing the dough is a process, beginning with a well-fed starter, a preferment, and final dough. After an overnight rest in the fridge, the loaf is baked in the morning. This long fermentation is what takes you from a mere tablespoon of starter to the beautiful risen loaf you see in the photos.
Oh, and as if you hadn’t waited long enough, the baked loaf will need to rest a full day before slicing! Most gluten free breads need extra time to release their moisture but for this one I don’t slice for a full 24 hours. It is worth the wait.
This post contains affiliate links.
Like many sourdough loaves, Tartine is traditionally baked in a cast iron Dutch oven [2]. If you don’t have one, or if like me you find that cast iron pots are getting too heavy to lift, then a lighter weight enamel roasting pan or ceramic pan with a lid [3] will get the job done.
Enough talk- let’s bake!
Ingredients:
Preferment:
- 1 tbsp. fully active sourdough starter
- 75 g. warm water
- 50 g. gluten free all-purpose flour
Final dough:
- all of the Preferment
- 280 g. warm water
- 250 g. gluten free all-purpose flour
- 10 g. whole psyllium husk [4]
- 7 g. salt
Preparation:
If you work full time, you may be thinking “I don’t have time for all this”. Rest assured though, you can fit this into your workday. Just follow the steps!
Day 1 –
Evening – Take your starter out of the refrigerator, feed it and leave it out on the counter overnight.
Day 2 –
Morning – Stir together the preferment ingredients, cover with plastic wrap and let sit in a warm place for at least 7 hours (I used my proofing box [5]). As the day goes on, it will become increasingly puffy and smooth.
Late Afternoon – Combine the final dough ingredients with the preferment in the bowl of a stand mixer with the paddle attachment. Mix just until combined to form a wet shaggy dough. You can also mix the dough together by hand with a stiff spatula or dough whisk.
Transfer the dough to a lightly oiled bowl, cover with plastic wrap and let it rest 45 minutes while you have dinner.
Evening – Rub a large cutting board with olive oil and turn the dough out. Use a bench knife [6] to spread the dough and fold it over on itself, rotating the cutting board as you fold.
The dough will be sticky, and you won’t be able to handle it like you would a wheat dough (i.e. “stretch and fold”). But- after a few dozen folds you should have a nice smooth ball.
Return it to the bowl and cover with plastic wrap. Leave it out on the counter until you go to bed.
Night – Refrigerate the dough overnight to be baked in the morning.
Day 3 –
Morning – Take the dough out of the refrigerator and let it stand at room temperature while you preheat the oven to 475º. Place a Dutch oven [7] on the middle shelf while the oven is heating for 1/2 hour prior to baking (note- if you are not using cast iron be careful, read the instructions for your pot to make certain it can withstand being heated while empty).
Remove the preheated Dutch oven to the stovetop, sprinkle the bottom with cornmeal and use a stiff spatula to carefully nudge the dough from the bowl without deflating it. Cover and return the pot to the oven.
Reduce the oven temperature to 450º and bake for 30 minutes. Then remove the cover and continue baking another 20 minutes. Loaf is done when the internal temperature reaches 210º (check with a thermometer [8]).
Carefully remove the loaf from the pan and place on a rack to cool. Once it reaches room temperature you can put it in a bread bag or use plastic wrap.
After all that, you will probably want to tear right into your loaf of bread. But- please be patient! This beautiful, artisanal loaf needs a full 24 hours to release its moisture. Rushing it can mean a wet sticky loaf instead of a gorgeous crumb like this!
Day 4-
Finally, the long-awaited moment! Slice and serve with dipping oil. What do you think? Was it worth the wait?
Notes:
♪ You do not need a stand mixer to make the preferment, but as mentioned above, I did use mine for the final dough. You can also stir the final dough together with a dough whisk [9] or stiff spatula, just enough to form a wet shaggy dough, kneading is not required.
♪♪ I used Better Batter Gluten Free Flour in this recipe. When you shop Better Batter, remember to use my Promo Code MGFC30 [10] for 30% off your full price purchase.
♪♪♪ Notice how small my loaf is? This loaf size is perfect for solo households, or a dinner for two. You can double the recipe if you wish, to make 2 small loaves or 1 large loaf. I kept it small for testing, and it is just right for me, a great size for gifting too!