Gluten Free Pumpkin Bread
🎃
Looking back at my recipe notes, I was surprised to find that I have not made Pumpkin Bread since 2013. Why I don’t know, because I had a really good recipe that everyone enjoyed.
So, this week I decided to dust off that old favorite and give it a gluten free makeover. Would you believe, the only ingredient that had to be changed was the flour? I find that’s the case with so many recipes.
For my Gluten Free Pumpkin Bread, I used Better Batter Original Blend [1].
This easy pumpkin bread is super moist! Serve it with ice cream for dessert and have the leftovers for breakfast! It would be a fine addition to your Thanksgiving breadbasket.
This post contains affiliate links.
Ingredients:
Dry Ingredients:
- 200g. gluten free all-purpose flour [1]
- 1/2 tsp. salt
- 1 tsp. cinnamon [2]
- 1/2 tsp. nutmeg [3]
- 1/4 tsp. allspice [4]
- 1/2 tsp. baking soda
- 1/4 tsp. baking powder
Wet Ingredients:
- 2 large eggs
- 1/4 cup softened butter (1/2 stick)
- 1/4 cup canola oil
- 1 cup Pumpkin Puree [5]
- 1/4 cup milk (I used 2%)
- 1/2 cup white sugar
- 1/2 cup brown sugar
Use my Promo Code MGFC30 for 30% off at Better Batter! [6]
Preparation:
Whisk together all of the dry ingredients. Combine the wet ingredients in a separate bowl and whisk until smooth and the butter breaks down into little bits.
Add the dry ingredients to the wet, and fold with a spatula just until moistened. Let the batter rest while you preheat the oven to 350º.
Scrape the batter into a greased 1 lb. loaf pan [7] (8″ x 4″) and smooth it out evenly. Bake for 60-65 minutes.
Test with a toothpick, it should come out clean, and the loaf will be starting to pull away from the sides of the pan. Cool in the pan for 10 minutes then slide a thin spatula [8] around the edges. The loaf should remove easily. Allow it to cool for at least 2 hours. Bet you’ll have hard time waiting!
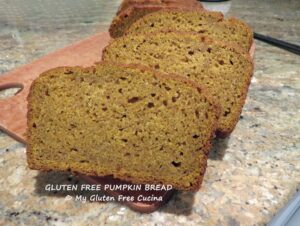
I let mine cool to room temperature, then stored it in a plastic bag on the counter overnight. Look at that beautiful color! 🎃
I sliced my Pumpkin Bread into nice thick pieces and wrapped a few individually for the freezer.
I ate the 2 end slices on the spot (had to taste test!), then had another big slice for breakfast! SOOOO good!
Notes ♪♫ Pan size is important. Be sure to use a 1 lb. metal loaf pan. I like this one [9], from USA Pan. Larger loaf pans, like a 1.25 lb. pan will change the height and width of the loaf, as well as the cook time.