Homemade, hot out of the oven Italian bread. Dipped in olive oil, or slathered with garlic butter and toasted. Cutting off “the heel” to make a meatball sandwich! Mastering gluten free bread has been an ongoing challenge for me, so when I manage to create an amazing loaf I want to tell everyone! I’ve been playing with the grain blend and adjusting the amount of water in the recipe, and this was my best attempt yet!
This post contains affiliate links.
Ingredients:
- 1 tbsp. gluten free cornmeal [1]
- 1 tbsp. instant yeast [2]
- 1 tbsp. sugar
- 1-1/2 cups water, divided
…………………………………………………………………….
- 1 egg
- 3 tbsp. olive oil
…………………………………………………………………….
- 158 g. brown rice flour [3]
- 90 g. sorghum flour [4]
- 85 g. arrowroot starch [5]
- 42.5 g. potato starch [6]
- 1 tsp. gelatin
- 1-1/4 tsp. xanthan gum [7]
- 3/4 tsp. salt
…………………………………………………………………….
Preparation:
Microwave 1-1/2 cups water for 30 seconds. Pour 1/3 cup of the water into the bowl of a stand mixer with the yeast and sugar. Proof for 10 minutes.
Line a half sheet pan [8] (18 x 13″) with parchment paper and sprinkle cornmeal down the middle. Whisk together the dry ingredients.
When the yeast has bloomed, add the egg and olive oil and whisk well.
Gradually stream in the flour mixture and remaining water with the paddle attachment on low. Increase the speed and beat until the dough is very smooth, 2-3 minutes. It will have a wet, sticky consistency like mashed potatoes.
Set up a bowl of warm water. Dip a spoon and your fingers in water, and drop the dough by spoonful over the cornmeal in a loaf shape. Keep wetting your spoon and fingers to help handle the sticky dough.
Now dip a spatula in the water, and use it to smooth out the surface of the dough.
Mist a sheet of plastic wrap with cooking spray and cover the dough. Let it rise for 30 minutes. While the dough proofs, preheat the oven to 400º. Place a pizza stone [9] on the middle rack of the oven, and a second rimmed sheet pan on the lower rack.
Now for the reality of gluten free dough, it doesn’t hold its shape. You can see how mine has spread out considerably. Maybe not an issue if you want ciabatta bread, but I was going for more of a traditional Italian loaf. So I lifted it up, parchment and all onto a curved loaf pan [10]. The sloped sides will provide support for the bread as it bakes.
The loaf pan goes back onto the sheet pan. Yes, I used a lot of pans! Check out the photo below to see how I arranged everything in the oven. The risen loaf is resting on a layer of parchment, in a curved loaf pan, on a baking sheet. It all goes on top of a pre-heated pizza stone, with another sheet pan below where I added a cup of water for steam.
Each layer serves a purpose, shaping and insulating the finicky gluten free dough as it bakes. Without that protection, you might have a loaf that is singed on the bottom but not cooked through in the center, a common problem with gluten free bread.
As soon as you place the loaf in the oven, pour 1 cup of hot water into the bottom sheet pan to create steam, then quickly close the oven door.
Bake for 15 minutes, then reduce the oven temperature to 375º. Tent the loaf with foil and continue baking for an additional 18 minutes. The internal temperature should be 190º, do check it with a thermometer [11]!
Take the loaf out of the oven and slide it onto a rack to cool. Gluten free bread needs several hours to set properly, so resist cutting into it while it’s still hot. It smells so good, you will have a hard time waiting!
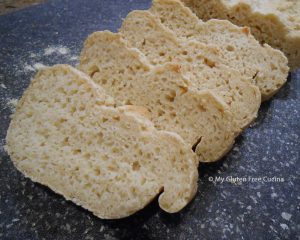
This bread was amazing! Even my gluten eating family said it was great, look at that crumb!
Like all gluten free bread, this one is best the day it is baked. Leftovers (if you have any!) are great toasted. Wrap the bread tightly in plastic wrap and refrigerate to be used in the next day or two. You can also freeze it.
Notes ♪♫ Gluten free dough cannot be baked directly on a perforated loaf pan, it would seep through the holes. A sheet of parchment will keep everything in place until the loaf has partially baked, and if you like you can slide it off for the last 10 minutes of baking for a crisper crust.